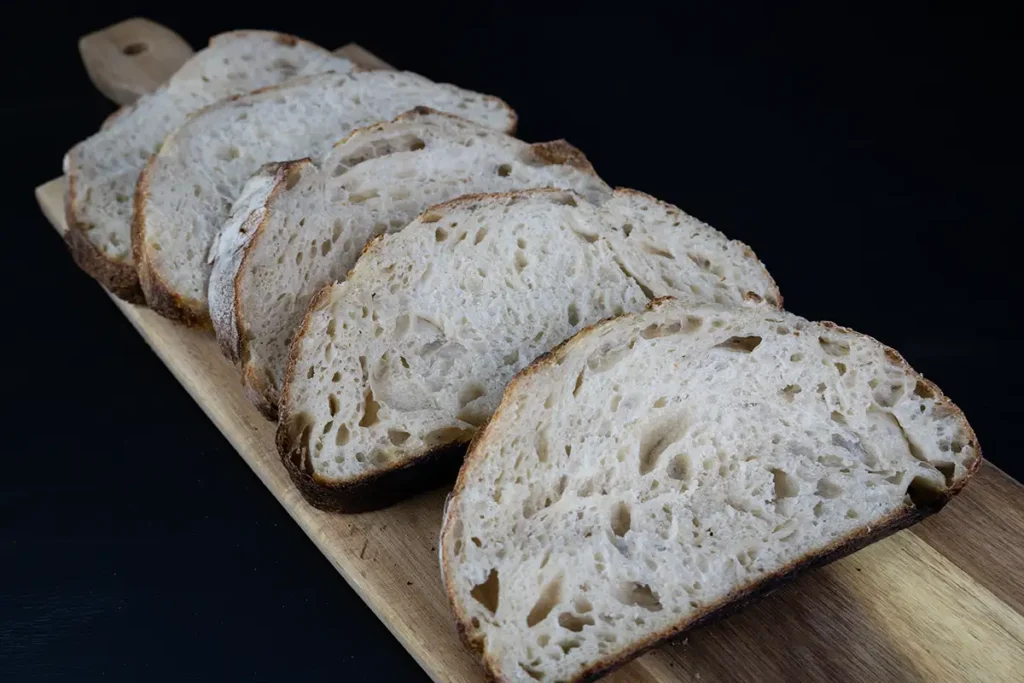
It’s truly wonderful knowing how to make your own delicious sourdough bread at home. And it’s far easier to do than you think! Before you know it you’ll be pulling crisp and crackly loaf of bread out of your oven, and filling your home with the heavenly scent of fresh-baked bread. All it takes is a few ingredients and maybe 15 minutes of hands-on time and you’ll never go back to the stuff they somehow get away with calling “bread” at the grocery store again. This sourdough bread recipe is perfect for beginners, and designed to use basic equipment you already have at home!
Some links in this post may be affiliate links. Read my disclosure policy.
The first time I made a loaf of sourdough bread from scratch, it was ugly as sin and honestly more like a doorstop than bread. I later learned that the problem was I was using an immature starter, but I was still intrigued at the idea of being able to make bread from just flour, water, salt, and wild yeasts. It almost felt like magic.
Though my first loaf was a disaster, I pressed on and learned how to make delicious sourdough bread. I’ve been completely hooked on making all kinds of bread ever since, and now I make all the bread my family eats from scratch. The excitement I still feel when I take a peak and see how much my loaf has sprung up in the oven is hard to describe, second only to the joy of taking a bite of the first slice. I want you to experience that feeling too, and the good news is it’s easier to do than you think!
Jump To:
- Prefer to Watch?
- What Makes this Sourdough Bread Recipe Different?
- What You’ll Learn
- What is Sourdough Bread?
- Ingredients You Need & Why
- Tools & Equipment You Need
- A digital kitchen scale or measuring cups, and measuring spoons
- A large mixing bowl
- A strong rubber spatula
- A damp kitchen towel, dinner plate, or plastic wrap
- A colander lined with a kitchen towel
- A large dutch oven, oven-safe pot, or enamel roasting pan
- Parchment paper
- A sharp straight-edged knife
- An oven
- A wire cooling rack
- A sharp serrated bread knife
- When is My Sourdough Starter Ready to Use?
- How to Make Easy Sourdough Bread for Beginners (Step-by-Step Guide)
- More Sourdough Recipes
- Sample Timelines for Baking Sourdough Bread
- How to Store Sourdough Bread
- Tried this Recipe?
- Easy Sourdough Bread for Beginners
Prefer to Watch?
What Makes this Sourdough Bread Recipe Different?
The truth is, most basic sourdough bread recipes are essentially the same at least as far as the ingredients and proportions used. What makes my recipe different from most is that I’ve written the instructions to be as beginner-friendly, informative, and simplified as possible. Over the years I’ve learned lots of ways to streamline the process of making sourdough bread. I’ve combined all of them into this recipe that’s tailor-made for beginners. This recipe produces a lower-hydration dough than what’s typical for artisan-style sourdough bread, making it far easier to handle and shape. And there’s absolutely no compromise on the taste or texture!
This recipe was developed to use basic equipment you probably already have in your kitchen, so there’s no need for you to run out and buy a bunch of new things just to try this out. I want to set you up for success with your very first loaf, so that you can quickly build your confidence as a sourdough baker. I simplified the process by removing any techniques or steps that some more advanced recipes include but which aren’t absolutely critical to baking a delicious loaf of sourdough bread. You won’t even have to knead the dough!
What You’ll Learn
Imagine being able to churn out bakery-quality artisan sourdough bread from your own kitchen! This tutorial breaks up the process of making a loaf of sourdough bread from scratch into easy-to-learn steps. You’ll learn how to mix the dough by hand, then strengthen it using an easy technique called stretching & folding. You’ll also learn how to tell when your dough is done fermenting, and how to shape and proof the loaf. Finally, you’ll learn how to score the dough and bake it up into the light, fluffy, golden brown and crispy loaf of your dreams!
What is Sourdough Bread?
Sourdough bread is just what people simply called “bread” for thousands of years, before commercial yeast came along. It’s bread that is leavened with the natural yeasts and beneficial bacteria in a sourdough starter. Sourdough bread has a much deeper and more complex flavour than breads made with commercial yeast. That’s thanks to a much slower fermentation and all the complex metabolic processes the natural yeasts put the starches in the flour through.
Sourdough bread rises much more slowly than bread made with commercial yeast, which usually doubles in size in just one hour or so. Sourdough fermentation breaks down the phytic acid in bread dough, making it more nutritious and easier to digest compared to regular bread. The sourdough fermentation process also partially breaks down the gluten in the dough, so some people with gluten intolerance are able to eat sourdough bread without issue. There will still be plenty of gluten left, so those with celiac disease will not be able to eat a typical sourdough bread.
Ingredients You Need & Why
The truly magical thing about sourdough is how you can transform just a few basic ingredients into something so delicious! All you need is some active sourdough starter, flour, water, and salt.
Sourdough Starter
The wild yeasts in sourdough starter are needed to leaven the bread and produce its beautiful large air pockets. The starter needs to be strong and established before it can be used to make bread, so that there is a high enough population of robust wild yeasts to properly ferment the dough. If you don’t already have an established starter, you can ask for one from a friend or local bakery, buy a dehydrated starter online, or make a sourdough starter from scratch yourself.

Flour
This recipe was designed to use all-purpose flour since you probably already have some on hand. You can use bread flour instead, which will make a bread with an even higher rise and a chewier texture. Don’t use cake or pastry flour, as it doesn’t have a high enough gluten content to make bread. And avoid using self-rising flour, as the added rising agents will interfere with the fermentation process. You may also want to avoid using bleached flour for your first few loaves. There’s no need to spend extra to get organic flour unless using organic is important to you.
Water
Generally speaking, any water that’s safe to drink is fine to use for making sourdough bread. For the best chance of success, avoid using chlorinated tap water which could slow down the natural yeasts in your sourdough starter. If your tap water is chlorinated, you can dechlorinate it by either letting it sit out uncovered for 24 hours, or boiling it uncovered for 15-20 minutes and letting it come back to room temperature. Avoid using distilled water, which lacks the minerals that the organisms in a sourdough starter need to thrive.
Salt
Salt is needed to enhance the flavour of the bread—without it, the bread will taste very bland. It also tightens the gluten structure of the dough and makes it stronger. Salt slows down fermentation in a good way, allowing the bread to develop complex flavours. I love using fine sea salt, but kosher salt would work well too. You may want to avoid table salt, which includes anti-caking agents and additives like iodine. However, if all you have on hand is table salt it should work well enough, so don’t let that stop you!
Tools & Equipment You Need
There are plenty of tools and gadgets you can get to make sourdough baking easier and more efficient (and to be honest, I own a few myself). But the good news is that you really don’t need anything special to make a wonderful loaf of sourdough bread. You probably already have all the stuff you need to get started!
A digital kitchen scale or measuring cups, and measuring spoons
I highly recommend using a kitchen scale if you have one—it’s far more accurate as well as being faster and less messy than measuring cups. I do include cup measurements in the recipe so you can still make this if you don’t have a scale. If you are using cups, fluff the flour in the bag or container first. Then scoop it into the measuring cup with a spoon and level out the top. Otherwise your flour might get compressed and you could end up using too much.
A large mixing bowl
Almost any food-safe mixing bowl will work, the only thing you need to avoid are bowls made of reactive metals such as copper and aluminum. Those metals will react negatively to the acidity of sourdough so steer clear. You want something that’s large enough for you to easily reach into with your hands to mix the dough, but small enough that you can cover it with a dinner plate, damp kitchen towel, plastic wrap, or a baking sheet.
A strong rubber spatula
This is useful for mixing the dough, though you can mix it entirely by hand from start to finish. It’s also helpful for loosening the dough out of the bowl after bulk fermentation, and for getting under the ball of dough during shaping. To be honest it isn’t even totally necessary to use a rubber spatula at all—you could use your hands for all of these tasks. But if you have one already, it can be helpful.
A damp kitchen towel, dinner plate, or plastic wrap
You’ll need to cover the bowl while the dough is fermenting so it doesn’t dry out. Just about anything will work as long as it’s food-safe and completely covers the bowl. I like using a dinner plate to avoid wasting plastic wrap.
A colander lined with a kitchen towel
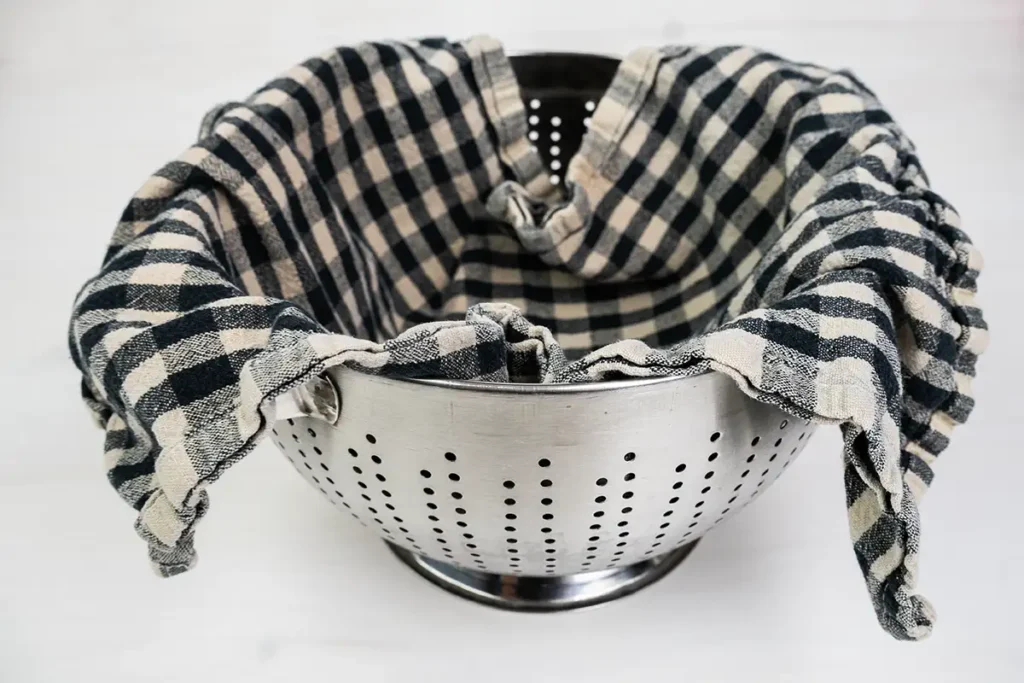
This will be used to proof the dough after it’s shaped. The round shape of a colander helps support the shaped dough ball as it proofs. The holes in the side of the colander along with the kitchen towel work together to wick just enough moisture away from the surface of the shaped loaf to make it easier to score. This also helps produce a crisp and crackly crust. If you don’t have a colander, a large round bowl lined with a kitchen towel will also do the trick, though it won’t wick moisture away quite as well as a colander.
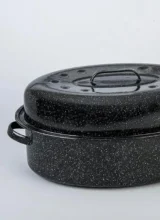
A large dutch oven, oven-safe pot, or enamel roasting pan
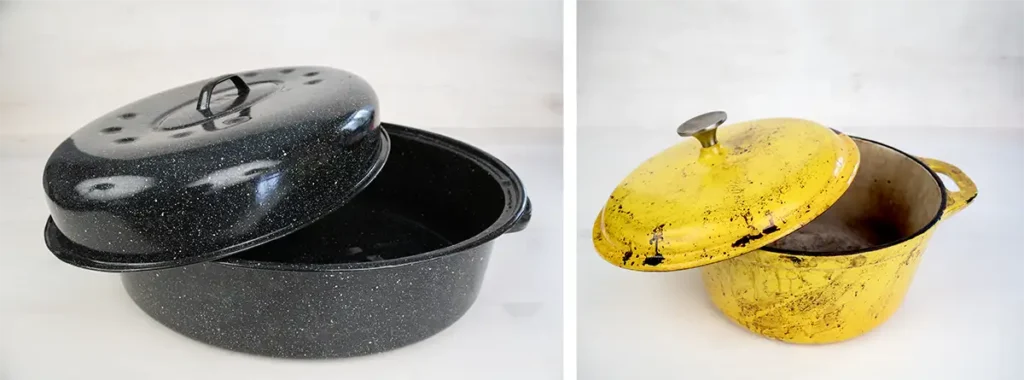
Steam is very important to baking a beautiful, lofty, and crisp loaf of bread. Steam keeps the surface of the bread moist so it can expand a lot more before it sets. When it does finally set, the crust will be thinner and crisper than it would have been if it was baked without steam. Commercial ovens in bakeries inject steam into the oven during the first part of the bake, but most home ovens don’t have this feature. The easiest way to bake your bread with steam in a home oven is by using a large covered pot that can safely withstand temperatures of at least 450˚F (235˚C) or ideally 500˚F (260˚C). The pot traps the moisture that escapes from from the dough during baking as steam. It works just as well as a commercial steam-injected oven at producing beautiful artisan loaves!
Most sourdough bakers use a large dutch oven to bake their loaves in, but my favourite thing to use is a large enamelled roasting pan. They have a few distinct advantages over dutch ovens. First, they’re usually much larger so you can bake just about any shape and size of loaf. A typical round dutch oven is limited to making boules (i.e. round loaves). Second, they’re significantly cheaper, usually less than half the cost of a dutch oven. Finally, enamel roasting pans are much lighter and therefore easier to get in and out of the oven, which might be an important consideration for you.
Parchment paper
Parchment paper prevents the bottom of your loaf from sticking to the cooking pot while baking. It also makes it easy to get the loaf in and out of the cooking pot. Use a good reliable brand of parchment paper. Cheap parchment paper can scorch and crumble apart at the high temperatures that this kind of sourdough bread is baked at. Whatever you do, make sure you don’t use wax paper because the wax coating will come off during baking and ruin your loaf.
A sharp straight-edged knife
You’ll need to score (or make a shallow cut in) your shaped loaf before it bakes, and you need a very sharp knife to do this properly. Scoring helps the dough expand to its fullest potential in the oven. Without scoring, the dough would randomly crack all over the place and wouldn’t be able to rise as much during baking.
An oven
Just about any home oven will do as long as it can be heated to at least 450˚F (235˚C), or ideally 500˚F (260˚C) and is large enough to comfortably fit your cooking pot. A convection oven is not necessary, though using convection wouldn’t hurt. Even if you only have a toaster oven at home you can still make sourdough as long as it can be heated to at least 450˚F (235˚C)! Get a small dutch oven that can fit in your toaster oven, and split the dough in half after bulk fermentation. Then shape each half into a mini-loaf and bake them one at a time.
A wire cooling rack
A very important and often-overlooked step in the baking process is allowing the bread to cool completely before you slice into it. A wire cooling rack allows air to circulate evenly around the cooling loaf so it cools more quickly and thoroughly.
A sharp serrated bread knife
A loaf of artisan-style sourdough bread is harder to cut than a standard loaf of sandwich bread. Using a dull bread knife could not only mangle your loaf, but it could be dangerous if it slips off and cuts your hand. Round sourdough bread loaves are also wider than a sandwich loaf, so you’ll want one that’s at least 12-14″ (31-36 cm) long. If you don’t already have one, this is a good excuse to buy a nice new bread knife. You can get a regular bread knife to cut any size slice you like. Or you might prefer a harp-style bread knife that helps you cut even-sized slices.

When is My Sourdough Starter Ready to Use?
You want to use an established starter that is at, or shortly after, its peak. “Peak” means the highest point of a starter’s rise. It’s at least double (and sometimes triple or more) the volume it was when just fed. Depending on how much flour and water you feed your starter relative to the amount of starter, it could reach peak anywhere from 4-18 hours after being fed.
Using an active starter at peak is the best way to ensure you’re adding a large population of robust natural yeasts that are active and ready to leaven your bread dough. A starter that has begun to fall is OK to use too—it will still have a large yeast population. You can use starter that has completely fallen, but the bulk fermentation time may take longer than usual. Avoid using starter that hasn’t peaked yet, because its yeast population is still building up.
How to Make Easy Sourdough Bread for Beginners (Step-by-Step Guide)
I’m providing you with a very thorough tutorial to arm you with all the information you need to complete each step successfully. Don’t let the length of the tutorial scare you off, I’ve just described each step in great detail. You’ll only spend about 15 minutes of hands-on time to make this recipe.
The rest of the time is waiting for the dough to ferment, proof, bake, and cool. The first couple of times you make this recipe, I recommend doing it on a weekend or day off. You want to keep a close eye on the starter and dough and keep track of its fermentation progress. After you get a couple of bakes under your belt you should be able to work it into your regular schedule, knowing more about what to expect from your dough and starter. Here’s a quick summary of all of the steps:
- Feed your starter
- Mix the dough
- Stretch & fold
- Bulk fermentation
- Shape
- Proof
- Score and bake
- Cool, slice and eat!
Step 1: Feed your starter
About 4-12 hours before you want to mix the dough, feed your sourdough starter. Decide on what feeding ratio you want to use depending on how quickly you’d like it to peak. A feeding ratio looks like 1:1:1 or 1:5:5 and it represents amounts (by weight) of starter : flour : water. A lower feeding ratio like 1:1:1 or 1:2:2 means your starter has less food and will peak sooner. A higher feeding ratio like 1:5:5 or 1:10:10 gives your starter more food, and it will take longer to peak. The temperature in your home is another big factor that will determine how quickly it peaks. Starters peak faster at a warm temperature, and more slowly at a cool temperature. Until you get a feel for how your starter behaves in your environment, feed it and check on it every couple of hours until it’s bubbly and has doubled or more.
Step 2: Mix the dough

- Add 100 grams (about ½ cup) of active sourdough starter, 320 grams (about 1⅓ cups) of water, 500 grams (4 cups) all-purpose or bread flour, and 10 grams (2 tsp.) of fine sea salt to a large bowl.
- Use a large spatula or wooden spoon to start combining all of the ingredients. When it starts to get difficult to mix with the spatula, start squishing the ingredients together with your hands. When there are no dry bits of flour left (some residue on the sides of the bowl is fine) cover the bowl with a damp kitchen towel, dinner plate, or plastic wrap and rest for 30-45 minutes.
Step 3: Stretch & fold
I’m going to show you how to strengthen the dough and organize its gluten network using a technique called stretching & folding. It’s a great way to get nice big air pockets in your sourdough bread. I also find it to be really relaxing and enjoying to get my hands right in the dough and seeing it get smoother and smoother!

- Wet your hands with a little bit of water. Using one hand, reach under the dough and stretch a piece of it up until it starts to resist your pull a little bit.
- Lift the piece of dough up and over to the other side.
- Give the bowl a quarter turn, then lift, stretch, and fold the dough over. Repeat until you’ve stretched and folded around all four sides of the dough.
- Reach under the dough and flip it over so the nice smooth side is facing up. Cover the bowl again, and rest for another 30-45 minutes. Repeat stretching and folding like this every 30-45 minutes, 2-3 more times. This helps strengthen and organize the gluten network in the dough so you get lots of nice air pockets in your sourdough bread!
Step 4: Bulk fermentation
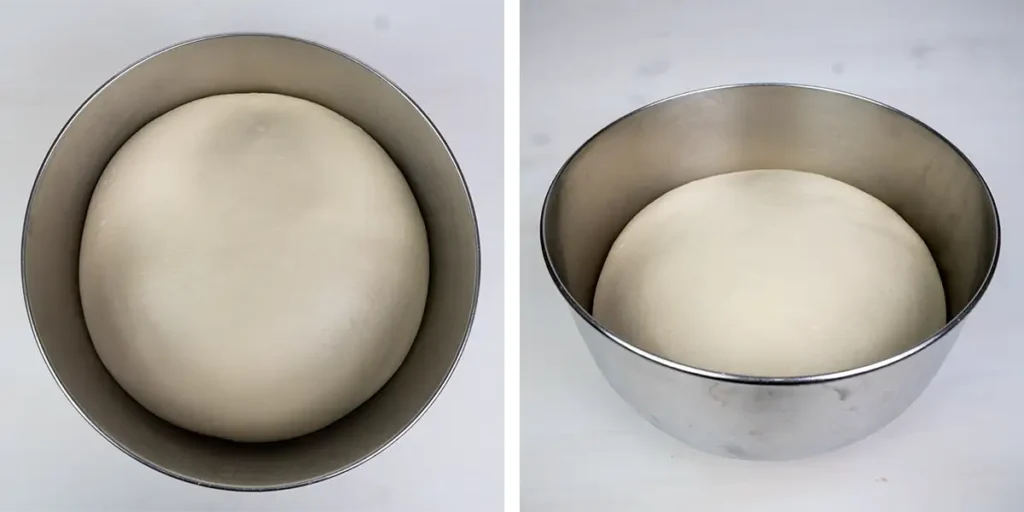
Leave the bowl at room temperature for another 3-12 hours. You’re looking for the dough to just about double in size, be slightly domed at the top and curved downwards at the edges. It should have some bubbles visible under the surface. How long this step will take really depends on how warm your room temperature is. The warmer your home, the faster this will take.
For a next-day bake you will be proofing your dough in the fridge (more on that below). I’m mentioning this here because if your home is warm, you’ll actually want to move on to shaping when the dough has increased in volume by only 50-75%. The dough mass itself will be warm and keep rising and fermenting in the fridge for a few hours. If you were to let it double at room temperature before putting it in the fridge it could over-ferment.
Step 5: Shape
I’m going to show you how to shape the dough into a boule, or a round loaf. It’s the most common shape for artisan-style sourdough bread, and allows you to use a colander or bowl you already have to proof it in. Other shapes would require using a special basket called a banneton for proofing your dough.
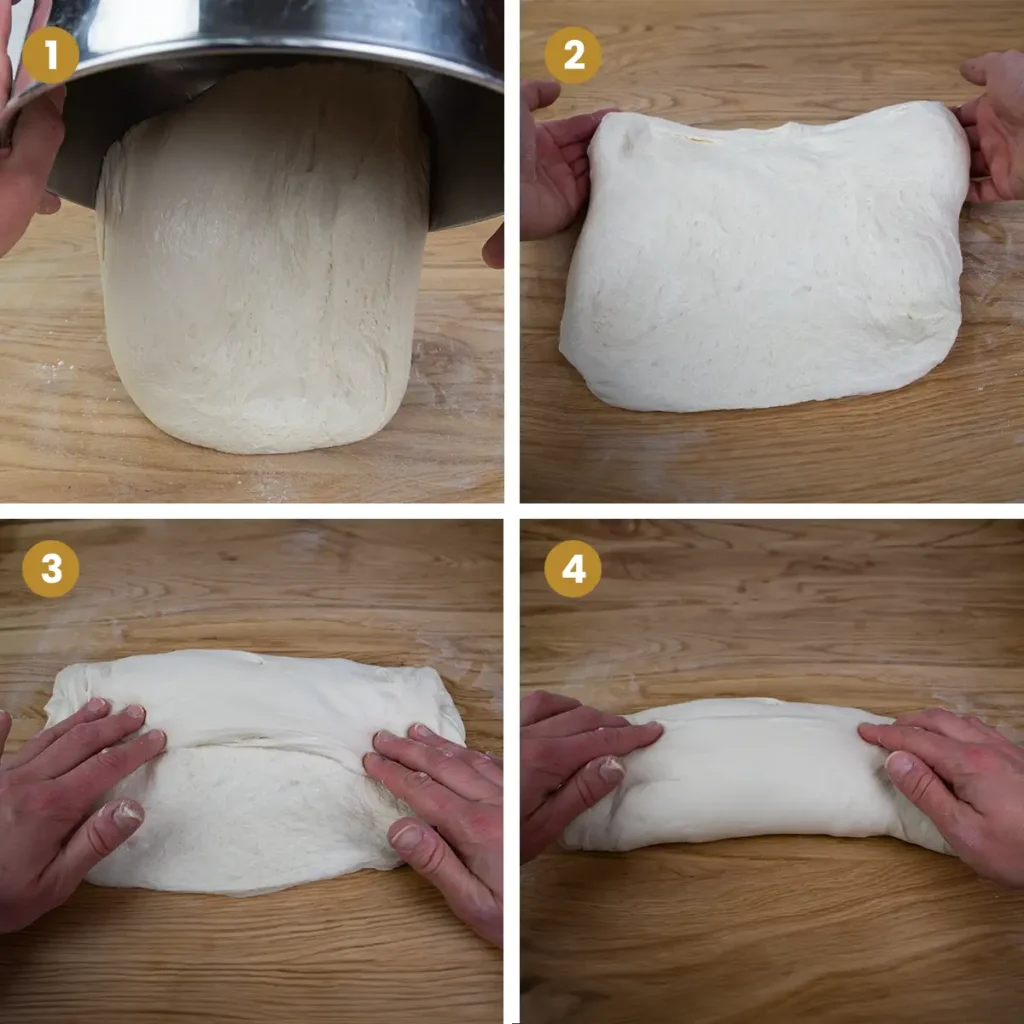
- Tip the dough out onto a lightly-floured work surface. You can use a rubber spatula to loosen the dough around the edges to gently help it come out. Be careful not to disturb too many of the beautiful air bubbles that have developed!
- Use your hands to gently pull and stretch the dough into a rough square. The dough should be between ½-1″ (1.25-2.5 cm) thick.
- Pull the top third of the dough down toward the center and gently press in place.
- Pull the bottom third of the dough up, like you’re folding a letter.
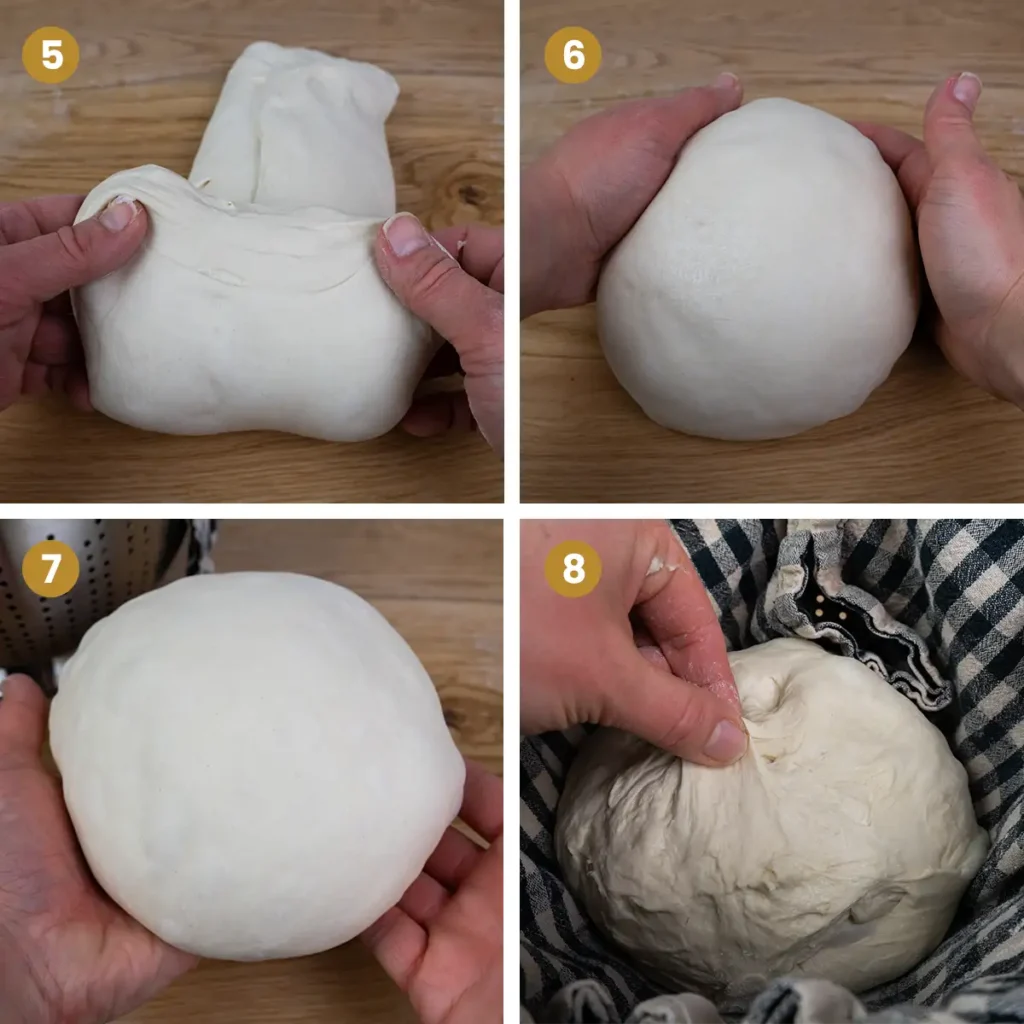
- Turn the dough so the short side is facing you. Roll it up and away from you into a fat spiral.
- Cup your hands around the sides of the dough. Pull and roll the dough towards you, then rotate it so you’re pulling on a different side. Keep going until you’ve formed a ball with a smooth top.
- Line a colander or bowl with a clean kitchen towel, and lightly dust it with flour. Carefully lift the dough ball off the counter, and place it smooth side down into the colander or bowl.
- Pinch together any openings you see on what is now the top of the dough ball. Cover the bowl or colander with a dinner plate or damp kitchen towel.
TIP: For even tighter shaping and better oven spring, you can do what’s known as a pre-shape. Follow steps 1-6 above, and leave the dough ball uncovered on your counter for 30-45 minutes. Then flip the dough ball over onto the counter so the smooth side is on the bottom. Perform all of the shaping steps above.
Step 6: Proof
For a same-day bake: Leave the colander or bowl with the dough in it at room temperature for around 1-4 hours. How long this takes depends on how warm your home is. If it’s warm in your home, this could even take just an hour or two.
To bake the next day: Put the bowl or colander with the dough in it in the fridge, and leave it for 12-48 hours. Cold fermenting in the fridge slows down fermentation. Doing this has a couple advantages. First, you can decide when to bake your dough any time over the next day or two because you’re not at the mercy of a dough that’s fermenting quickly at room temperature. Second, the long and slow fermentation increases the complexity and sourness of the bread’s flavour. Finally, a long and slow fermentation can result in a bread that’s easier to digest.
Whether you’re baking the same day or next, you’re looking for the dough ball to look a bit puffier before you bake. It won’t double at this stage, but should look like it has grown a little bit.
Step 7: Score and bake
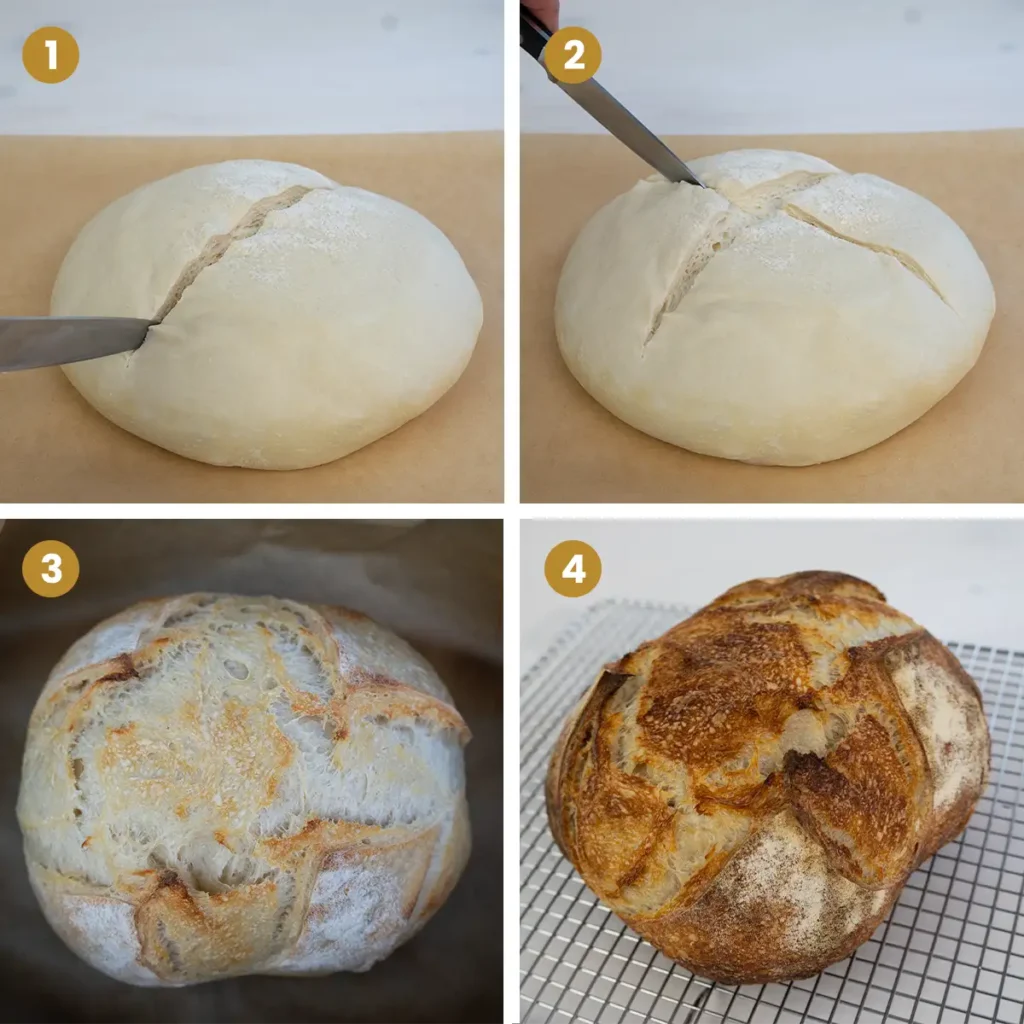
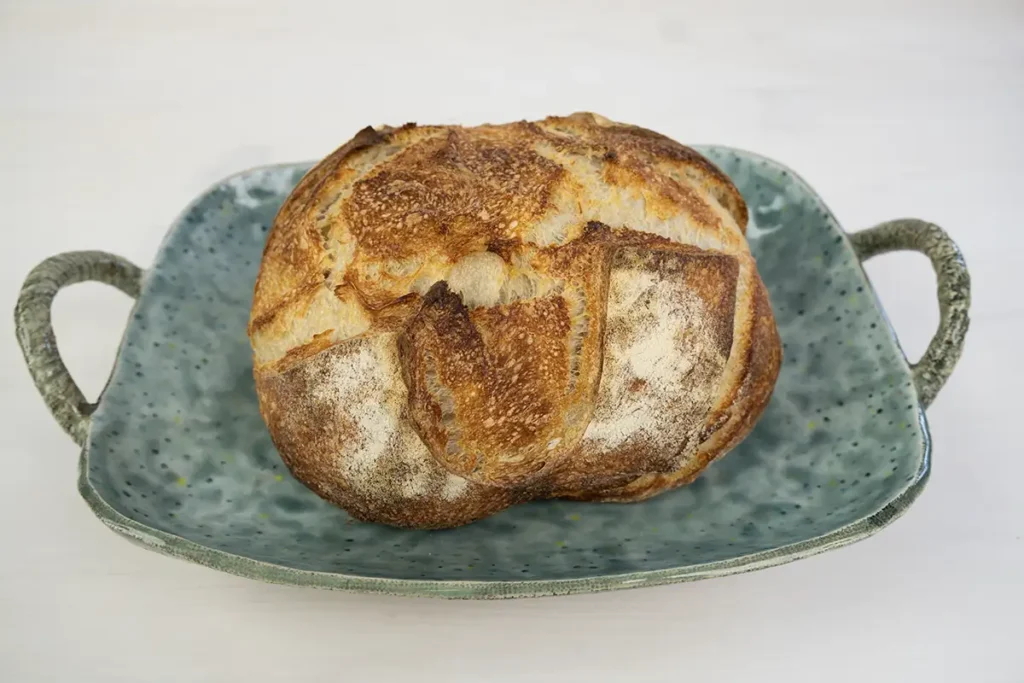
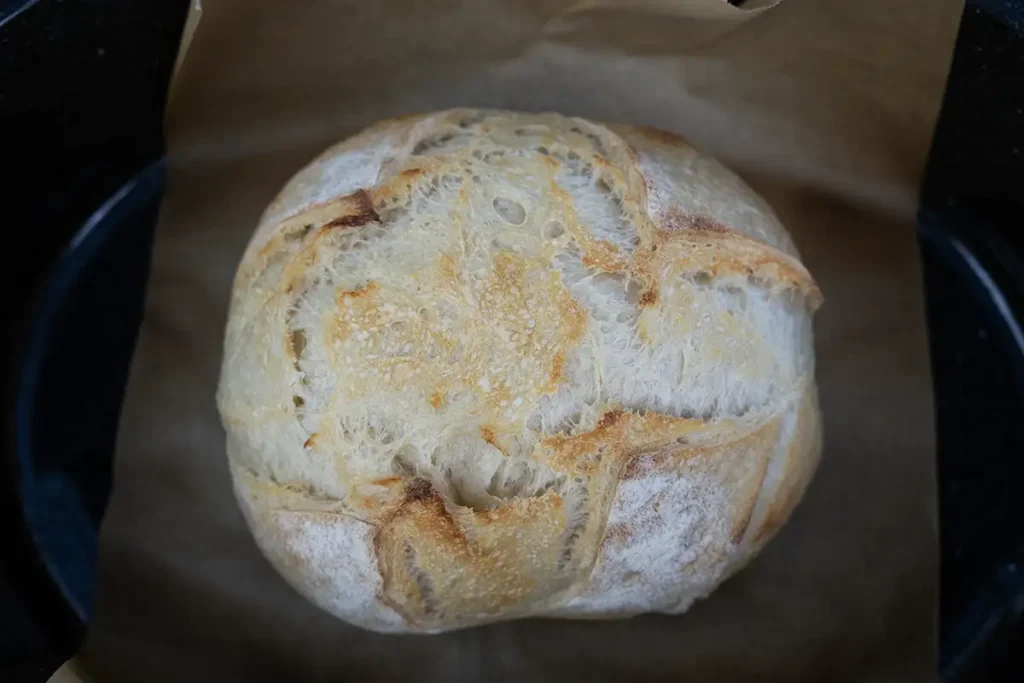
- Preheat your oven to 500˚F (260˚C) if the pot you will be baking the bread in can withstand that high of a temperature. If not, preheat it to 450˚F (235˚C) or as high as your pot is rated to. Put your pot inside the oven, and your colander or bowl with the dough inside the freezer as the oven preheats. Cut a sheet of parchment paper that’s about three times as long as your dough ball is wide. When it’s done preheating, take the dough out of the freezer. Place the parchment paper on the counter, and carefully invert the dough onto it. Use a very sharp knife to cut a slash about 1″ (2.5 cm) deep in the dough. Move quickly and confidently so the knife doesn’t drag in the dough.
- If you wish, you can cut a second slash into the dough to make an X shape. A more symmetrical scoring pattern like this will encourage the dough to expand evenly all around so it maintains a more circular shape. If you leave just one score line it will expand outwards along just that line, becoming more oblong. Either way is fine and completely up to your personal preference!
- Using oven mitts, carefully remove the hot dutch oven or roasting pan from the oven and remove the lid. Carefully drop the dough on the parchment paper into the dutch oven or roasting pan, close the lid, and return it to the oven.
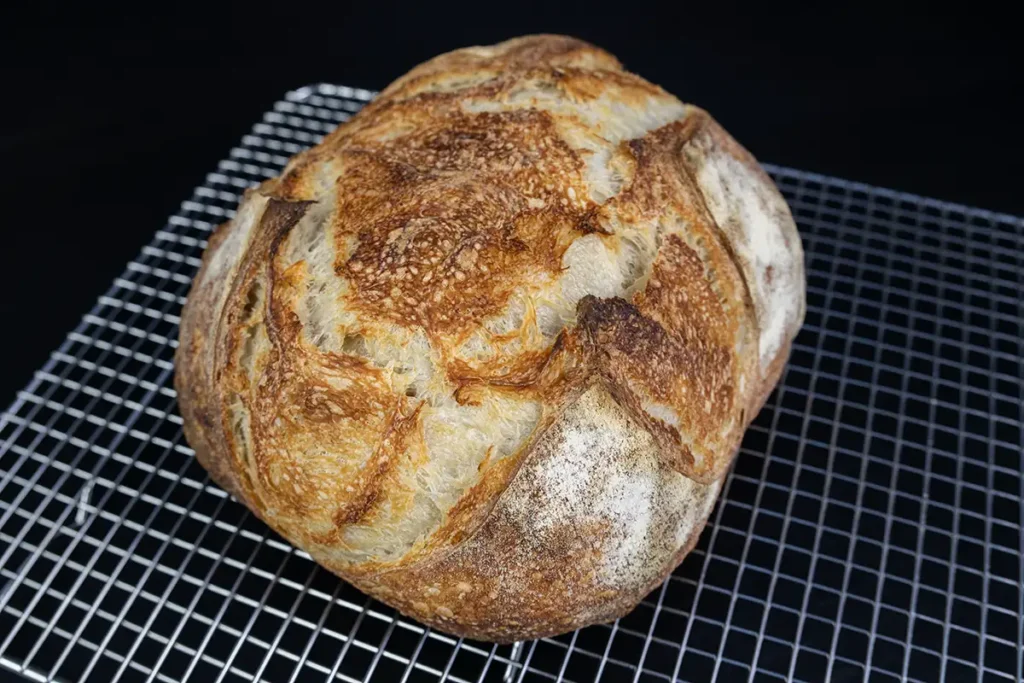
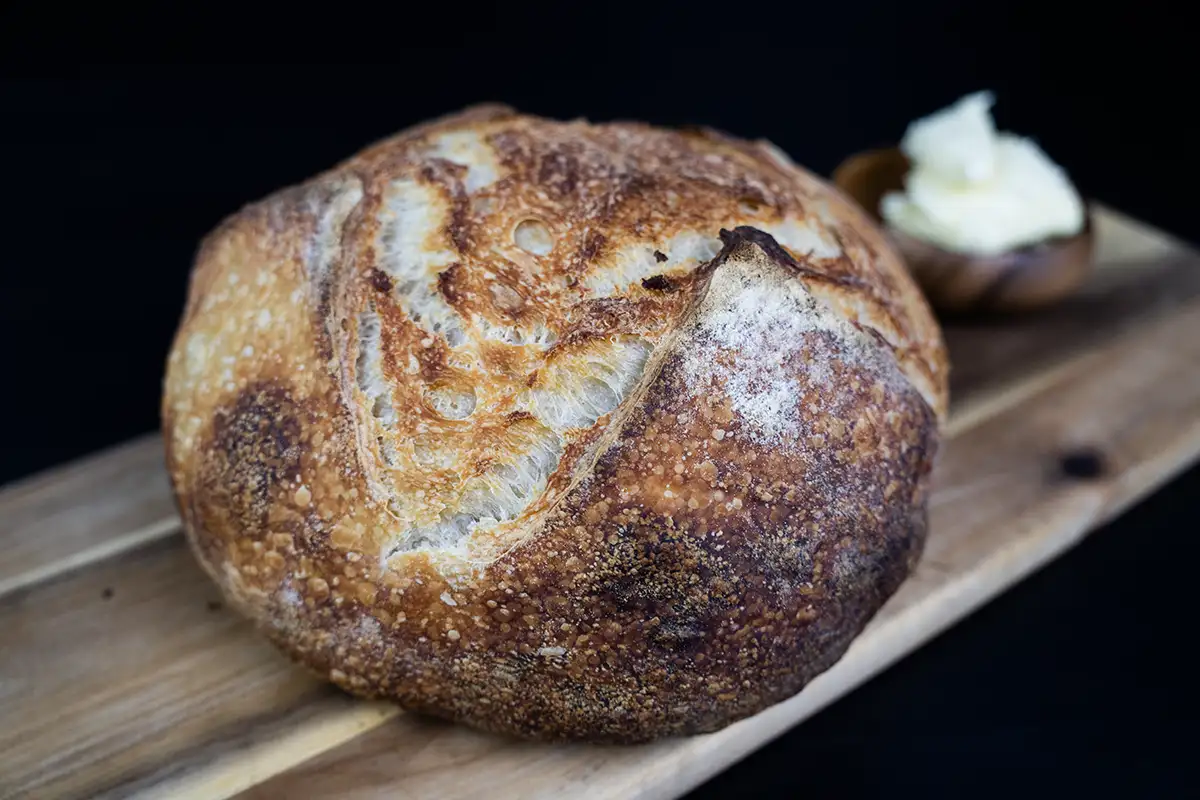
- After 20 minutes, remove the lid from the dutch oven or roasting pan. Continue baking for another 7-15 minutes, depending on how dark you like your crust to be. If you happen to have a probe thermometer you can also check its internal temperature to make sure it’s done baking. If the middle of the sourdough bread registers 205-210°F (96-99°C), it’s done! Without a thermometer, you can tell it’s done if the bread looks golden brown on the outside and feels light when you pick it up (using tongs or oven mitts, of course!). Remove from the oven and carefully place the loaf on a wire cooling rack.
Step 8: Cool, slice and eat!
This is possibly the most difficult step in the entire process! While cooling, the bread is actually continuing to bake, and the interior crumb structure needs this time to finish setting properly. If you cut into the bread while it’s still warm, you could end up with a disappointingly gummy interior. Believe me, I know how hard it is to wait while this golden crackling loaf of deliciousness is wafting heavenly scents throughout your home, but it’s well worth it. Consider it an exercise in willpower!

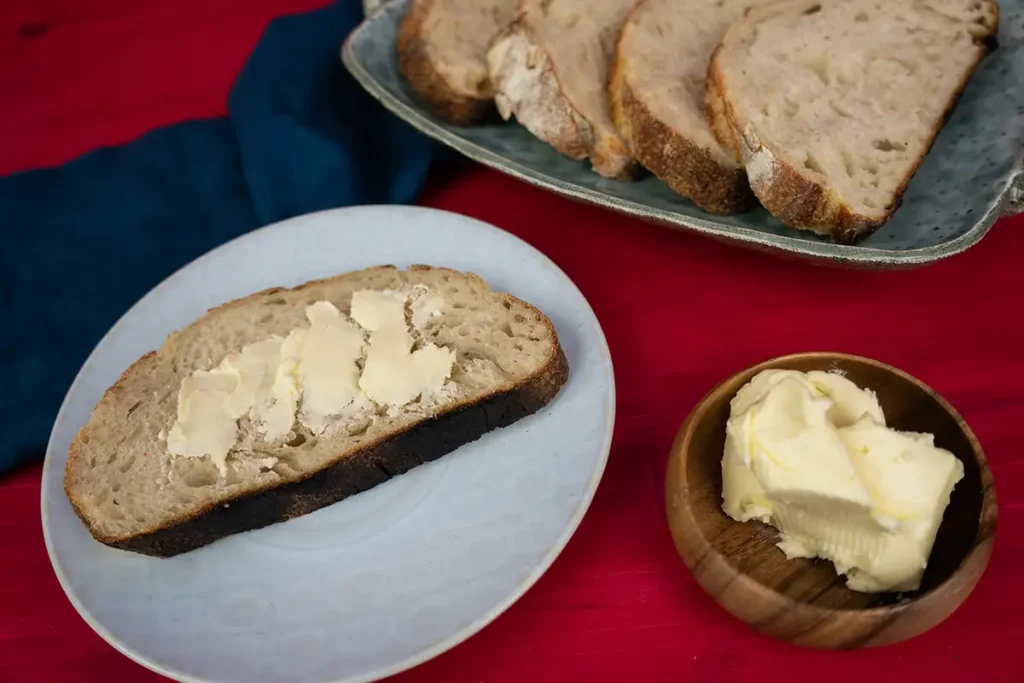
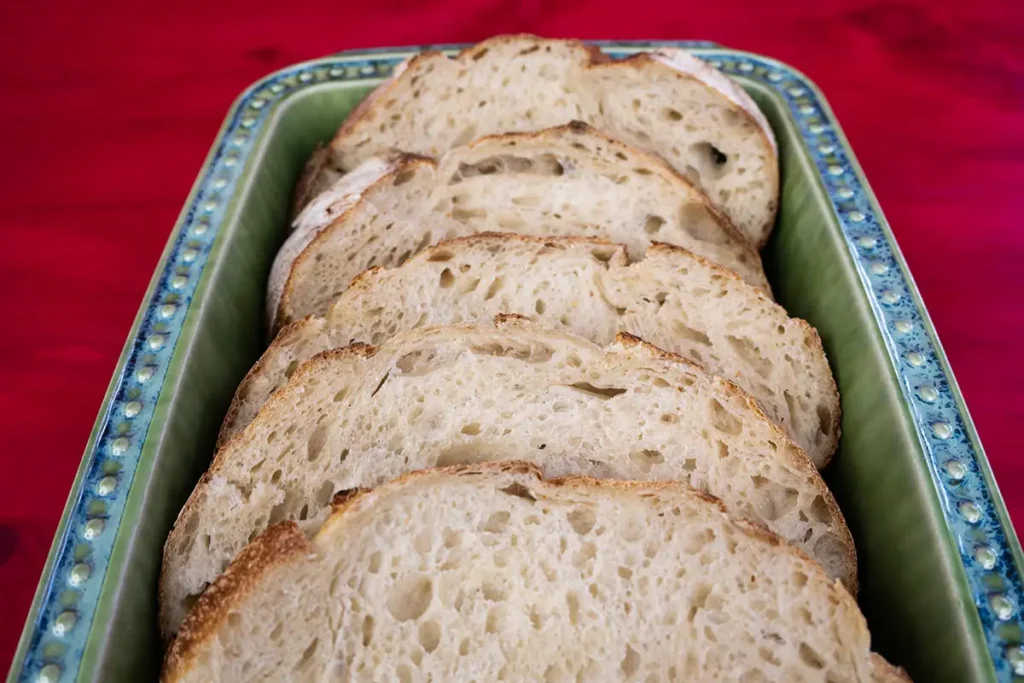
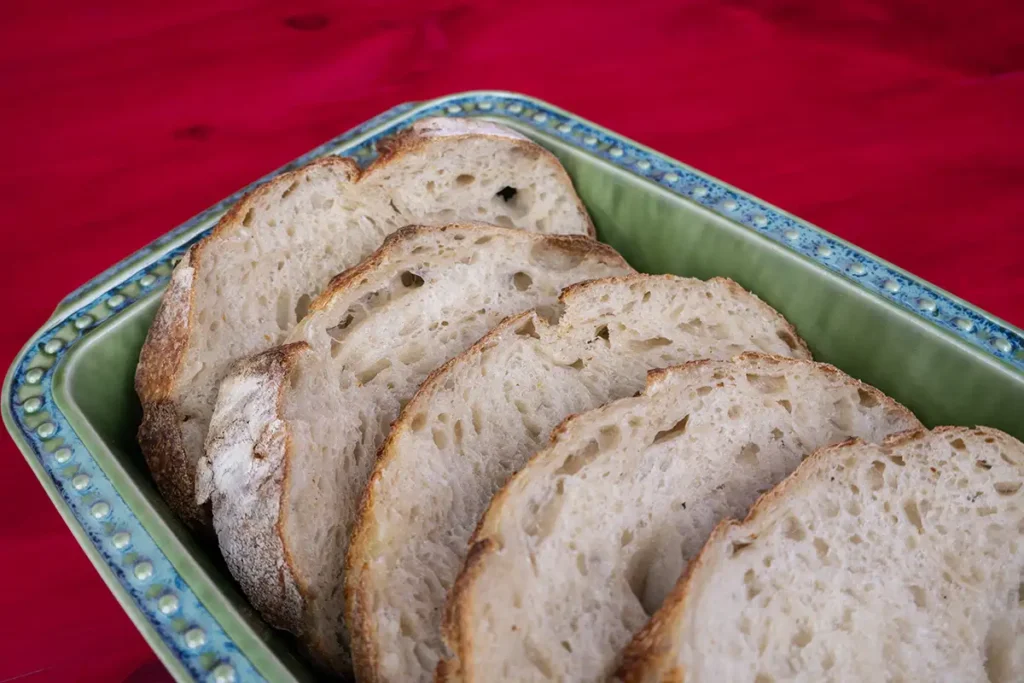
To slice, use a good sharp serrated bread knife. There’s no right or wrong way to slice a loaf of sourdough bread. You can cut the entire thing in half first, then put one of the halves cut side down and cut smaller slices from it. Or if you prefer, you can cut across the entire loaf to make larger slices. Or skip cutting it entirely, and just tear chunks out of it to dip in some delicious olive oil!
Now sit and relax, and enjoy the delicious loaf of sourdough bread you just made with your own two hands! You deserve it. Whether or not it turned out perfectly this time, I bet it’s still about a hundred times better than anything you can buy at the grocery store. Well done, you!
More Sourdough Recipes


Sample Timelines for Baking Sourdough Bread
Whenever you see a baking timeline in a sourdough recipe, you should take it with a huge grain of salt. Sourdough fermentation timing is highly dependent on several variables. The most important variable you should to be aware of is temperature. Warmer temperatures speed up bulk fermentation and proofing, while cooler temperatures slow things down. So take these timelines as just a starting point for how to work this sourdough recipe into your life.
At least the first few times you make this recipe (and whenever the season changes) you should check on the dough every hour or so. Always pay attention to the dough, not the clock. Remember, sourdough doesn’t know what time it is! Observe the dough at each stage using the cues described in the step-by-step tutorial above to decide when it’s ready to move on to the next stage.
Weekday/Overnight Timeline
| Time | Step |
|---|---|
| 6:00 PM | Mix the dough |
| 6:30 PM | First stretch & fold |
| 7:00 PM | Second stretch & fold |
| 7:30 PM | Third stretch & fold |
| 9:30 PM | Pre-shape |
| 10:00 PM | Final shaping, and put in fridge |
| NEXT DAY | |
| Any time | Preheat oven |
| 30 min. later | Score & bake |
Same Day / Weekend Timeline
| Time | Step |
|---|---|
| 9:00 AM | Mix the dough |
| 9:30 AM | First stretch & fold |
| 10:00 AM | Second stretch & fold |
| 10:30 AM | Third stretch & fold |
| 12:30 PM | Pre-shape |
| 1:00 PM | Final shaping |
| 4:00 PM | Preheat oven |
| 4:30 PM | Score & bake |
How to Store Sourdough Bread
The best place to store sourdough bread is in a bread box. It doesn’t need to be anything fancy or expensive, any basic bread box will do! If you don’t have a bread box, you can wrap the loaf in a reusable beeswax wrap or kitchen towel. Never store bread in the fridge, it will go stale much faster.
Sourdough bread is at its best for up to 2 days after it’s baked. It should be fine to eat for several days longer than that, but won’t be as nice as fresh bread. If you don’t think you’ll eat the whole loaf within 2 days, I recommend slicing and freezing a portion of the loaf on the same day it’s baked. Then you can take out a slice or two at a time and thaw them out as needed, or better yet pop them in the toaster. It’ll be almost as good as it was when freshly baked!
Tried this Recipe?
If you made this recipe or have any questions please leave me a comment below! And if you liked this one, you’ll love my Fluffiest Sourdough Sandwich Bread recipe (it makes a killer grilled cheese!)
Easy Sourdough Bread for Beginners
Ingredients
Method
- Add 100 g active sourdough starter, 320 g water, 500 g all-purpose or bread flour, and 10 g fine sea salt to a large mixing bowl. Use a strong rubber spatula or your hands to combine the ingredients until no dry bits of flour remain (some residue on the sides of the bowl is fine).
- Cover the bowl with a damp kitchen towel, dinner plate, plastic wrap, or baking sheet. Rest for 30-45 minutes.
- Moisten your hands slightly with water. Reach one hand under the dough and stretch it up until you start to feel a little resistance. Bring it up and over to the other side of the dough. Give the bowl a quarter turn and repeat. Do that twice more until all four sides of the dough have been stretched and folded. Cover the bowl and rest another 30-45 minutes.
- Perform two or three more sets of stretches & folds as described above, 30-45 minutes apart.
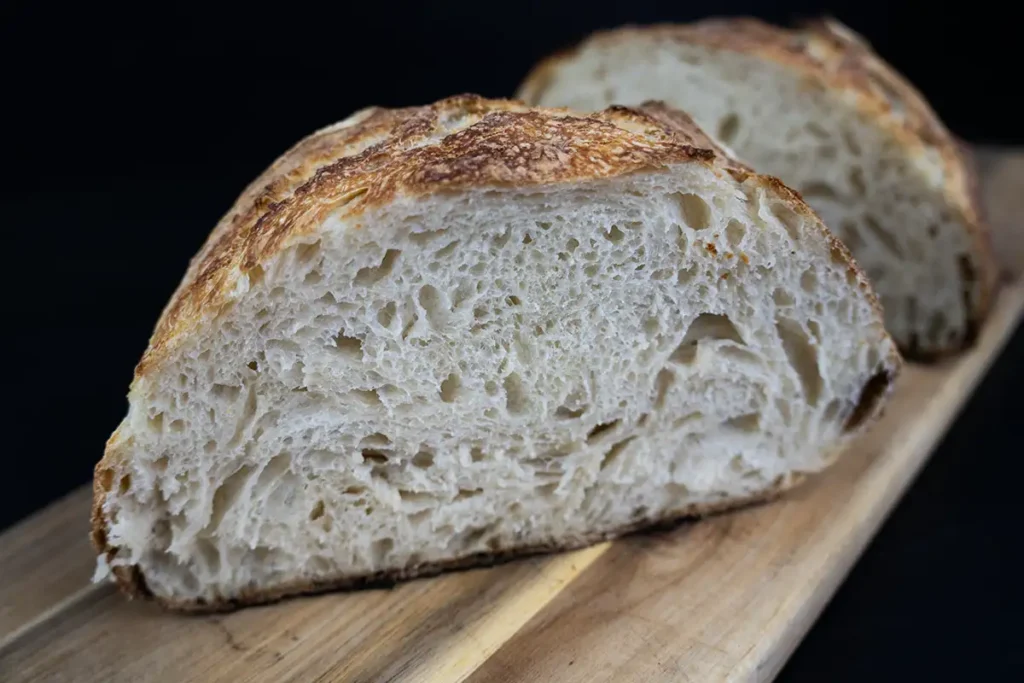
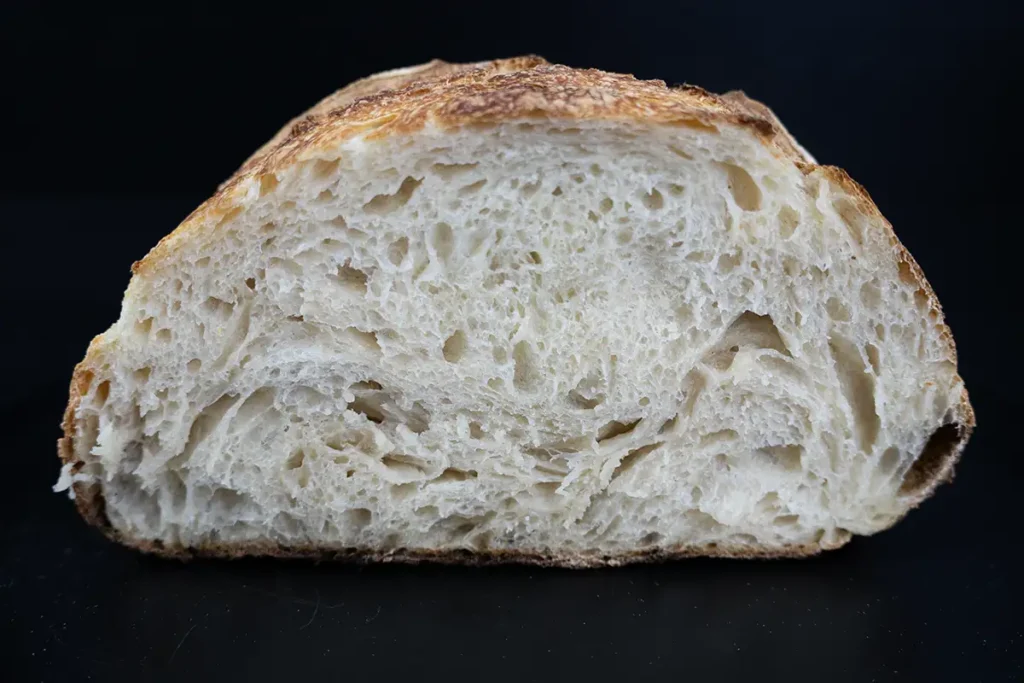
- Leave the bowl at room temperature until it's about doubled in size (see note), is slightly domed on top, and has some visible bubbles under the surface. See the post above for photos of what the dough should look like at the end of bulk fermentation.
- See the post above for step-by-step photos of how the shaping is done. Lightly flour your work surface. Tip the dough out of the bowl. You can use a rubber spatula to loosen it around the edges.
- Gently stretch the dough out into a rough square. Fold the top third of the dough down, and then the bottom third of the dough up. Rotate the dough so a short side is facing you, and roll it up into a fat spiral.
- Cup your hands around the back of the dough, and pull it towards you while rotating it. The goal is to form a ball with a nice smooth top.
- Leave the dough uncovered on the counter for 30-45 minutes. Line a large bowl or colander with a clean tea towel and dust it lightly with flour. Repeat the shaping instructions above, then gently place the dough ball upside-down in the colander or bowl, so the nice smooth side is facing down. Pinch closed any openings you see. Cover the colander or bowl with a damp tea towel or dinner plate.
- If baking the same day leave the colander or bowl at room temperature for 1-4 hours or until it looks noticeably puffier. It won't double again at this stage.If baking the next day place it in the fridge.
- Place a large enamelled roasting pan or dutch oven in the oven and preheat it to 500˚F (260˚C). If your dutch oven or enamelled roasting pan isn't rated for that high of a temperature, preheat to 450˚F (235˚C) or as high as your pan is rated for. While your oven is preheating, place the colander or bowl with your dough in it in the freezer.
- When the oven is done preheating, carefully invert the dough onto a piece of parchment paper on your counter. Use a very sharp knife to cut a slash about 1" (2.5 cm) deep across the middle of the loaf. If you wish, cut a second slash across it to form an X.
- Remove the dutch oven or roasting pan from the oven, and remove its lid. Carefully place the dough into the dutch oven or roasting pan on the sheet of parchment paper. Close the lid, and return to the oven. Bake for 20 minutes.
- Remove the lid from the dutch oven or roasting pan. Bake for another 7-15 minutes depending on how dark you like your crust. When the bread is done baking it will feel light when you pick it up (with a pair of tongs or oven mitts!), or the temperature in the middle will register 205-210°F (96-99°C) with a probe thermometer.
- Carefully transfer the loaf to a wire cooling rack, and cool completely to room temperature before slicing. Enjoy!
Sheryl C says
Love the video! Very easy to follow and my loaf is going into the oven now!
Joanna Rankin says
Woo hoo, I’m so happy you enjoyed the recipe!
Angela Hart says
I’m confused, the YouTube says this recipe doesn’t need a Dutch oven?
Joanna Rankin says
It doesn’t! The post recommends using either a Dutch oven or a large enamel roasting pan (which is my favourite thing to use). You just need some kind of pot or vessel with a lid, that can safely withstand the high temperatures used to bake the bread. Even a large stock pot would work, as long as it’s rated for a high enough temperature.
Louise Peterson says
Tried this and the bread came out perfectly! Thank you! I’m about to put my second one in the oven today.
Joanna Rankin says
Hooray, I’m so happy to hear that!