These traditional Polish donuts are made with a brioche-like dough, and filled with jam, custard, or other yummy things. They’re usually eaten on Fat Thursday in Poland, or Fat Tuesday (aka Mardi Gras) in the US. With this easy sourdough pączki recipe there’s no reason not to make them any time of year!
Some links in this post may be affiliate links. Read my disclosure policy.

My family immigrated to Canada from Poland in the early 1980s, and I spent most of my childhood in a Toronto suburb with a thriving Polish community. One of our favourite spots was a nearby Polish deli owned by family friends. They almost always had a tempting stack of pączki on the counter at all times of the year—some dusted with powdered sugar, others glazed, all with delicious fillings like custard and plum jam. I loved bringing home a paper bag full of them to enjoy with my family. Pączki are pure nostalgia for me, so developing a sourdough version of this traditional recipe really means a lot to me.
Jump To:
- What are Pączki?
- How do You Pronounce Pączki?
- Ingredients to make Sourdough Pączki
- Equipment to make Sourdough Pączki
- How to Make Sourdough Pączki Step-by-Step
- Sample Baking Timeline
- Tips for Success when making Sourdough Pączki
- How to Store & Make Sourdough Pączki Ahead
- Variations on Sourdough Pączki
- Sourdough Pączki (Authentic Polish Jam-Filled Donuts)
What are Pączki?
Pączki are donuts made with a rich and soft dough similar to brioche, and usually filled with plum jam. They originated in Poland around the Middle Ages, and were made and eaten on Fat Thursday to use up all the sugar, eggs, butter, and fat in the house that were forbidden during Lent. In the mid-19th century, lots of Polish immigrants settled in the Midwest and brought their pączki recipes with them. In America though, they’re normally eaten on Fat Tuesday as opposed to Fat Thursday in Poland. To this day, “Pączki Day” is an extremely popular event in Midwestern cities wherever there are large Polish communities, especially Detroit and Chicago. On Pączki Day, popular bakeries there can have line-ups around the block!
How do You Pronounce Pączki?

There’s a lot of misinformation out on the internets about how to pronounce this confusing-looking word. Some people will tell you it’s pronounced poonch-key, and others will say it’s punch-key. I’m here to tell you they’re both wrong! I grew up in a Polish-speaking home and am fluent in Polish myself, so take it from me—it’s actually pronounced paunch-key. And that’s pretty apt because one pączek (paunch-ek, or how you say a singular pączki) has upwards of 500 calories!
Ingredients to make Sourdough Pączki

Sourdough Starter
Active sourdough starter is used to leaven the pączki dough. If you don’t already have one, you can ask for one from a local sourdough bakery, buy a dehydrated one online, or even make a sourdough starter from scratch yourself (I promise it’s not hard to do!).
Milk
Milk adds richness to the dough and aids in browning. For the best flavour, use whole (3.25%) milk. This is meant to be a rich and delicious treat, so don’t waste your time with skim milk!
Unsalted Butter
Butter adds even more richness and a beautiful silky texture to the dough. Use unsalted if you can, so the dough doesn’t end up being too salty by accident. If all you have is salted butter go ahead and use that, but reduce the other salt the recipe calls for by at least half.
Egg & Egg Yolks
The whole egg helps the dough bind together and become nice and smooth. The extra yolks add, you guessed it, even more richness! Farm-fresh eggs are the best in my opinion, and give the dough a really nice deep golden colour. If you can get your hands on farm-fresh eggs, use them in this recipe!
Vanilla Extract
Vanilla adds a beautifully-complex depth of flavour. If you can afford it, pure vanilla extract is the best choice. If all you have is artificial vanilla extract, it will do the trick well enough.
All-Purpose Flour
All-purpose flour has a medium gluten content that will provide the pączki with enough structure so they puff up nicely, while remaining deliciously soft. Cake or pastry flour doesn’t have enough gluten to provide structure. Bread flour has too much gluten and could result in unpleasantly chewy pączki. I recommend using an unbleached flour if that’s available to you. If all you can get is bleached flour, go ahead and use that.
Lemon or Orange Zest
Lemon or orange zest (or a combination of both) helps balance out all the richness of the dough. It’s optional, but I think the brightness it adds is well worth it!

Sugar
Sugar adds sweetness to the dough of course, but also makes the dough soft and helps it brown nicely during deep frying. I also like to fry the scrap pieces of dough left after cutting out the pączki, and coat them in sugar after frying.
Salt
Salt is very important to round out all the other flavours in the dough. Without it, it would taste very bland! It also tightens up the gluten network and helps the dough achieve a good strong structure.
Fat or Oil for Deep Frying
Pączki were traditionally deep fried in lard. You can use that, or any neutral-flavoured oil with a high smoke point that’s appropriate for deep frying. I like to use peanut oil.
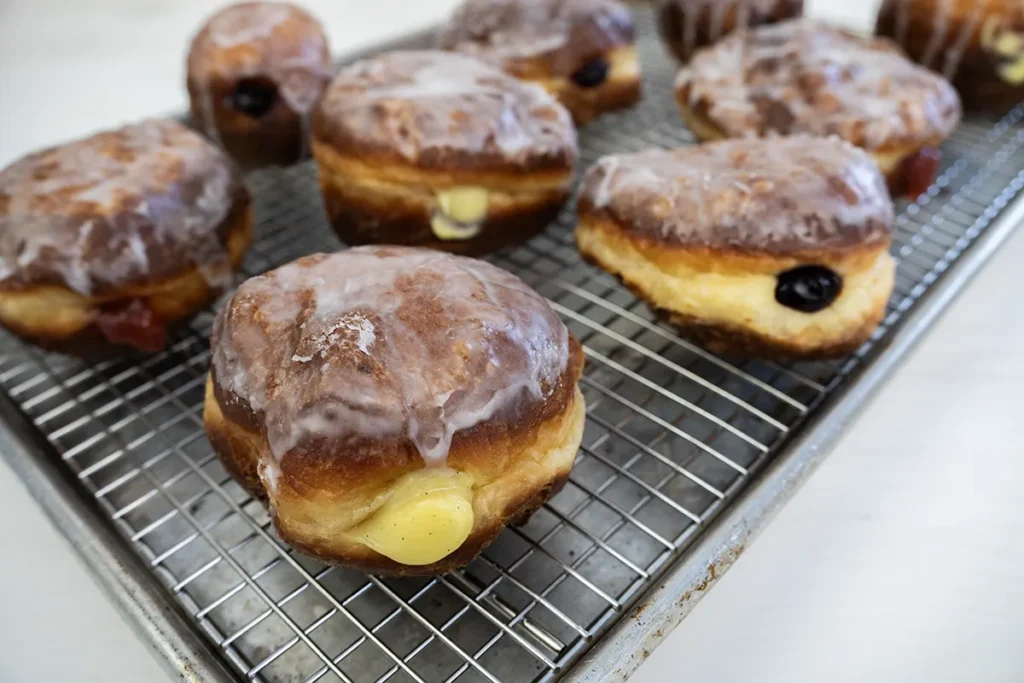
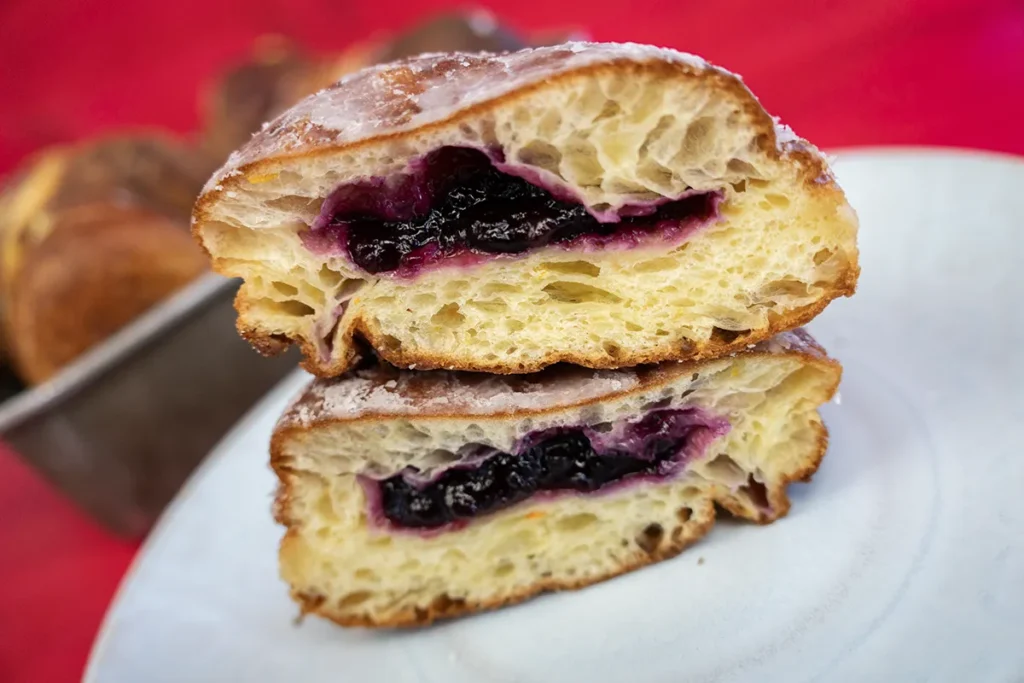
Jam for Filling
Plum butter, called powidła śliwkowe (poh-vee-dwah shleev-kov-eh) in Polish, is a very traditional and delicious filling for pączki. You can learn how to make some here. You can use any jam you like, though. Pastry cream, custard, lemon curd, Nutella, or chocolate ganache would all make great pączki fillings, too.
Sugar for Coating
You have a few options for coating your pączki. The simplest option is to roll them in granulated sugar. You could dip them in a glaze made of powdered sugar and water (my favourite!), or simply dust them with powdered sugar.

Equipment to make Sourdough Pączki
Baking pans
You’ll need at least two half-sheet baking pans to proof the donuts and dough scraps on. This is my favourite kind, and they come in an inexpensive 6-pack. I honestly go through all six pans whenever I’m baking a lot around the holidays so if you do a lot of baking it’s worth getting the 6-pack. Having a couple reusable baking sheet covers like this one would make it really easy to cover the pans. That way you can proof donuts, bagels, buns, etc. without them drying out. Though you can use greased plastic wrap to cover the pan while your pączki proof instead, if you prefer!
Deep fryer
A deep fryer like this one makes it easy to heat your oil to a set temperature and keep it there. In my opinion it’s also a bit safer to use than a dutch oven on the stove. If you prefer you can definitely use a dutch oven or another large heavy-bottomed pot instead. In which case, use a candy or deep fry thermometer so you can monitor the temperature of the oil. If you’re using a pot to fry in, you’ll also need a slotted spoon or a spider to fish the sourdough pączki out of the oil.
Piping or pastry bag with a long tip for filling donuts
A piping bag fitted with a donut-filling (aka Bismark) tip makes it easy to fill your sourdough pączki. Alternatively, you can use a regular round tip. If so, you’ll need to use a paring knife to make holes in the side of each pączek.
How to Make Sourdough Pączki Step-by-Step

- If you’re using orange and/or lemon zest, add the granulated sugar to a small bowl along with the zest. Use your fingertips to rub the zest into the sugar until it resembles damp sand.
- Add the sourdough starter, lukewarm milk, large egg and egg yolks, vanilla, all-purpose flour, sugar, and salt in the bowl of a stand mixer. Using the dough hook, mix on low speed until everything is combined. Then increase the speed to medium and knead until the dough gets smoother, clears the sides of the bowl, and holds together (about 8-10 minutes).

- Begin adding the room-temperature butter one piece at a time. Wait until each piece disappears into the dough before adding the next piece. After all the butter has been incorporated knead for another 2-3 minutes. The dough should feel quite strong now. When you pull the dough hook from the bowl, the dough should cling to it and you should feel resistance. The dough should also look silky smooth. Transfer the dough to a large bowl coated in butter. Cover it with a damp tea towel, dinner plate, or baking sheet.
- Leave at room temperature for another 4-8 hours and possibly longer. Enriched doughs ferment and rise more slowly than lean doughs. You can expect the bulk fermentation to take a fair bit longer compared to a standard sourdough bread recipe. You’re looking for the dough to almost double in size, unless your home is quite warm. If so, move on to the next step when it has increased in size by only 50-75%. This is because the dough will be quite warm, and will continue rising and fermenting in the fridge for a few hours before the dough cools down. If your home is warm and you wait until the dough doubles in size, it could actually over-ferment in the fridge. Transfer the covered bowl of dough to the fridge overnight.

- Cut out 10-12 squares of parchment paper, about 4″ x 4″ (10 x 10 cm). Lightly flour a work surface, and remove the dough from the bowl. Lightly flour the surface of the dough as well as a rolling pin. Use your hands to roughly form the dough into a rectangle, then roll it out to about ½” (1.25 cm) thick. Do your best to roll it to an even thickness throughout, so the pączki proof evenly and later puff up evenly in the deep fryer. Use a round cookie cutter or glass to cut out rounds that are 2.5″-3″ (6.5-7.5 cm) in diameter. Cut them as close together as possible to reduce the amount of scraps.
- Gently transfer each cut pączek to a parchment square, and place on a baking sheet at least 1″ (2.5 cm) apart from its neighbour. Cover the baking sheet with greased plastic wrap or a reusable baking sheet cover like this one. You may need to proof the pączki on two separate baking sheets depending on how many you’re able to cut out.

- You can press or gently knead any scraps together. Then cover them, rest for 20-30 minutes, and roll and cut them out. You can only really do it this once before the dough gets too tough and scrappy to roll out nicely. That said, I think that pączki rolled from scraps are never quite as nice as the first roll. So I like to roll and cut just once, and randomly cut the scraps into chunks about 1″ (2.5 cm) large, then toss them in some granulated sugar after frying. They’re just like Polish Timbits (or donut holes, for my American friends)! Place the cut-up scraps on a separate baking sheet lined with parchment paper or a silicone baking mat, and cover with greased plastic wrap or a reusable baking sheet cover.
- Leave the pączki and cut-up dough scraps at room temperature to proof for about 1 hour. They shouldn’t double at this stage, but they should look a little puffier. After 30 minutes or so, start preheating a deep fryer or oil in a dutch oven to 350˚F (175˚C). Line a baking sheet with a couple layers of paper towel or a clean kitchen towel to drain the pączki after frying.

- While the oil is preheating, prepare whatever you will be coating your pączki with. If you’re glazing your pączki, whisk the powdered sugar and water together into a bowl just large enough to dip one pączek. The glaze should be about the consistency of heavy cream, so that it leaves a crisp and thin coating on the pączki when it sets. Cover the glaze with plastic wrap and set aside. If you will be tossing your pączki in sugar, fill a bowl with about ½” (1.25 cm) of graulated sugar, and set aside. If you will be dusting the pączki with powdered sugar, place a small sieve over a small bowl, and fill it with about ¼ cup of powdered sugar.
- When the oil reaches the right temperature, carefully drop in 2-3 pączki still on their parchment squares. After a moment, the squares should float away—use tongs or a pair of forks to carefully remove them from the oil. Fry for 5-6 minutes or until golden brown on the bottom, then use tongs or a pair of forks to carefully flip them to the other side. Fry for another 5-6 minutes or until golden brown. Use a spider or slotted spoon to carefully remove the pączki and drain on the towel-lined baking sheet. Repeat with the remaining pączki. The dough scraps should only need about 3-4 minutes of frying per side, or until golden brown on each side.

- Fit a pastry bag with a donut-filling (Bismark) tip. Or you can use a regular round tip—if so, you’ll want to use a paring knife to cut an opening in the side of each pączek first. Fill the pastry bag with about 2 cups of jam, pastry cream, or whatever filling you are using. Fill the pączki with the filling, until it feels noticeably heavier and a little bit of the filling peeks out of the opening.
- Toss the pączki in granulated sugar, dust with powdered sugar, or dip into some glaze. Sourdough pączki are best eaten the same day, but will be OK for another day or two. Use your judgment on when to store leftover pączki in the fridge depending on what kind of filling you used.

Sample Baking Timeline
Keep in mind that timing in sourdough baking is highly dependent on a lot of variables, especially the temperature in your home. So take this timeline as just a starting point!
| Time | Step |
|---|---|
| 12:00 PM | Mix the dough |
| 12:30 PM | Begin bulk fermentation |
| 8:30 PM | Transfer dough to the fridge |
| NEXT DAY | |
| 8:00 AM | Roll, cut, and proof the pączki |
| 8:30 AM | Preheat the oil |
| 9:00 AM | Fry, fill, and enjoy! |
Tips for Success when making Sourdough Pączki
- This is a very soft and enriched dough, so I recommend using a stand mixer to knead it. It would be quite difficult to do by hand. Yes…I know, our Polish grandmas all would have done it by hand. But I’m no Polish grandma, and neither are you (probably) so do yourself a favour and let a machine handle the kneading on this one!
- Butter is technically a type of “shortening”, even though nowadays we tend to associate that word with those flavourless white bricks of lab-created vegetable oil. The word shortening refers to the action of fat in dough, which literally inhibits, or shortens, the formation of gluten strands. If you were to add the butter too soon, the dough wouldn’t be able to develop enough gluten. So in order for the dough to be able to develop enough gluten to puff up beautifully in the deep fryer, you want to knead the dough for a while so that a good network of gluten is already there before adding any butter. That’s why in my recipe I recommend that you knead the dough for 8-10 minutes or until it clears the sides of the bowl and starts getting nice and smooth. Then you add the butter one piece at a time, waiting until each piece is completely incorporated before adding the next.
- You may be able to roll and cut the pączki right after bulk fermentation. And if you have your heart set on making these in one day, give it a try! But I do recommend you chill the dough overnight after bulk fermentation. The slow fermentation builds more flavour, and also firms up the butter in the dough making it so much easier to roll and cut.
How to Store & Make Sourdough Pączki Ahead
You have a couple options to make part of the sourdough pączki recipe in advance:
- Mix the dough and bulk ferment it at room temperature, then leave it in the refrigerator for up to 2 days.
- Fry the pączki then drain and let them cool completely to room temperature. Do not coat them in any kind of sugar. Freeze them separately on a baking sheet, then once they’re solid (about 2 hours) transfer them to a ziploc bag. Store them in the freezer for up to 3 months. Then thaw them out at room temperature, fill, and coat with your sugar of choice. They won’t be quite as nice as freshly-fried pączki, but they’re a close second!

Variations on Sourdough Pączki
You can customize the flavour of the dough with spices, extracts, and other citrus zests. Have fun pairing the flavour of the dough with the filling! Here are a few ideas:
- For a tropical twist, add lime zest to the dough instead of orange or lemon. For the filling, make a pastry cream using coconut milk instead of milk.
- Use orange zest in the dough, and fill with chocolate ganache or Nutella.
- Add almond extract to the dough, and fill with cherry jam.
- Use grapefruit extract in the dough, and fill with white chocolate ganache.

Sourdough Pączki (Authentic Polish Jam-Filled Donuts)
Ingredients
Method
- Add the zest of 1 lemon or orange (if using) and 100 g granulated sugar to a small bowl. Rub the zest into the sugar using your fingers, until the sugar takes on some colour and resembles damp sand. It should also smell intensely lemony or orangey.
- Add the sugar, 100 g active sourdough starter, 290 g whole milk, 1 large egg, 3 large egg yolks, 1 tbsp. vanilla extract, 525 g all-purpose flour, and ½ tsp. fine sea salt to the bowl of a stand mixer fitted with a dough hook. Mix on low until combined, then increase to medium speed and knead until the dough pulls away from the sides of the bowl and is starting to look smooth (8-10 minutes).
- Add 115 g unsalted butter one piece at a time, waiting until each piece is incorporated before adding the next. Once all the butter has been incorporated, knead for an additional 2-3 minutes. The dough should be very smooth. If you pull the dough hook up from the bowl, you should feel a fair bit of resistance from the dough.
- Transfer the dough to a greased bowl, and cover. Leave at room temperature until just about doubled in size (see note 2). This could take 4-8 hours or possibly longer, depending on the temperature in your home. Transfer the dough to the fridge overnight.
- Cut out at least 12 squares of parchment paper about 4" x 4" (10 x 10 cm). Lightly flour your work surface. Place the dough on your work surface, and flour the top of the dough and a rolling pin as well. Roll it out to ½" (1.25 cm) thick, and use a 2.5"-3" (6.5-7.5 cm) round cookie cutter or glass to cut out as many rounds as you can. Carefully transfer each pączek to a parchment square, and arrange them on a baking sheet leaving at least 1" (2.5 cm) of space in between. Cover the baking sheet with greased plastic wrap or a plastic baking sheet cover.
- You can gather the scraps together and form them into a ball, cover, and rest for 20-30 minutes. Then roll the scraps out again (flouring the dough and work surface as necessary) and cut out more rounds. Place those on squares of parchment paper as before.
- Any remaining dough scraps can be cut into pieces about 1" (2.5 cm) in size. Place the cut dough scraps on another sheet of parchment paper on a plate or baking sheet. Cover that with some greased plastic wrap.
- Leave the pączki and dough scraps at room temperature for about an hour. They won't double at this stage, but should look puffier. After about 30 minutes, begin preheating some oil in a deep fryer or large heavy-bottomed pot to 350˚F (180˚C).
- Fry the pączki a few at a time—however many will comfortably fit in your pot or fryer without overcrowding it. Fry for 5-6 minutes per side, or until deeply golden brown. Use a pair of forks or slotted spoon to carefully flip them over to the other side, and fry for another 5-6 minutes or until deeply golden brown. Carefully remove from the oil using a spider or the deep fryer basket, and drain on the towel-lined baking sheet.
- Repeat with the remaining pączki and dough scraps. The dough scraps should only need to be fried for about 3 minutes per side.
- Add the 1 cup powdered sugar and 2 tbsp water to a small bowl. Use a small whisk or fork to whisk until smooth.
- Transfer the fruit jam, Nutella, or pastry cream to a piping bag fitted with a donut-filling (Bismark) tip, or a medium round tip.
- If using a Bismark tip, push it into the side of a pączek and fill with your filling of choice until the pączek feels full (it should feel noticeably heavier in your hand). If using a round piping tip, use a paring knife to cut an opening in the side of the pączek and then fill it.
- Dip the tops of the pączki in the powdered sugar glaze and let the excess drip off. Let the glaze set for about 5-10 minutes.
- Pączki are best eaten the same day, but will be OK for a couple of days. Please use your judgment as far as when to store any leftovers in the fridge based on what filling(s) you used.
Notes
- Instead of glaze, you could toss the pączki in some granulated sugar, or dust them with powdered sugar.
- If your home is warm, transfer the dough to the fridge when it has increased in size by only 50-75%. This is because the dough will be warm and it will take a few hours for all of it to cool down. In the meantime while it’s in the fridge, it could overproof.
Meghan says
They look so delicious!
Joanna Rankin says
Thank you!
Jenna says
These look great! Could these be baked instead of fried? I’m just wondering if there is any difference in the dough of baked vs fried paczkis? (I just don’t love frying at home because of the smells and spatters. Haha!)
Joanna Rankin says
Yes you can absolutely bake these instead of fry! It’s the exact same recipe. I should probably bake them myself more often, I think my cholesterol will thank me haha.
Alicja says
Delicious!!! Made one today. Thank you for a foolproof recipe.
Joanna Rankin says
So happy to hear it worked out well! Thanks for sharing!
ania says
wczoraj wyrobione ciasto z podwojnej porcji (zawsze jak cos dobre) , lubie eksperymentowac z zakwasem i dodalam 800g bo mialam extra, dzisiaj smazylam , ja oczywiscie na dawne sposoby ,wycinalam kwadrato/prostokaty nie kulka , BARDZO DOBRY PRZEPIS, jesli juz robimy cos z zakwasu tzn. lubimy piec i wiemy ze czas i cierpliwosc to jest to , tak jak chleb musi rosnac w lodowce dobe tak i te paczki ,tylko wypieki z zakwasem a i cukru tylko polowa porcji(zawsze ucinam) !!!! rowniez dobre
pozdrawiam ze stanow CT
Joanna Rankin says
Dziekuje bardzo!
Sandy W says
Fantastic, definitely making again!!
Joanna Rankin says
Thank you so much, I’m so glad you enjoyed the recipe!