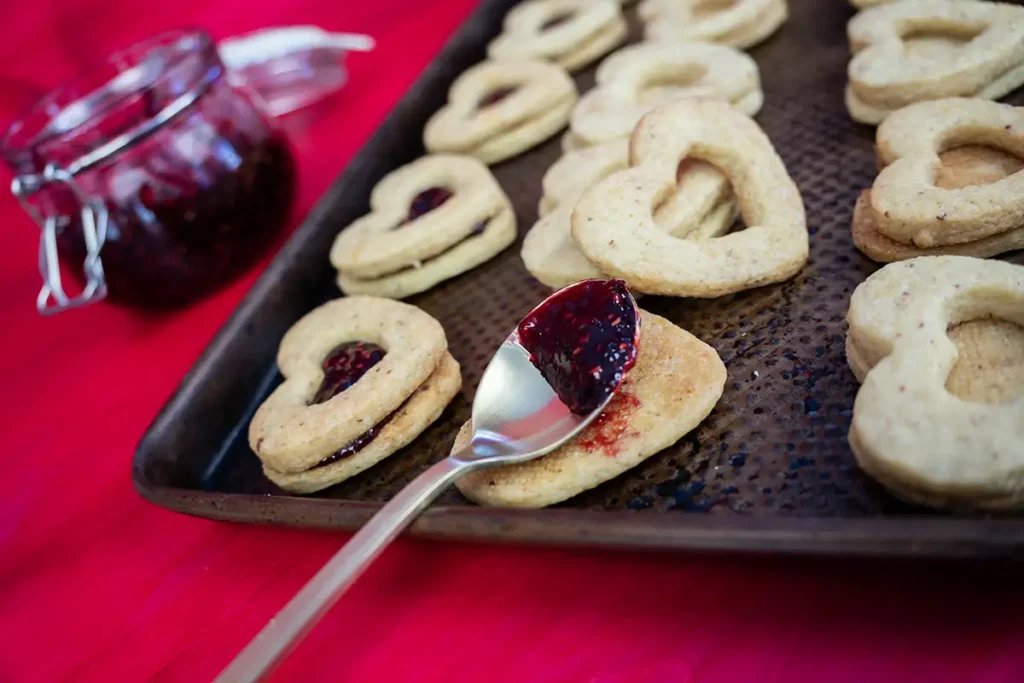
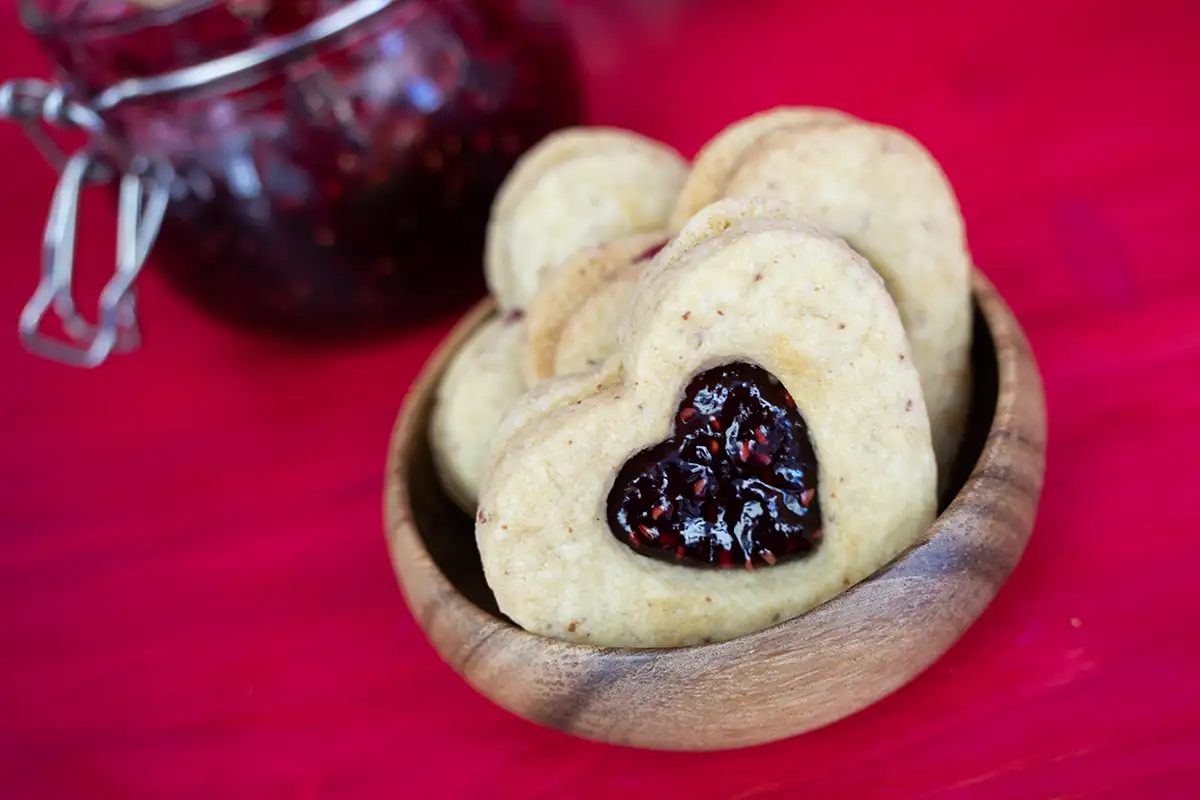
These jam sandwich cookies make the perfect gift for any holiday, but I especially love cutting them into windowed hearts and filling them with raspberry jam for Valentine’s Day. Two cookies made with browned butter and sourdough discard are sandwiched together around homemade or store-bought jam for a rich, buttery, and delicious treat you’ll want to include in all your holiday cookie boxes!
Some links in this post may be affiliate links. Read my disclosure policy.
Jump To:
Why You’ll Love This Recipe
Are you looking for an easy-to-make yet delicious cookie to add to your holiday treat boxes? These sourdough jam sandwich cookies are the perfect choice! They also use up lots of sourdough discard so none of your precious starter goes to waste. And the best part? You can fill them with anything you like, from store-bought jams and spreads like Nutella or cookie butter. And there’s no better way to use that special homemade jam you’ve been saving! You can also cut them into any shape to suit a variety of holidays. These cookies are as versatile as they are delicious, so you’ll want to bookmark this recipe!
This recipe was adapted from Sarah Kieffer’s recipe for Cut Out Cookies, from her book 100 Cookies. She is one of my all-time favourite cookbook authors—her recipes are always delicious and turn out perfectly! I tested several versions to modify her original recipe to use sourdough discard, but the main changes I made was to brown the butter and substitute the whole egg with two egg yolks. Both of these modifications remove liquid from the recipe to accommodate for the water in the sourdough discard so that the resulting dough maintains the right consistency.

Ingredients You Need for Jam Sandwich Cookies & Why
- Unsalted butter is the best choice, because it allows you to control the salt content in the cookies. It adds richness to the cookies, and because the butter gets browned first, it adds loads of nutty and intensely buttery flavour too. Browning butter also removes its water content, which means you’re able to add a lot more sourdough discard to the recipe than you otherwise could.
- Unrefined coconut oil makes the cookies softer and less prone to drying out.
- Granulated sugar not only sweetens the cookies, but also promotes browning.
- Egg yolks make the cookies soft and rich. This kind of cookie recipe would typically use a whole egg, but egg whites have a lot of water in them. Leaving the whites out removes water content from the recipe, meaning that even more sourdough discard can be used.
- Vanilla extract adds a deep complex flavour to the cookies. Artificial vanilla is OK in a pinch, but use pure vanilla extract if you can afford it—the flavour will always be superior.
- Sourdough discard adds flavour and softness to the cookies. You can use either discard or active starter. If you don’t already have one, follow this tutorial for how to make a sourdough starter from scratch.
- All-purpose flour gives the cookies their structure. It has a medium gluten content, so the cookies are strong enough to hold jam but without being too tough.
- Fine sea salt rounds out all of the flavours. Without salt, these cookies would taste bland so don’t skip it!
- Baking powder & baking soda work together make the cookies rise. The sourdough discard is used only for flavour and texture in this recipe, not for leavening.
Tips for Success
- While you can roll the dough immediately after mixing, it’s easier to handle if you chill it in the fridge for at least an hour (and up to 2 days) first. Let it come up to room temperature for 5-10 minutes to soften just a bit before rolling.
- Using an adjustable rolling pin like this one makes it easy to roll your cookies to a perfect even thickness.
- Choose how thin to roll the cookies based on the texture you’d like. Thinner cookies tend to be more crisp, while thicker cookies are more tender. I like my jam cookies on the tender side, so I rolled these to ¼” (6 mm) thick.
- After cutting your cookies and arranging them on baking sheets, either chill them in the fridge for 1-2 hours or in the freezer for 20-30 minutes before baking. This prevents spreading and helps the cookies keep their shape.
- Using a perforated baking mat like this one helps steam to escape evenly from the cookies during baking, and prevents spreading. You’ll find it useful for lots of baking projects from eclairs to tarts, so it’s well worth the investment!
How to Make Jam Sandwich Cookies with Sourdough Discard
Step 1
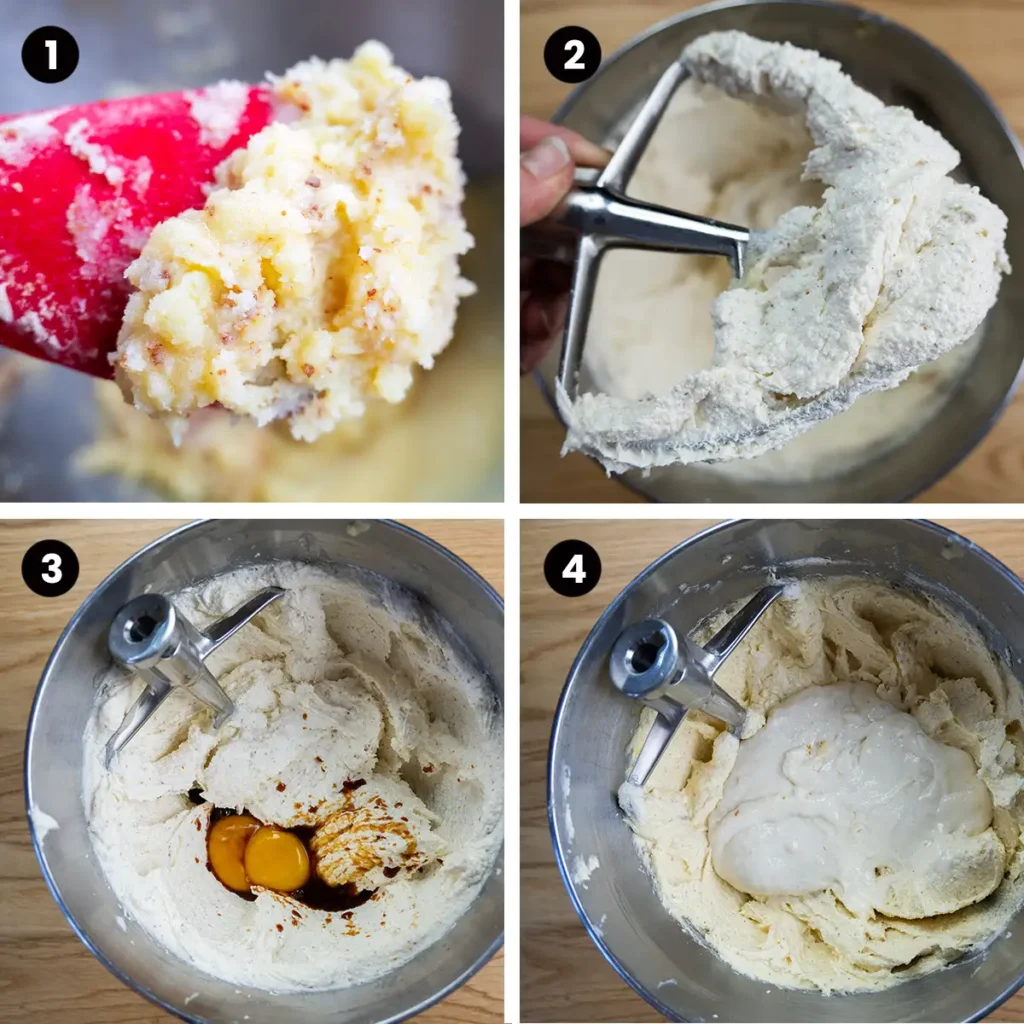
Brown the butter. Cut it into roughly 2″ (5 cm) chunks and put them in a light-coloured heavy-bottomed pan. Melt over low heat, then increase the heat to medium or medium-low. Stir constantly as the butter heats up. The butter will sputter and foam as its water content evaporates, and eventually the milk solids will sink to the bottom and turn a deep golden brown. This will take about 5 minutes. Keep a close eye on it the entire time—you can go from a delicious brown butter to a ruined burnt butter in just a few seconds. As soon as you see brown flecks in the butter and it smells nutty, take the pan off the heat and pour the browned butter into the bowl of a stand mixer (or a large bowl, if using a hand mixer). Make sure to scrape out all of the brown bits from the bottom of the pan into the mixing bowl—they’re full of flavour! Let the butter cool at room temperature until it’s almost solidified but still pliable. Read more about how to brown butter here.
Step 2
Add the coconut oil and sugar. Using the paddle attachment, beat on medium-high speed until fluffy and very pale yellow, about 5 minutes. Use a rubber spatula to scrape down the bowl and paddle at least once midway through mixing.
Step 3
Add the egg yolks and vanilla, and mix on medium-low until combined.
Step 4
Give the mixing bowl another scrape with the rubber spatula, then add the sourdough discard and mix again until combined. Add the flour, salt, baking powder, and baking soda, and mix on low just until combined. Be careful not to over-mix or your cookies could turn out tough.
Step 5
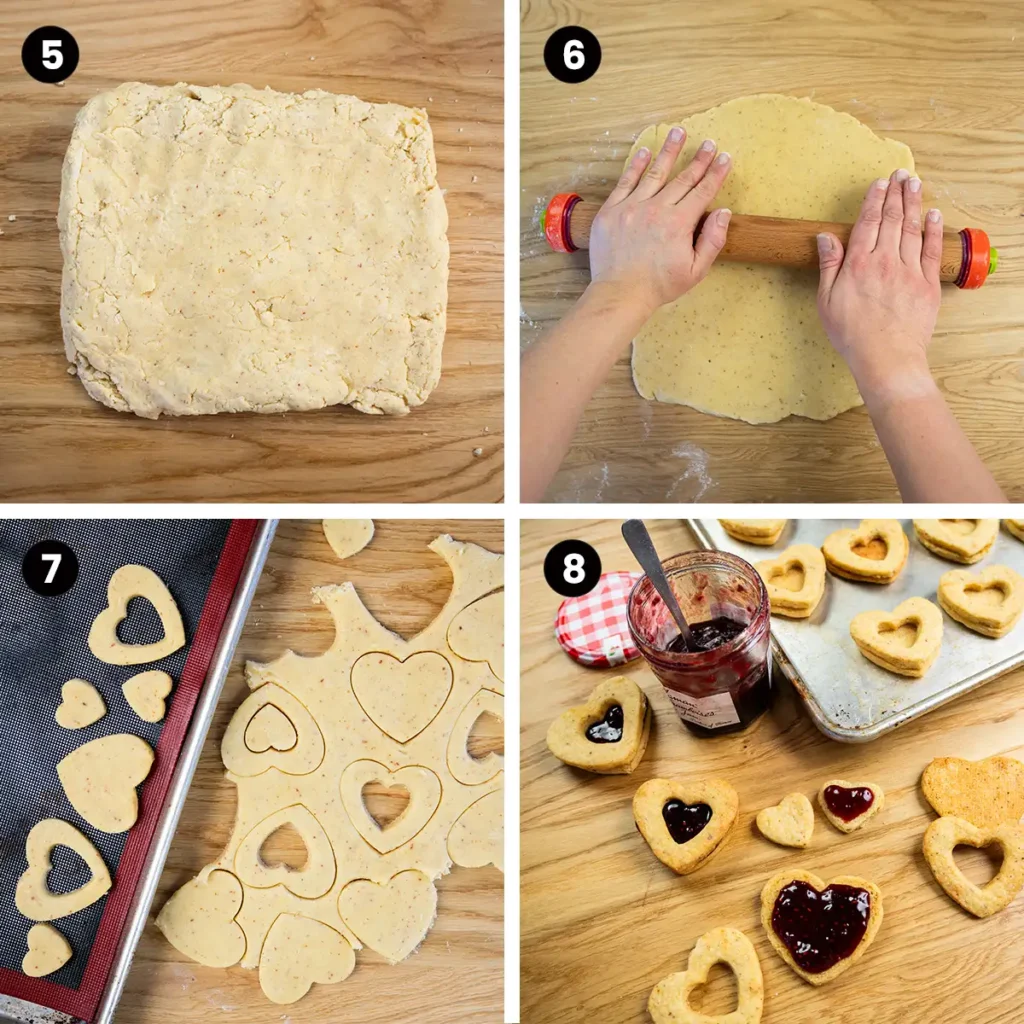
Dump the dough out onto a clean work surface, and use your hands to pat it into a rectangle. Divide the dough into two roughly equal pieces and wrap them in plastic wrap. Chill in the fridge for at least 1 hour and up to two days.
Step 6
Take one of the portions of dough out of the fridge, and let it warm up at room temperature for about 5 minutes. Lightly flour your work surface, and roll it out to between ⅛” and ¼” (3 – 6 mm). The thinner the dough, the crisper the cookies will be. Personally, I like mine a little softer so I rolled it to ¼” (6 mm). I use this adjustable rolling pin to make sure all of my cookies are rolled perfectly to the same width. It comes with removable discs you can put on each end to roll to different thicknesses.
Step 7
Use cookie cutters to cut shapes out of the dough as closely together as possible, and carefully transfer them to a lined baking sheet leaving at least ½” (1.25 cm) between each cookie. You can cut windows out of half of the cookies if you want the jam to peek through! Save your scraps for re-rolling. For the baking sheet, you can use either parchment paper or a silicone baking mat. But my favourite thing to use is a perforated baking mat like this one. The little holes allow steam to escape from the cookies evenly while they bake, which prevents them from spreading.
Cover your baking sheet(s) with plastic wrap or a reusable baking sheet cover. Chill the cut out cookies in the refrigerator for at least 1 hour or in the freezer for at least 20 minutes to help the cookies keep their shape while baking. When ready to bake, preheat the oven to 350˚F (180˚C). Bake the cookies one sheet at a time for 12-16 minutes or until a little bit puffy and golden around the edges. A shorter bake time will give you softer cookies, while a longer bake time will give you crisper cookies.
Step 8
Let the cookies cool on the baking sheet for about 10 minutes, then transfer to a wire rack to cool completely. Match pairs of cookies that are about the same size. If you cut windows out of half of the cookies, make sure you pair a solid bottom cookie with a windowed top cookie. Use a spoon to spread some jam, Nutella, cookie butter, or other spread onto the bottom cookie, leaving a border of about ¼” (6 mm) around the edge. Gently press the top cookie on, and enjoy!

How to Store and Make Sourdough Jam Sandwich Cookies Ahead
There are lots of options for storing the cookies at almost any point in the process:
- Before rolling and cutting: Wrap the dough tightly in plastic wrap and place in a ziploc bag. Refrigerate for up to 2 days, or freeze for up to 3 months. Let the dough warm up at room temperature until it is pliable enough to be rolled, and proceed with the recipe.
- After rolling and cutting, but before baking: Arrange the cookies on a lined baking sheet, cover with plastic wrap or a reusable baking sheet cover, and freeze until the cookies are solid (about 2 hours). Transfer the cookies to a freezer bag and store in the freezer for up to 3 months. When ready to bake, arrange the cookies on a lined baking sheet and bake straight from the freezer. You may need to add 1-2 minutes to the bake time.
- After baking, but before filling: Let the cookies thaw out at room temperature, pair like-sized cookies together and fill with jam.
- After baking and filling: You can leave these cookies at room temperature for anywhere from a few hours to a few days, depending on what kind of filling you used. Use your judgment! Transfer any leftovers to an airtight container and refrigerate for up to 3-5 days.

Variations on Sourdough Jam Sandwich Cookies
These cookies are so easy to customize to different flavours! Here are a few ideas:
- Zest a lemon, lime, or other citrus fruit. Rub the zest into the granulated sugar to release its oils, then add the sugar to the solidified browned butter and cream together. Citrus zest pairs very well with lots of fillings. Imagine a lemon zest cookie paired with blueberry jam, or an orange zest cookie paired with Nutella! There are lots of possibilities here, so have fun experimenting!
- Add about a teaspoon of ground cinnamon to the dough when adding the flour, and fill with cookie butter for some cozy fall vibes.
- Add about a teaspoon of extract to the dough along with the vanilla extract. Almond, lemon, or orange extract would be particularly nice!
Sourdough Jam Sandwich Cookies
Ingredients
Method
- Brown the butter: Cut 340 g unsalted butter into chunks roughly 2" (5 cm) in size. Put them in a light-coloured frying pan or skillet, and melt on low heat.
- Once the butter is completely melted, increase the heat to medium or medium-low. Keep heating the butter while stirring constantly until you see brown flecks in the butter and it smells nutty. Remove the pan from the heat, and pour the butter into the bowl of a stand mixer or a large mixing bowl, making sure to scrape out all of the brown bits on the bottom of the pan—that's where all the flavour is!
- Cream the butter and sugar. Let the butter cool at room temperature until it's almost solid. Add 42 g unrefined coconut oil and 350 g granulated sugar. Using a hand mixer, or the paddle attachment on a stand mixer, mix on medium speed until very light and fluffy (about 5 minutes).
- Continue mixing. Add 2 large egg yolks and 1 tbsp. pure vanilla extract, and mix until combined. Add 200 g sourdough discard and mix again until combined.
- Add dry ingredients. Add 470 g all-purpose flour, 1 tsp. fine sea salt, ¾ tsp. baking powder, and ¼ tsp. baking soda and mix on low speed just until combined.
- Tip the dough out onto a clean work surface, and use your hands to pat into a rectangle. Divide into two roughly equal pieces and wrap in plastic wrap. Refrigerate at least one hour and up to two days.
- Roll. Remove one portion of dough from the fridge, and leave at room temperature to warm up for 5-10 minutes. Dust your work surface and rolling pin with a little bit of flour, and roll to ⅛" and ¼" (3 – 6 mm) in thickness. Thinner if you prefer a crisper cookie, and thicker if you like a softer cookie.
- Cut out. Use cookie cutters to cut into any shapes you like. Remember that you will need tops and bottoms that fit together, so a symmetrical cookie cutter such as a circle, star, or heart is the best choice. You can cut windows out of half of the cookies if you want the jam to peek through. Save the scraps for re-rolling.
- Carefully transfer the cookies to a baking sheet lined with parchment paper, a silicone baking mat, or a perforated baking mat. Leave at least ½" (1.25 cm) between each cookie. Cover the baking sheet(s) with plastic wrap or a reusable baking sheet cover, and chill in the fridge for at least 1 hour or in the freezer for at least 20 minutes to help the cookies keep their shape in the oven.
- When ready to bake, preheat the oven to 350˚F (180˚C). Bake one sheet at a time for 12-16 minutes. A shorter baking time will result in a softer cookie, while a longer baking time will give you a crisper cookie.
- Let the cookies cool on the baking sheet for 5-10 minutes, then transfer to a wire cooling rack to cool completely.
- Pair similar-sized cookies together. If you cut windows out of half of the cookies, make sure to pair a windowed top with a solid bottom. Use a small spoon to carefully spread some jam or other filling onto the bottom cookie, leaving an unfilled border of about ¼" (6 mm) around the edge. Place the top cookie over the jam, matching it with the bottom cookie, and carefully press together. Enjoy!
- Storage: Cookies can be left at room temperature for anywhere from a few hours to a few days, depending on what filling you used. Use your judgement to decide when to transfer the cookies to an airtight container and store in the refrigerator.
Leave a Reply