Think you know apple pie? Think again. This miso caramel apple pie takes a classic dessert to a whole new level with a delicious brown butter crust and a deeply flavourful apple filling. Try this recipe, and I bet you’ll never make another apple pie without miso!
Some links in this post may be affiliate links. Read my disclosure policy.
Jump To:
- Prefer to Watch Instead of Read?
- What is Miso, and Why Use It in Apple Pie?
- Ingredients You’ll Need
- Pro Tips for an Amazing Miso Caramel Apple Pie
- How to Make Miso Caramel Apple Pie Step-by-Step
- Avoiding the Dreaded Soggy Bottom
- Serving
- Let’s Talk Apples: Choosing the Best Varieties for Pie
- Tips for Making Ahead
- FAQs
- Miso Caramel Apple Pie with Brown Butter Crust
Prefer to Watch Instead of Read?
What is Miso, and Why Use It in Apple Pie?
Miso is a traditional Japanese food, made from fermented soybeans, salt, and koji (a fungal culture grown on rice and barley). Though it’s rich in umami, miso isn’t just for savoury dishes. It can add amazing depth of flavour to desserts, too. In Japanese cooking, there’s a concept called kakushi aji, or “hidden flavor.” It’s all about adding something that subtly makes the dish taste better without you even noticing it.
That’s exactly the role miso plays in this apple pie. It has a delicious umami flavour that makes the caramel richer, brightens the apples, and just kicks the whole pie up several notches—all without making the pie taste noticeably like miso at all. Since I started testing this recipe, it has honestly become my new favourite pie (apple or otherwise) and one that I’ve already baked several times this fall!
Ingredients You’ll Need
For the Brown Butter Pie Crust
- Unsalted butter. Since it gets browned before being used in the crust, it can come straight from the fridge. Using unsalted butter lets you control how salty the crust is. If you want to use salted butter just reduce or omit the salt called for in the recipe.
- All-purpose flour. Use unbleached if you can.
- Salt enhances the flavour of the crust. I like to use fine sea salt, but kosher salt will work great too.
- Water is used in the crust in two ways. Some gets added to the butter to replace the water lost during the browning process, and ice cold water is added to hold the crust together.
- An egg yolk adds richness as well as some strength. This tends to be a very delicate crust, so that extra binding power is very helpful!

For the Miso Caramel
- Miso is a fermented Japanese soybean paste. It is rich in umami and adds an unbelievable depth of flavour to the caramel. I like to use white miso, which is milder. You can use red miso if you want a bolder flavour.
- Granulated and brown sugars caramelize when heated to add flavour to the sauce. Brown sugar adds some flavour complexity thanks to its molasses. You can use dark or light brown sugar. You can even play with the sugar proportions or use all white or brown sugar—just keep the overall weight of sugar the same.
- Heavy cream (AKA whipping cream) adds richness to the caramel, gives it a pourable consistency, and its proteins help stabilize it.
- Butter adds a velvety richness to the caramel sauce.
- Vanilla adds a deep warm flavour that rounds everything out. You can use either extract or vanilla bean paste.
For the Apple Pie Filling
- Apples, of course! Use a mix of tart, firm, and sweet varieties to add flavour and texture contrast to the filling. Or you can use whatever apples you have on hand! See below for more on how to choose the best apples for your pie.
- Cornstarch absorbs juices from the apples as they cook and helps hold the filling together.
- Ground cinnamon is a must, it just wouldn’t be apple pie without it! Try making some homemade smoked cinnamon if you’re up to a challenge, otherwise regular ground cinnamon will do just fine!
- Lemon juice balances the sweetness of the filling and prevents the apples from browning in the air.
- Miso caramel sauce makes the apple filling taste absolutely sublime!
Pro Tips for an Amazing Miso Caramel Apple Pie
- Keep everything cold for the best, flakiest pie crust. Flaky pie crust happens when the water content in butter turns to steam in the oven, but that only works if the butter is still solid and in the crust while it bakes. If the butter melts out of the crust or melts into and combines with the flour, your crust will end up dense and tough. So it’s important to use ice water, make sure your browned butter chills and solidifies completely, chill the dough after rolling, and pop the dough or pie in the fridge at multiple stages of the process. This is especially important if your kitchen is warm!
- Add just enough water to the crust to hold it together. At the end of mixing, it should still look rough and shaggy. The flour will finish hydrating while it rests in the fridge. Adding too much water will activate too much gluten and lead to a tough and chewy crust. The excess water will also steam out of the crust while baking, which could cause the crust to shrink.
- Add the miso and vanilla to the caramel off the heat to preserve as much of their flavour as possible.
- Press the crust completely into the pie plate to avoid air pockets that can prevent the crust from baking properly.
- Bake at a high temp first to let the crust bake up nice and flaky (the butter needs a blast of heat to turn its water content into steam), then reduce the temperature to finish baking the filling all the way through without burning the crust.
- If your crust is browning too quickly, cover it with foil while the pie finishes baking. You can cover just the edges if that’s what is browning too fast, or cover the entire top.
How to Make Miso Caramel Apple Pie Step-by-Step
I recommend making the recipe in this order to make the most efficient use of your time. Most of these steps can be done at least a day or two in advance so you can easily spread the work out over several days.
- Brown the butter. The brown butter will need to spend a few hours in the fridge to solidify completely, before it can be used to make the crust. You can make it several days ahead and keep it in the fridge.
- Make the miso caramel. It needs to be made before you can make the pie filling, but it doesn’t need to be cooled down first. You can make it up to a couple weeks ahead.
- Make the apple pie filling. It needs to cool down completely before it can be used in the crust. It can be made up to two days ahead.
- Make the brown butter pie dough. Once your brown butter has solidified, you can use it to make the pie dough. After mixing, it will need at least two hours to chill in the fridge. This chill time is important to let the flour hydrate completely, relax the gluten, and keep the butter cold.
- Assemble the pie. Now that all the components are ready, you can put the pie together!
Brown the Butter
- Brown the Butter. Add the butter to a large saucepan and melt over medium heat. Continue heating while stirring and scraping the bottom, until you see brown bits on the bottom and the butter smells almost like toasted nuts. Take it off the heat. Learn more about how to make browned butter here.
- Put a heatproof bowl on a scale and tare it to zero. Weigh the browned butter and add enough water to bring it back up to 285 grams. The butter’s water content gets lost during the browning process—it’s important to bring it back so the pie crust puffs up nicely in the oven.
- Refrigerate for about an hour or until the fat is starting to solidify but is still soft, then whisk it together with the water. Return it to the fridge until it’s completely cold and solid, about 2–3 hours more.
Make the Miso Caramel
- Take about 2 tablespoons of the measured heavy cream and whisk it into the miso paste to loosen it up. Miso paste has a tendency to be clumpy, so this helps it combine smoothly into the caramel later.
- Add the butter and sugars to a medium saucepan. Melt the butter into the sugars over medium heat until everything starts bubbling gently. You don’t need to start caramelizing the sugar yet, the idea is to get everything smoothly combined.
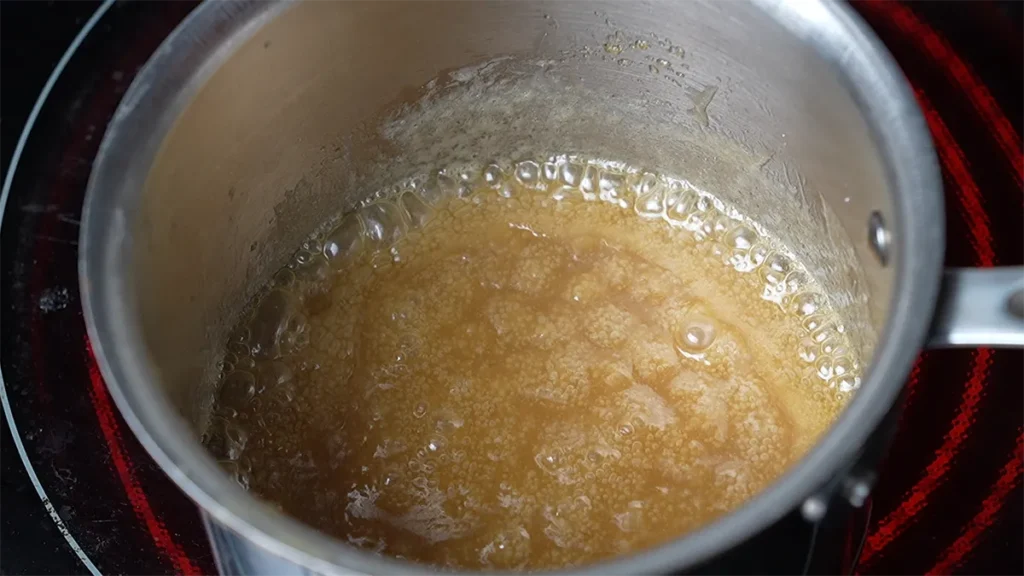
- Carefully add the heavy cream (it might bubble and sputter if your mixture got very hot) and stir to combine. Continue heating until the mixture is bubbling vigorously and is slightly thickened, about 5–6 minutes more.
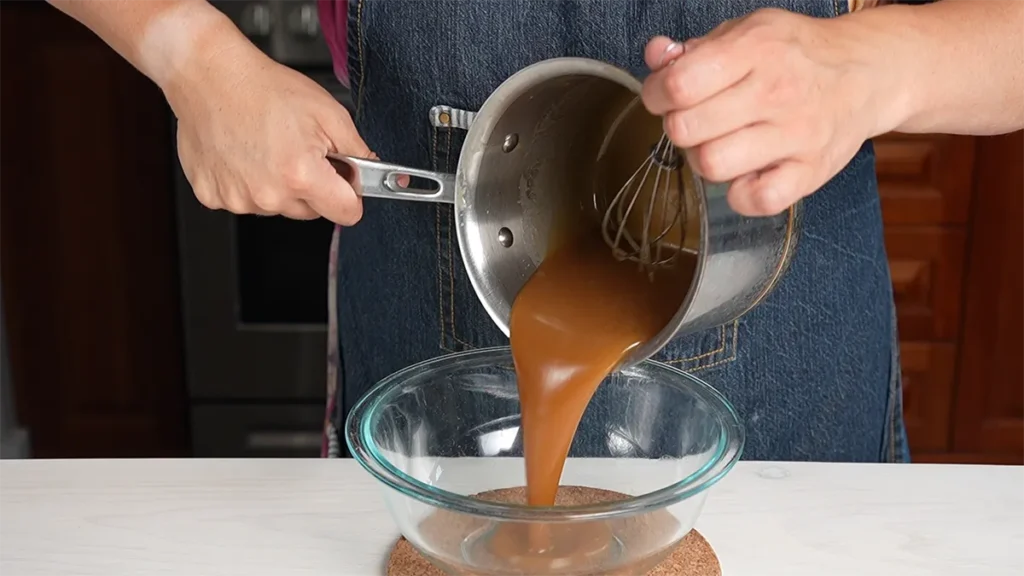
- Take it off the heat and whisk in the miso and vanilla extract. You can leave it in the pot if you want to, but I like to transfer it to a heatproof bowl or container to cool down a little to thicken up and make it easier to handle. The recipe makes a lot of caramel so you can add as much as you want to the apple pie filling, and have plenty left over for drizzling over your pie slices for serving. The caramel keeps in the fridge for up to 2 weeks.
Make the Apple Pie Filling
- Peel, core, and chop the apples. I love using a variety of apple varieties in my filling, though I’ll often just use whatever I have on hand. It’s up to you how large to cut the pieces depending on what texture you want in your pie. Larger apple chunks will tend to hold their shape better after baking (though this also depends on the type of apple), and smaller pieces will soften more.
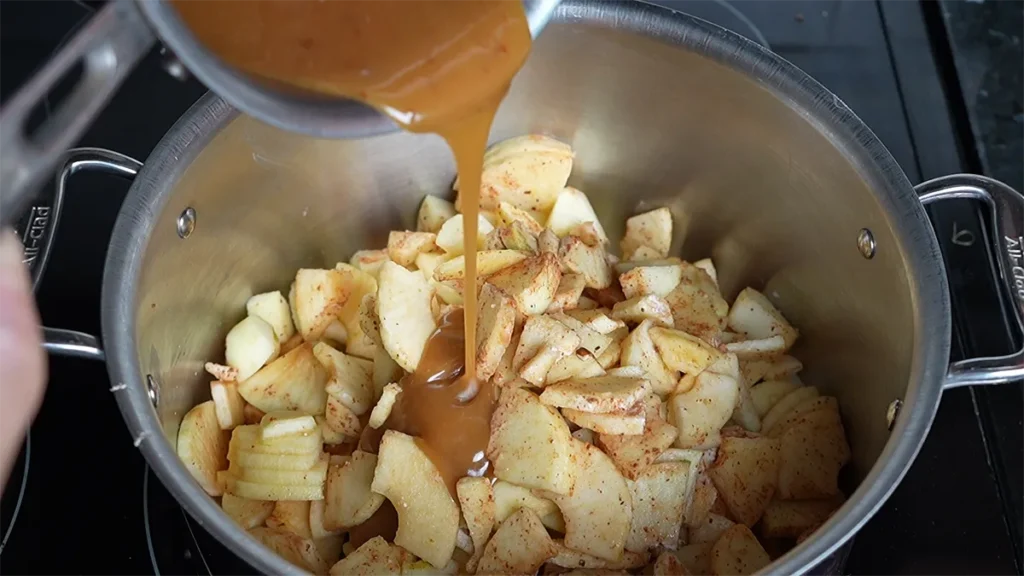
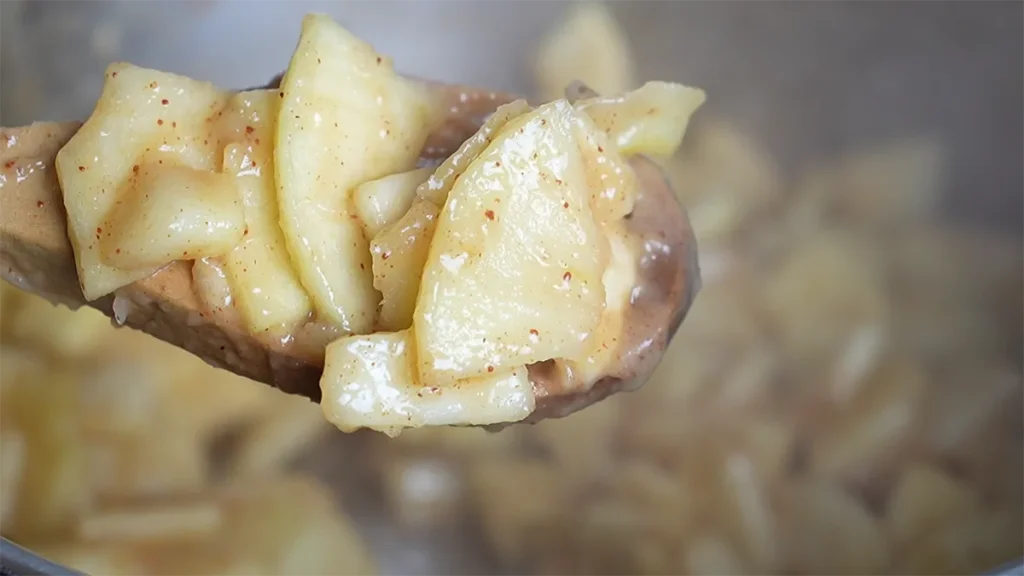
- Put the apple pieces in a large pot, and toss with the lemon juice, cornstarch, and cinnamon. Cook over medium heat while stirring regularly until the apples soften and the mixture has thickened slightly. Transfer it to a shallow heatproof container to cool to room temperature, then refrigerate until chilled completely, about 1–2 hours.
Make the Brown Butter Crust
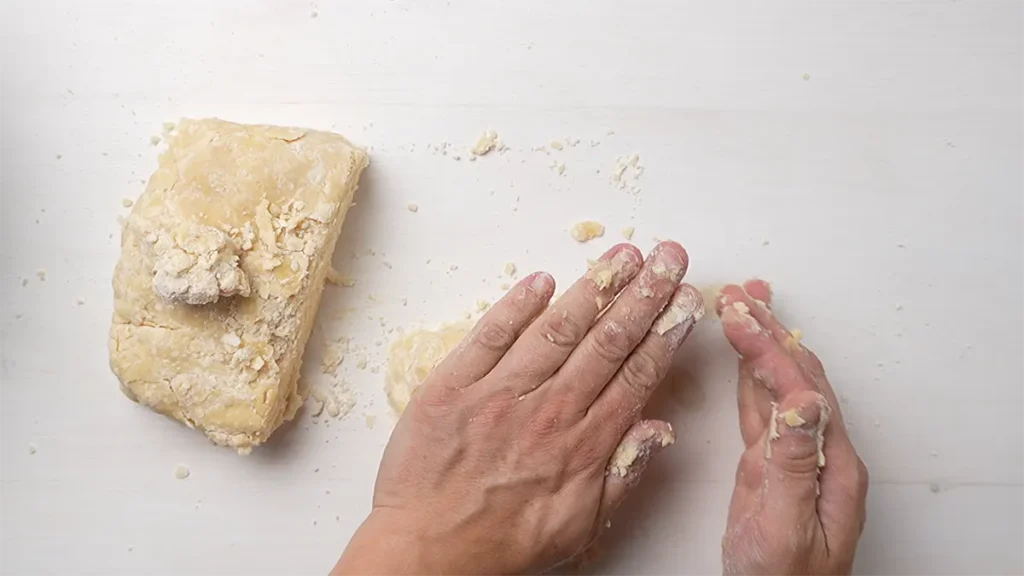
- Whisk together the all-purpose flour and salt in a large mixing bowl. Break the solidified brown butter into chunks and toss in the flour mixture to coat. Work it into the flour with your fingertips or a pastry blender until it mostly resembles bread crumbs with some pieces of butter as large as peas.
- Put the egg yolk in a small bowl and whisk together with 3 tablespoons of ice cold water. Drizzle over the flour and butter mixture and toss it in to evenly hydrate the flour. If needed, add a little more ice water a tablespoon at a time. Add as little water as possible to just bring the dough together, it should still look shaggy and rough at this stage.
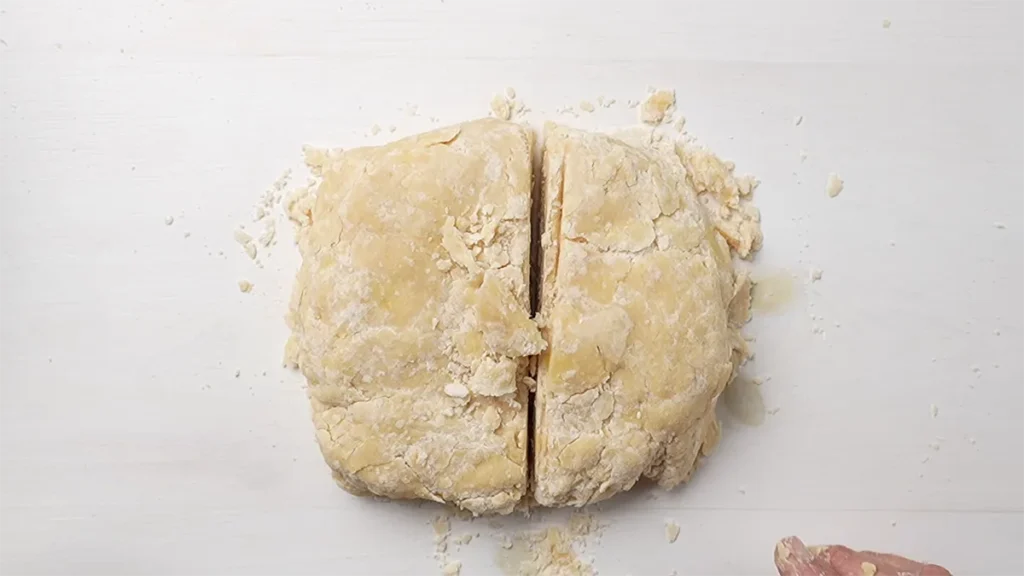
- Gently knead in the bowl to bring together, then tip it out onto your counter. Press it together into a rough square or rectangle. If you like, you can fold it over itself and press the dough back down a few times to get lots of flaky layers in your crust. Divide into unequal pieces: about two-thirds for the bottom crust, and the rest for the top crust. Wrap in plastic wrap and refrigerate for at least two hours before using.
Assemble and Bake
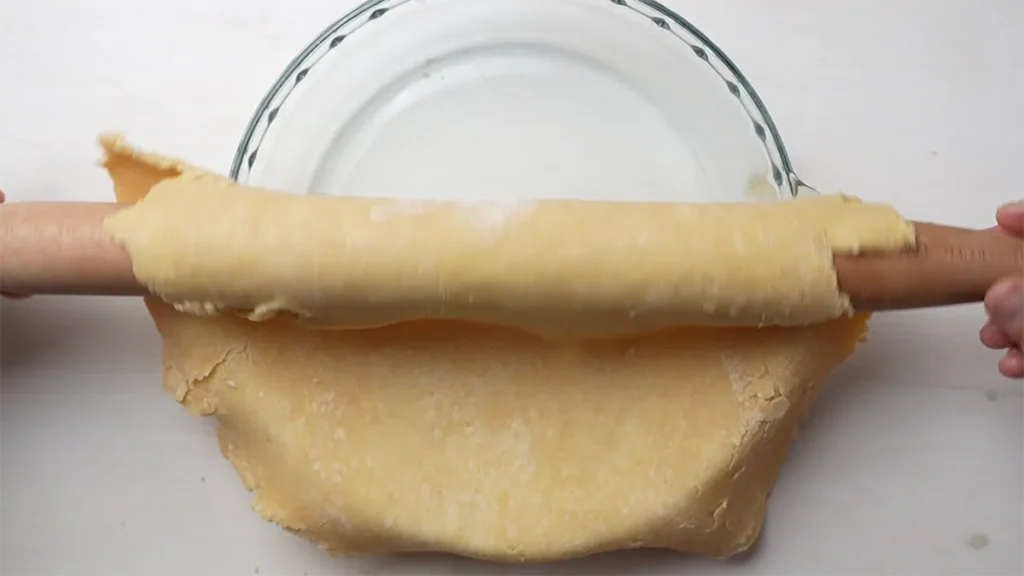
- Roll the larger portion of dough for the bottom crust on a lightly-floured surface until it’s about 2″ (5 cm) larger than your pie plate and about ¼–⅜” (0.5-1 cm) thick. Your pie plate should be 9-10″ (23.5–25 cm) in diameter. Flour the surface of the dough and counter as needed to keep it from sticking. Gently roll the crust onto your rolling pin and drape it over the pie plate.
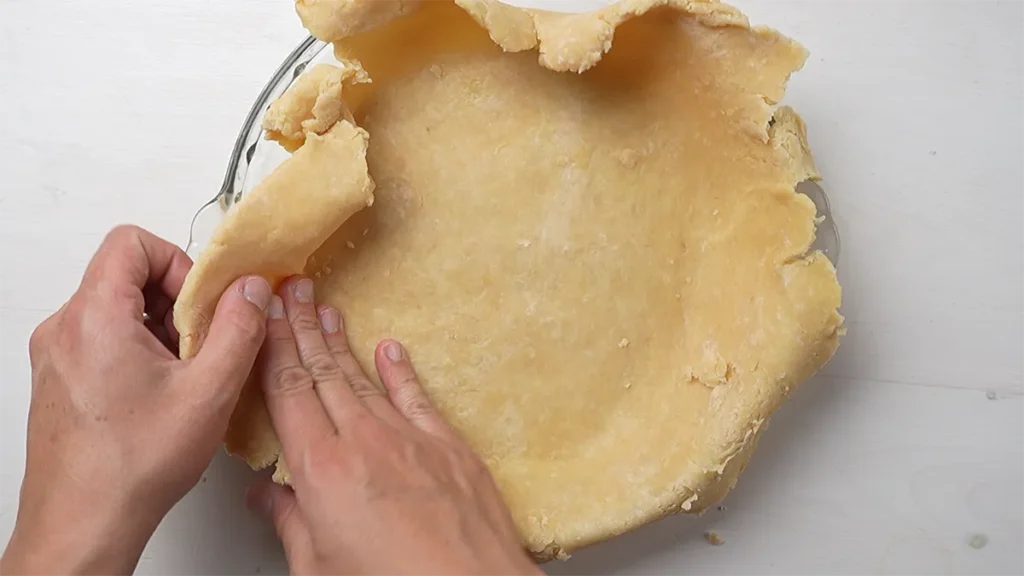
- Gently press the dough completely into the pie plate, making sure to get it right into the corners. This dough is very delicate so it’s likely you’ll have some tearing—just take longer overhanging pieces of dough to patch up any tears or to lengthen shorter areas. You’re aiming to have at least 1″ (2.5 cm) of dough overhanging the edge of the pie plate. Cover with plastic wrap (you can re-use the plastic wrap you used for the pie dough) and refrigerate while you roll out the top crust.
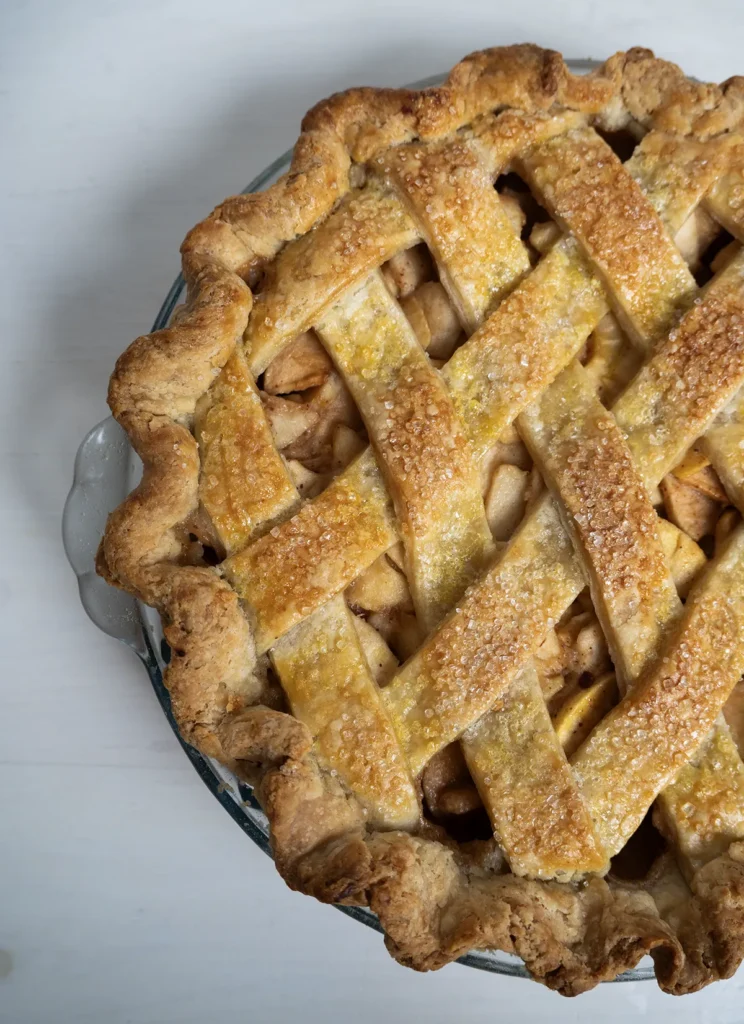
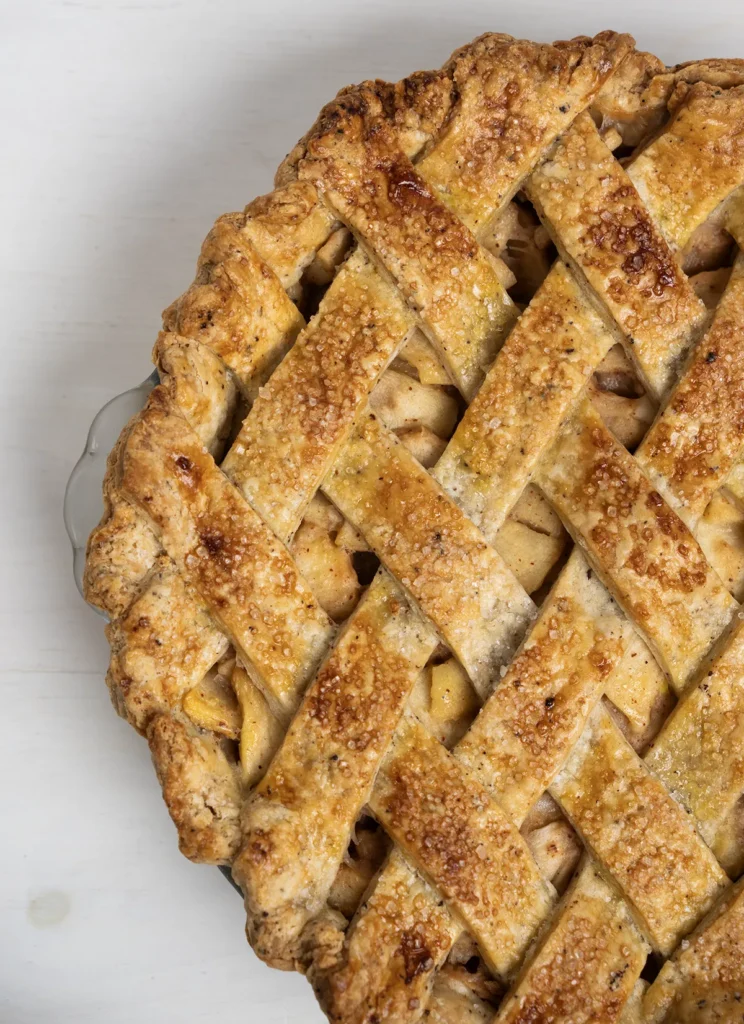
- To roll a lattice top crust, roll the other piece of dough roughly into a rectangle that’s a little bigger than the width of your pie plate and about ¼–⅜” (0.5-1 cm) thick. I like to roll the top crust out on a sheet of parchment paper so it’s really easy to move around without tearing. If your kitchen is warm, chill it for 15-20 minutes to firm up before cutting the strips. Cut the strips however you like—you can have lots of narrow strips, or a few chunky strips, or even mix-and-match strips of different widths.
To roll a plain top crust, roll the other piece of dough roughly into a circle that’s about 1″ (2.5 cm) larger than your pie plate, and about ¼–⅜” (0.5-1 cm) thick. You’ll need to add holes in the top crust to let the steam from the filling vent during baking—you can either use a cookie cutter to cut one or more holes before placing the crust on top, or use a knife to cut a few slits after placing it on top and crimping the top and bottom crusts together. - Fill the pie with the chilled apple pie filling, and use the back of a spoon to even it out.
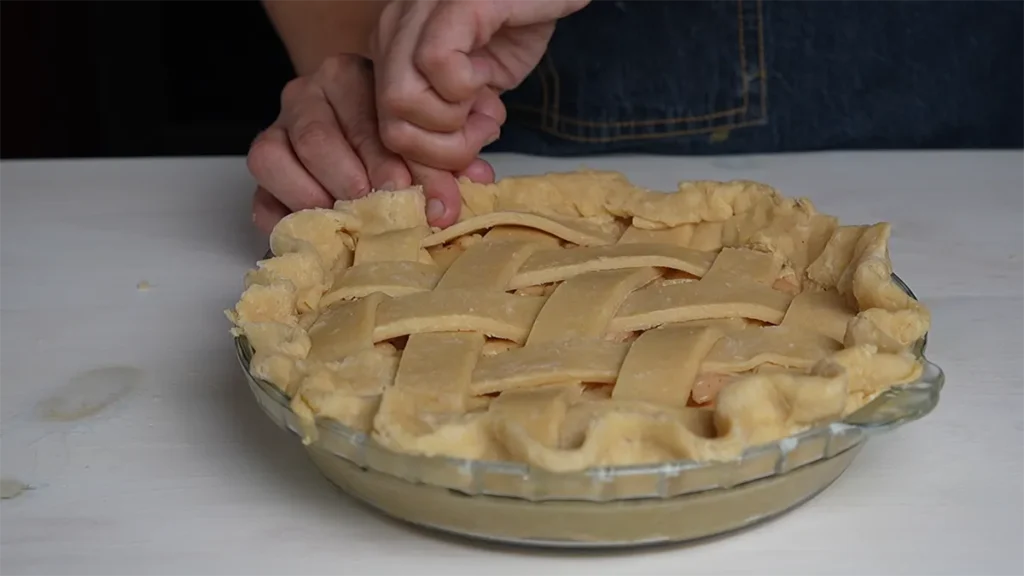
- To make a lattice crust, cross the two longest strips over each other, centered over the pie. Lift up the underlapping strip, place another strip next to it, and put the first strip back down. Continue lifting underlapping strips to place strips next to it until you cover the top of the pie. You can place the strips close to each other or leave gaps depending on what look you’re going for or how many strips you have to work with. Press the lattice strips into the bottom crust and trim evenly so you have about a 1″ (2.5 cm) overhang. Fold the bottom crust over the top crust and crimp between your thumbs and fingers.
To top with a plain crust, place the top crust over the filling and press down so there aren’t any air gaps. If you haven’t cut any holes in the top crust use a knife to cut a few slits as steam vents. Press the edges of the top crust and bottom crust together, and trim evenly for about a 1″ (2.5 cm) overhang. Fold the top crust over the bottom crust and crimp between your thumbs and fingers. - Cover and refrigerate the pie while you preheat the oven.
- Place a rack in the bottom third of your oven. If you have a pizza stone or baking steel, put it in the oven while you preheat it to 425˚F (220˚C). This holds a ton of heat and directs it right at the bottom crust to prevent a soggy bottom. I never get a soggy bottom on my double-crust pies whenever I bake them on my baking steel. Let the baking steel sit in the hot oven for 20–30 minutes so it gets very hot before you put the pie in.
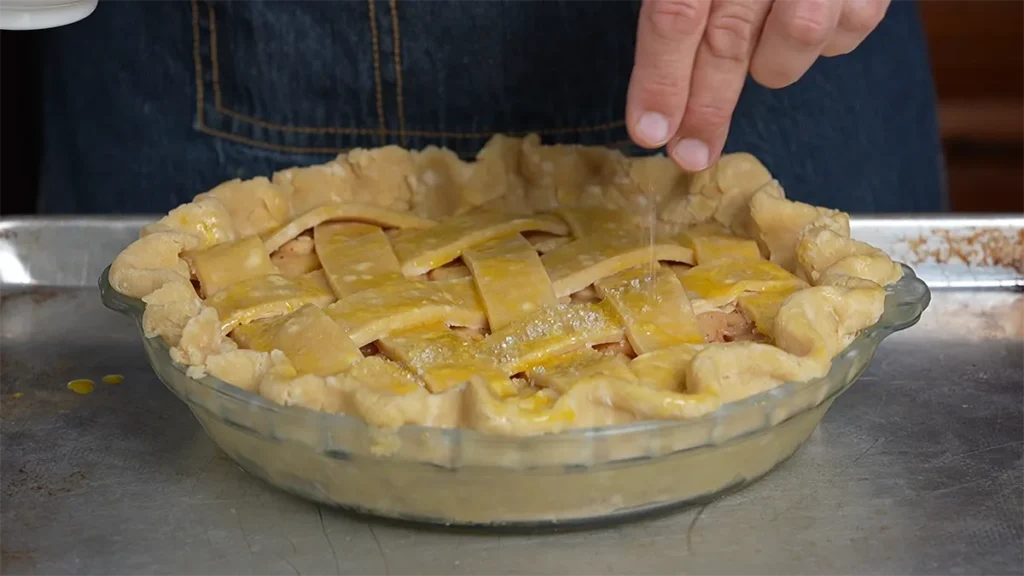
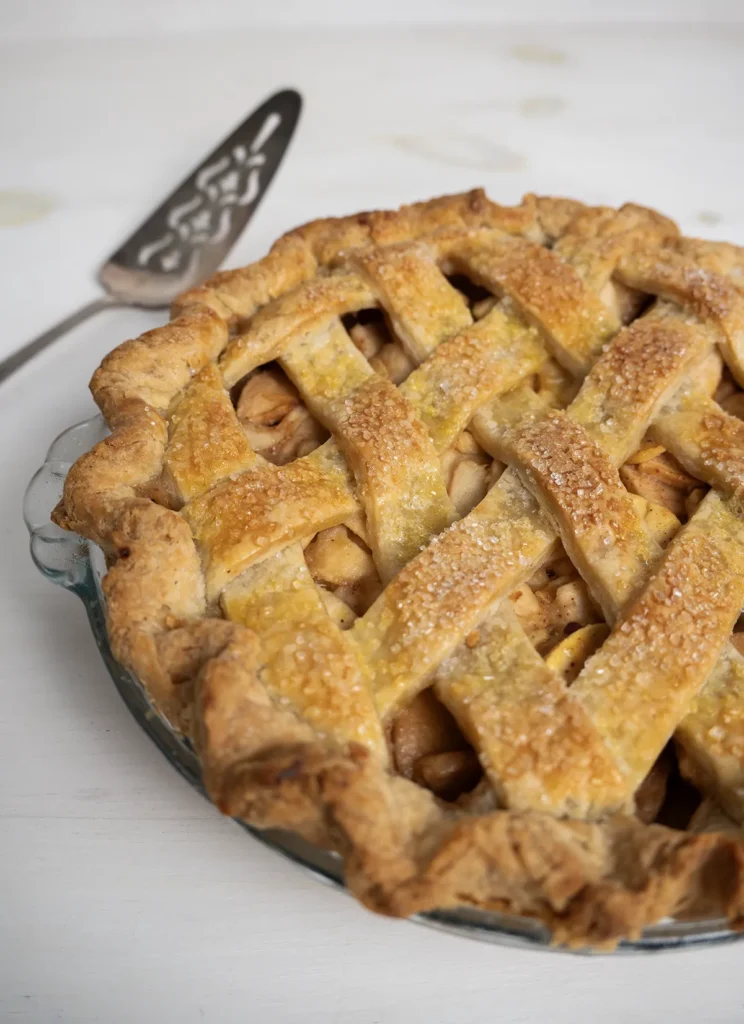
- Brush the top with egg wash, avoiding the crimped edges (egg wash can make the edges brown too quickly). Optionally, sprinkle over the egg wash with coarse sugar for some beautiful sparkle and crunch. Put the pie plate on a baking sheet to catch any drips and prevent smoky oven messes.
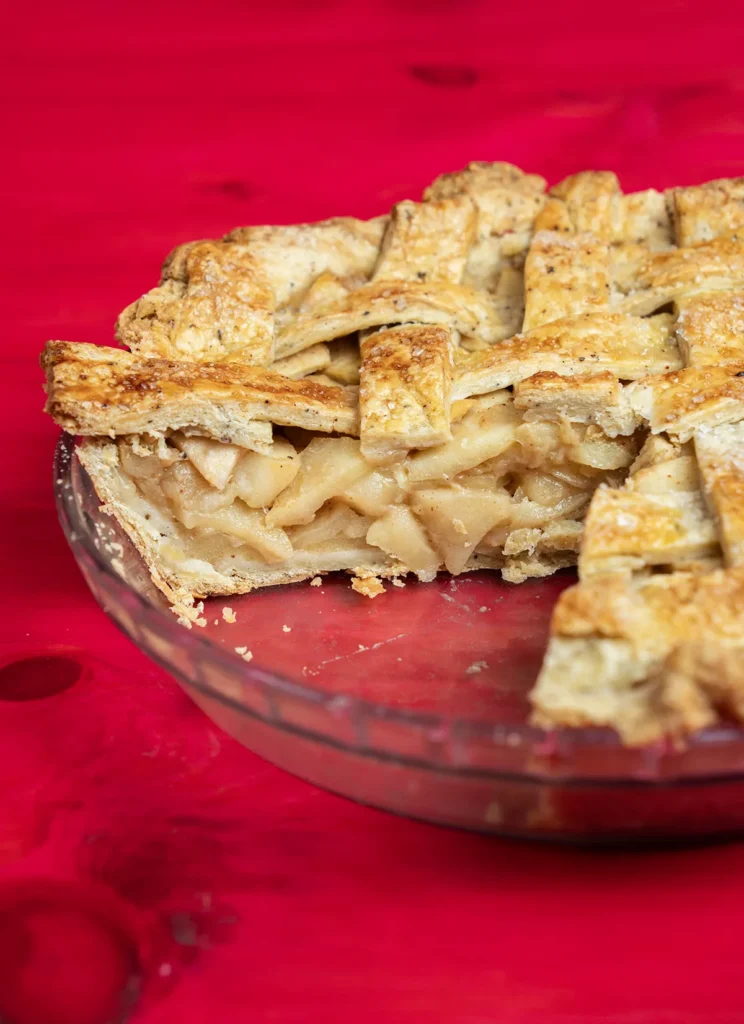
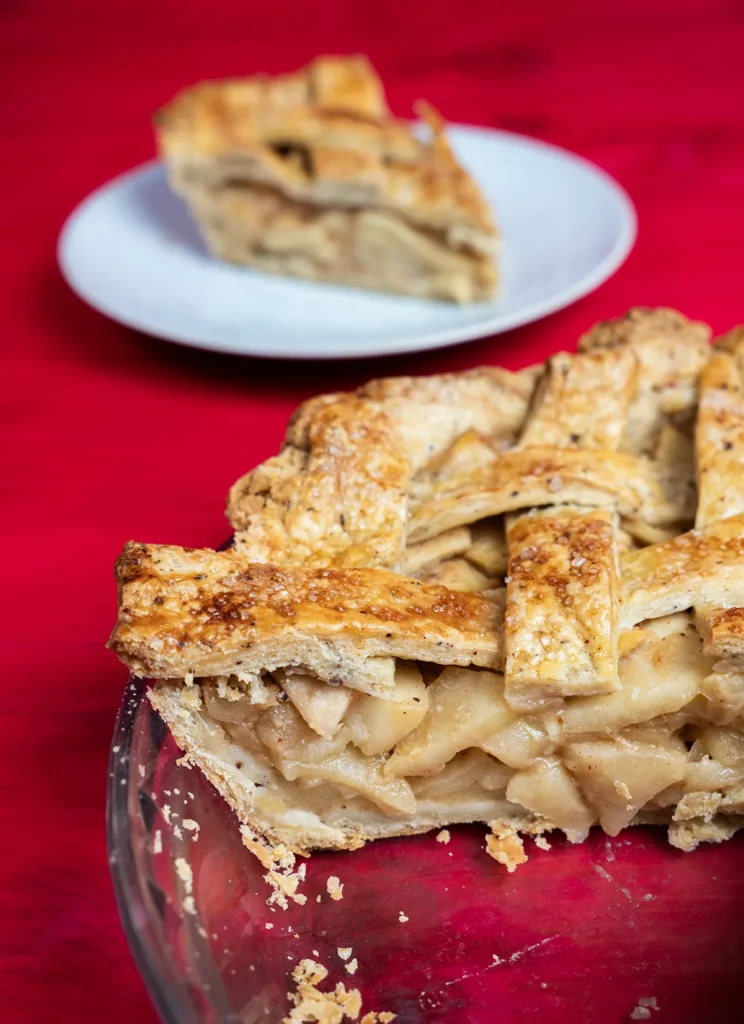
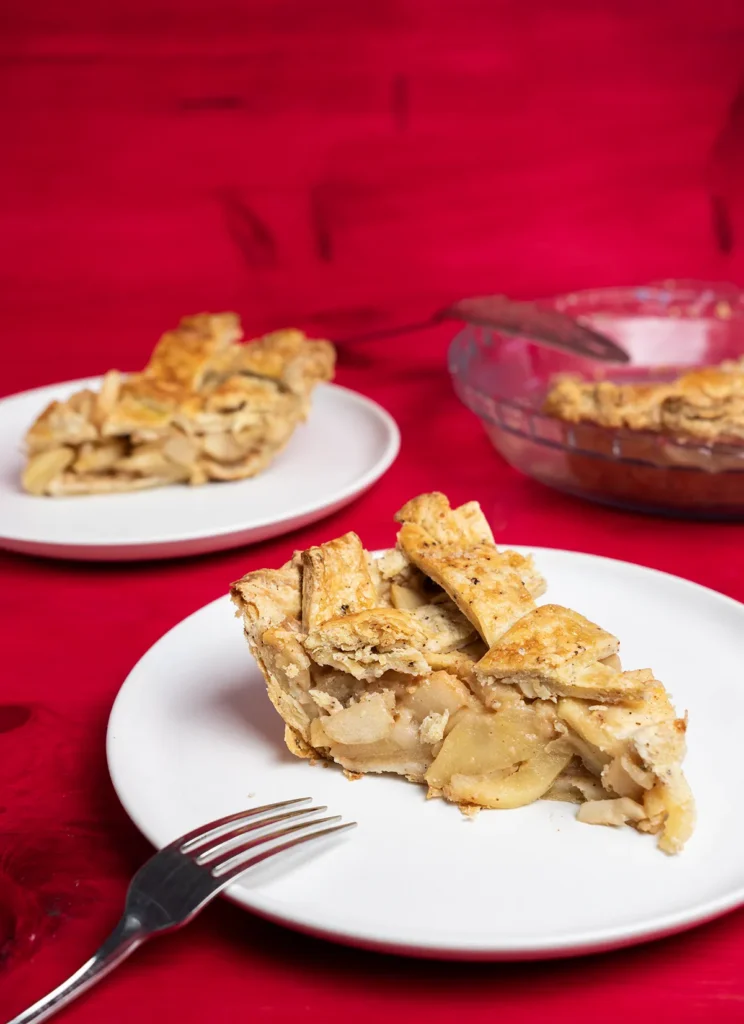
- Bake for 15–20 minutes, then reduce the oven to 350˚F (175˚C) and bake for another 30-40 minutes or until the top crust is golden brown and the filling is baked through. Leave to cool completely to room temperature before slicing. This can take a couple hours, but it’s worth waiting otherwise your pie filling could fall apart.
Avoiding the Dreaded Soggy Bottom
What pie bakers usually do to avoid a soggy bottom is to par-bake their bottom crust. But this isn’t ideal for a double-crust pie. Luckily there are a couple easy things you can do to get a double-crust apple pie with a beautifully-baked bottom crust:
- Pre-cook the apple pie filling to drive off moisture from the apples that could otherwise soak into the crust while baking, and leave you with a soggy bottom. Pre-cooking also slightly shrinks the apples to prevent a gap between the top crust and the top of the filling.
- Use a baking steel or pizza stone. Put it in the oven on the rack you’ll bake your pie on while the oven preheats. Let it sit in the oven for 20-30 minutes after the oven reaches 425˚F (220˚C) so it gets very hot before you put your pie in. Pizza stones and baking steels hold a lot of heat and send that heat right at your bottom crust, ensuring it bakes beautifully crisp instead of sad and soggy.
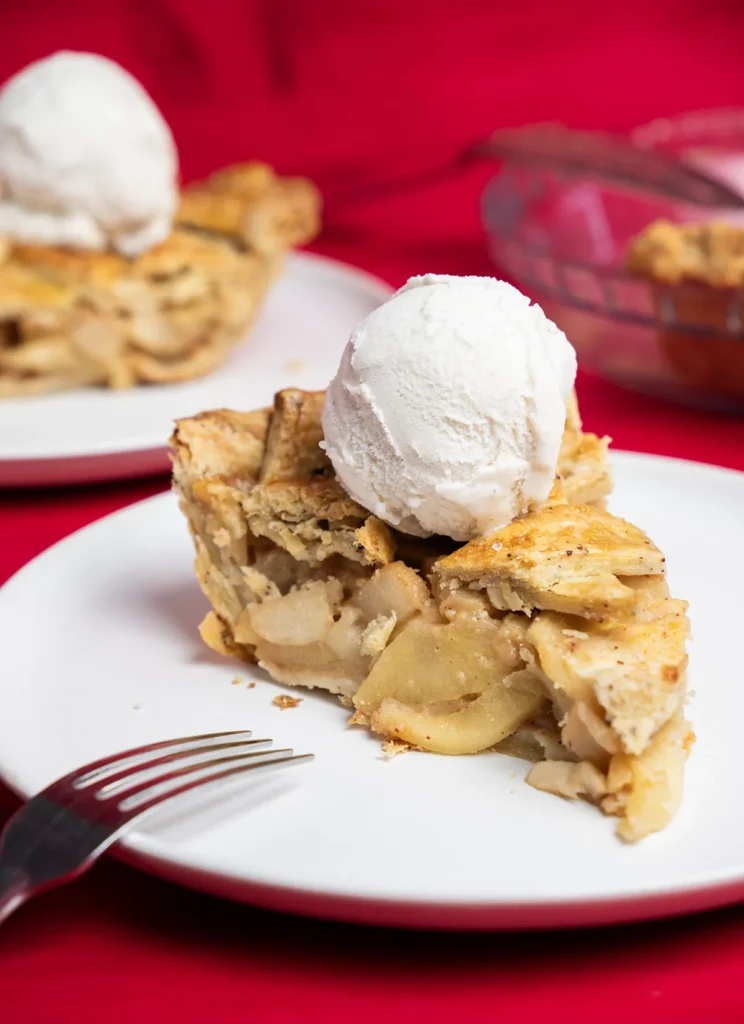
Serving
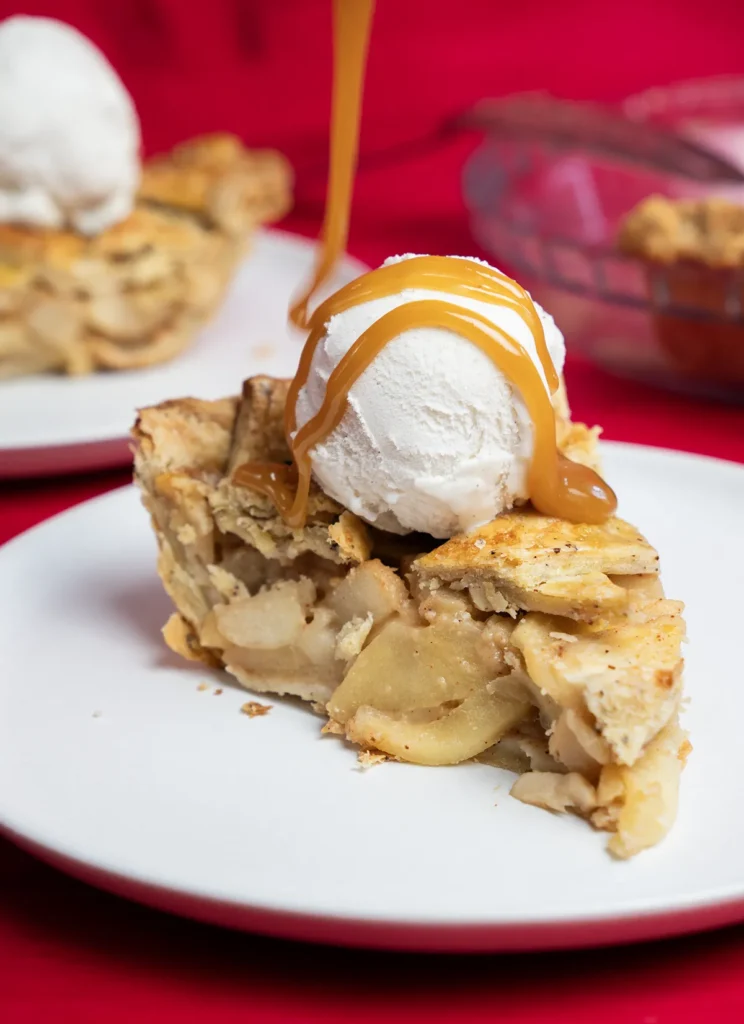
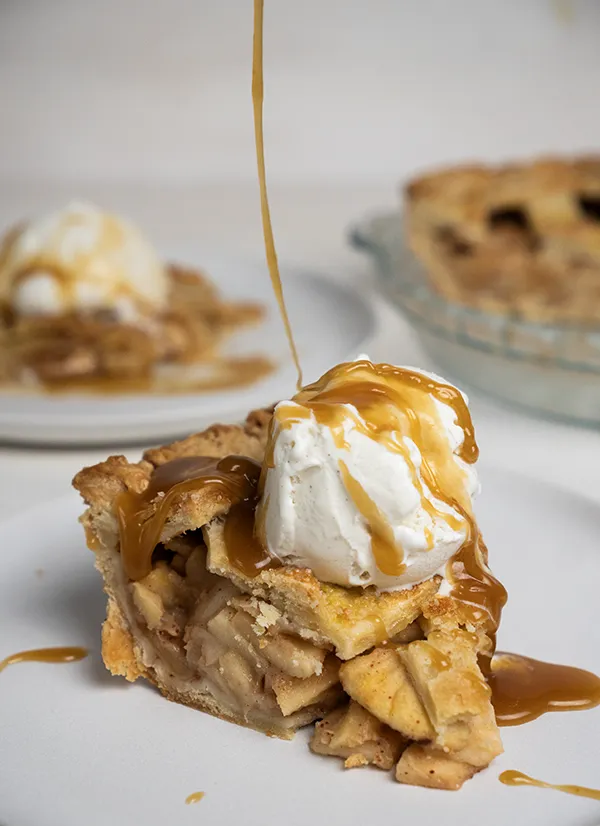
In my opinion, there’s no better possible way to serve this pie than with a scoop of vanilla ice cream and a generous drizzle of the miso caramel. I made sure the miso caramel recipe would make more than enough for the filling, so you’d have plenty left over for serving!
Make sure the pie cools completely before you slice it so the filling and crust are able to set up properly. Otherwise your slice could fall apart. If you like eating apple pie warm, you can microwave your slice for about 30 seconds without softening the crust too much, or you can loosely wrap the slice in aluminum foil and bake it in a 350˚F (175˚F) oven for 10-15 minutes.
Let’s Talk Apples: Choosing the Best Varieties for Pie
For the best pie with a complexity of flavour and a delightful texture contrast, use a combination of 2–3 types of apples. Ideally choose at least one tart and firm variety and one sweet and aromatic variety. That said, you can absolutely use whatever apples you have on hand!
Tart & Firm Apples
These apples are great at holding their shape after baking, and add a nice tartness that balances the sweetness of the filling.
| Variety | Notes |
|---|---|
| Granny Smith | Very tart and crisp, and does a great job at balancing sweetness in a filling |
| Northern Spy | Bright, acidic, complex, and aromatic flavour |
| Ida Red | Tart with a floral note |
| Cortland | Slightly tart with a more tender texture, doesn’t brown quickly |
| Jonathan | Tart with a slight sweetness and a strong apple aroma |
Balanced Apples
These apples are a little sweet and a little tart, and are able to hold their shape after baking to some degree.
| Variety | Notes |
|---|---|
| Honeycrisp | Juicy, crisp, and delicious |
| Pink Lady (AKA Cripps Pink) | Tangy and sweet with a subtle floral note |
| Braeburn | Complex and subtly spicy flavour |
| Empire | A little tart and aromatic |
| Jazz | Dense and crisp, almost like a pear |
Sweet & Firm
These apples hold their shape well after baking to some degree, and add natural sweetness to the filling. Some apple varieties are quite sweet and should only be used if paired with more tart apples to avoid a cloyingly-sweet filling.
| Variety | Notes |
|---|---|
| Golden Delicious | Mildly sweet with a note of honey |
| Jonagold | Juicy, with a honey-like sweetness |
| Ambrosia | Sweet, smooth, and delicate; best paired with tart apples |
| Fuji | Dense, crisp, and very sweet; best paired with tart apples |
| Gala | Sweet, aromatic, and juicy; softens a little, so should be paired with firm apples |
Soft & Quick-Cooking Apples
These apples will soften a fair bit after baking. If you like a saucier texture to your pie filling, add one of these varieties. They have a range of flavours from tangy to sweet. I recommend only using one of these if paired with a firmer apple variety, or your filling could end up too soft and fall apart.
| Variety | Notes |
|---|---|
| McIntosh | Soft, tangy, and fragrant |
| Paula Red | Slightly tart |
| Spartan | Slightly tart with a mild sweetness |
| Lobo | Aromatic balanced sweet and tart flavour |
Tips for Making Ahead
All of the components of this recipe can be made ahead, so you can easily work this recipe into your life!
| Component | Refrigerator | Freezer |
|---|---|---|
| Browned butter | Up to 2 weeks After browning and combining with water, refrigerate for about 1 hour and whisk to combine completely with the water. Store in an airtight container. | Up to 3 months Refrigerate for about an hour then whisk to combine completely with the water. Store in an airtight container. Thaw out in the fridge overnight before using in the crust. |
| Miso caramel | Up to 2 weeks Store in an airtight container. | Up to 3 months Store in an airtight container, and thaw out in the fridge overnight before using. |
| Brown butter pie crust | Up to 2 days Wrap tightly in plastic wrap. | Up to 3 months Wrap tightly in plastic wrap and also place in an airtight freezer bag to prevent freezer burn. Leave in the fridge overnight to thaw out. |
| Apple pie filling | Up to 3–4 days Store in an airtight container. | Up to 3 months Store in an airtight container, and thaw out in the fridge overnight before using. |
| Assembled pie | Unbaked: 1–2 days Wrap tightly in plastic wrap. Baked: 3–4 days Store wrapped tightly or in an airtight container, without any toppings like whipped cream or caramel drizzle. To reheat and refresh the crust, you can wrap slices or the whole pie in aluminum foil and bake at 350˚F (175˚C) for 10–15 minutes. | Unbaked: 3 months Cover the pie (still in its pan) with plastic wrap and freeze until solid enough to remove from the pan without breaking, about 1–2 hours. If you know you’ll be freezing the unbaked pie, you may want to line the inside of the pie plate with plastic wrap before lining it with pie dough to make removal easier. Then wrap the whole pie tightly in plastic wrap and store in an airtight bag or container. When ready to bake, return it to its pan and bake straight from the freezer, adding 15–25 minutes to the bake time at the end as needed, after lowering the oven temp to 350˚F (175˚C). Baked: 3 months Let the pie cool completely to room temperature. You can freeze the whole pie, or slice it and freeze the individual slices. Wrap the pie or slices tightly in plastic wrap and store in an airtight bag or container. When ready to serve, thaw it out on the counter for 30–45 minutes then lightly wrap it in aluminum foil and refresh it in a 350˚F (175˚C) oven for |
FAQs
Yes! While I think the browned butter crust is absolutely worth it (it adds so much flavour) it’s absolutely fine to use a store bought pie crust.
Yes, the pie can be assembled and refrigerated or frozen before baking. Each component of the recipe can also be made ahead, see above in the post for more details!
Yes! Keep in mind that every kind of apple has different characteristics, especially in terms of flavour and how firm it stays or mushy it becomes after baking. Some apple varieties are prone to becoming very mushy after baking, and some are so sweet they can make the filling overly sweet. Refer to the table above for more info on the best apple varieties to use for baking. If the apples you have on hand are of the soft and sweet variety, you may want to add at least 1–2 apples that are tart and firm to balance that out.
Miso Caramel Apple Pie with Brown Butter Crust
Ingredients
Method
- Put 285 g unsalted butter in a large saucepan, and melt over medium heat. Keep cooking the butter while stirring and scraping the bottom constantly, until you see browned bits on the bottom of the pan. The butter should smell nutty and a little like caramel. Read more about how to make browned butter here.
- Take the pan off the heat. Place a heatproof bowl on a scale and zero/tare the weight. Weigh the browned butter into the bowl, scraping out all of the browned bits from the bottom of the pan. Add enough water to the bowl to bring the weight back up to 285 grams.
- Cover the bowl and put it in the fridge. After about an hour, or once the fat starts to solidify but is still soft, whisk the water and butter together to combine. Return to the fridge to solidify completely (about another 2-3 hours).
- To a large mixing bowl, add 375 g all-purpose flour, 1 teaspoon granulated sugar, and 1 teaspoon fine sea salt. Whisk to combine.
- Break up the cold and solidified butter into smaller pieces, and toss into the flour mixture to coat the pieces in flour. Use your fingertips or a pastry blender to work the butter pieces into the dough until it resembles breadcrumbs, with the largest pieces about the size of peas.
- Add 1 large egg yolk to a small bowl, and whisk with 3 tablespoons ice water. Pour this over the flour and butter mixture and toss to combine and evenly hydrate the flour. If needed, add extra ice water 1 tablespoon at a time. Add just enough water to bring the dough together, it should be rough and shaggy at this point and just hold together.
- Gently knead the dough to bring it together in the bowl, then dump it out onto a clean work surface. Press it together into a square. If you like, you can fold it over itself a couple times to get more flaky layers in the crust. Divide it in two unequal pieces: about two-thirds for the bottom crust, and the rest for the top crust. Shape each piece roughly into a disc and wrap in plastic wrap. Chill for at least 2 hours before using.
- In a small bowl, whisk 2 tablespoons white miso paste with about 2 tablespoons of the total amount of 120 g heavy cream for this recipe until smooth. Set aside.
- Add 85 g unsalted butter, 150 g brown sugar, and 50 g granulated sugar to a small saucepan. Over medium heat and while stirring, melt the butter and sugars together until starting to bubble. Carefully add 120 g heavy creamhe remaining heavy cream—it may sputter and bubble. Whisk to combine.
- Continue cooking the caramel over medium heat until bubbling vigorously and slightly thickened, about 5-6 minutes. Pour carefully into a heatproof bowl and whisk in 1 teaspoon vanilla extract. Cover the bowl and leave to cool to room temperature. The miso caramel will keep in the fridge in a sealed container or jar for up to 2 weeks. This recipe makes plenty of miso caramel, so you'll have enough for the pie filling and to drizzle for serving.
- Peel, core, and chop 1-1½ kilograms apples and place in a large pot. Toss with 1 tablespoon lemon juice, 1 teaspoon ground cinnamon and 2 tablespoons all-purpose flour or cornstarch. Add 180 g miso caramel (that's about ¾ cup, and you can just eyeball this and add more or less to your taste) and stir to combine.
- Cook the apple mixture over medium heat while stirring regularly, until the apples have softened and the mixture has thickened. Transfer to a shallow container and cool to room temperature, then chill in the fridge until completely cold (at least 1-2 hours).
- To assemble the pie: Roll the larger portion of pie dough out to a circle about 2" (5 cm) larger than your 9-10" (23-25.5 cm) pie plate. It should be about ¼–⅜" (0.5-1 cm) thick. Gently roll it onto your rolling pin and into the pie plate. Press it completely into the pie plate and right into the corners, to avoid any air bubbles from forming during baking. Cover with plastic wrap and chill.
- Roll out the other portion of dough for the top crust. You can roll it into a circle to make a plain top crust, or roughly into a rectangle for a lattice crust. Roll it to about ¼–⅜" (0.5-1 cm) thick. If your kitchen is warm, cover and refrigerate it so it stays cold and firm.
- Add the filling to the crust, and spread it out evenly.
- For a lattice top crust: Cut the top crust into as many strips as you like. You can have lots of thin strips, or a few fat strips, or mix and match strips of different widths. I like to use a clear gridded ruler and a pizza cutter/wheel to make it easy to get straight and even strips.You'll likely have strips of different lengths. Save the long strips for the middle of the pie, and use the short strips for the edges. Place a long strip centered across the middle of the pie, and cross another long strip over it. Lift the first strip up, place one down next to it, and put the first strip back down. Continue lifting the underlapping strips up and placing strips next to them, to complete your woven lattice top.Press the top and bottom crusts together and trim the edges so you have about a 1" (2.5 cm) overhang. Fold the bottom crust over the top crust and crimp between your thumb and fingers.
- For a plain top crust: Cut one or more holes in the top for venting—you can use a knife or a cookie cutter for this. Place the top crust over the filling and press down gently. Pinch the top and bottom crusts together and trim so you have about a 1" (2.5 cm) overhang. Fold the top crust over the bottom crust and crimp together with your thumb and fingers.
- Cover the pie with plastic wrap and chill in the fridge for at least 30 minutes. Place your oven rack in the bottom third of the oven. If you have a pizza stone or baking steel, put it in the oven while you preheat it to 425˚F (220˚C). The pizza stone or baking steel will hold a ton of heat and direct it right at your bottom crust, so you don't get a soggy bottom!
- Brush the top crust with egg wash (1 egg beaten) and sprinkle on some coarse sugar if you like. Avoid brushing the crimped edges with egg wash—that can make them brown too quickly in the oven. Put the pie plate on a baking sheet to catch any drips.
- Bake for 15–20 minutes, then lower the oven temperature to 350˚F (175˚C). Continue baking until the top is golden brown and flaky, another 30–40 minutes.
- Leave the pie to cool completely at room temperature before slicing, or the filling will fall apart. This can take a few hours.
- Enjoy with a scoop of vanilla ice cream and a generous drizzle of miso caramel!
Video
Notes
- Honeycrisp
- Granny Smith
- Braeburn
- Fuji
- Golden Delicious
- Jonagold
- Northern Spy
- Pink Lady
Leave a Reply