These mousse cakes are light as a cloud, creamy, and not too sweet—perfect for showcasing delicate flavours like berries or matcha. These elegant and simple little cakes finish setting in the freezer, making them ideal for making ahead and serving whenever the mood strikes.
Some links in this post may be affiliate links. Read my disclosure policy.

Mousse is one of my absolute favourite desserts. It’s rich and yet light as a cloud, so you can both feel like you’re indulging in something really decadent while feeling like you’re pretty much just eating air which on average, makes mousse practically a health food…right? That sounds vaguely math-y, so it must be true.
It’s surprisingly easy to make and both looks and tastes really gourmet and elegant, so it has an excellent effort-to-impressiveness ratio. The base ingredients are quite plain on their own, so it’s also a great opportunity to experiment with flavours. So when I found some cute heart-shaped silicone molds at the store just before Valentine’s Day this year, I knew I wanted to use them to make mini mousse cakes. And because I couldn’t make my mind up on what flavour to use, and I really wanted to make a few different colours to go with the conversation heart molds, I decided to make a few flavours. My favourite part is how brightly-coloured the mousse ended up being, without needing to use a drop of food colouring!
Mousse is delicious enough on its own, but to take this dessert to the next level I’m turning it into a simple entremet (which, in a nutshell, is a traditional French style of cake made of multiple layers encased in mousse, usually formed in a mold). Usually, an entremet is finished either with mirror glaze or velvet spray, but to keep this recipe super simple I’m leaving that step out. These cakes set in their molds in the freezer so they’re perfect for making ahead of time—you can defrost just however many you need in the fridge the night before, and keep the rest in their molds in the freezer.

Jump To:
What is Mousse?
Mousse is a light and creamy mixture that incorporates air in some way, and uses something like gelatin or melted chocolate to make it stable and set its texture. Mousse is usually sweet and served as a dessert, but there are also some really interesting savoury mousse recipes out there. There are lots of ways to make mousse, but for these mousse cakes I’m focusing on one of the simplest methods—combining a liquid or puree with gelatin, and then folding that into cream whipped to stiff peaks. The liquid or puree lends flavour (and often colour) to the mousse, the whipped cream adds richness and airiness, and the gelatin sets the texture of the cake and makes it stable.
Why You’ll Love my Mini Berry & Matcha Mousse Cakes
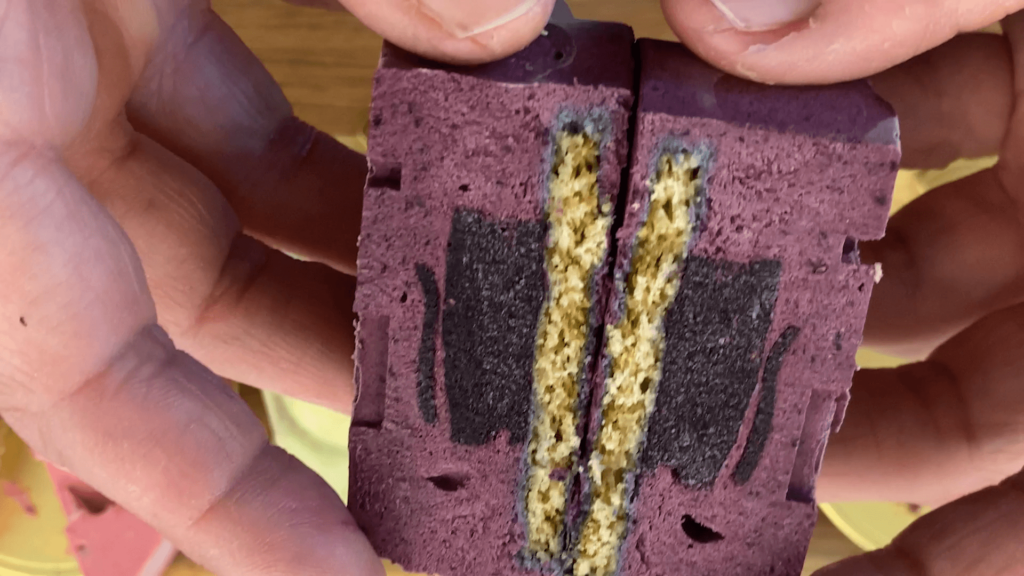
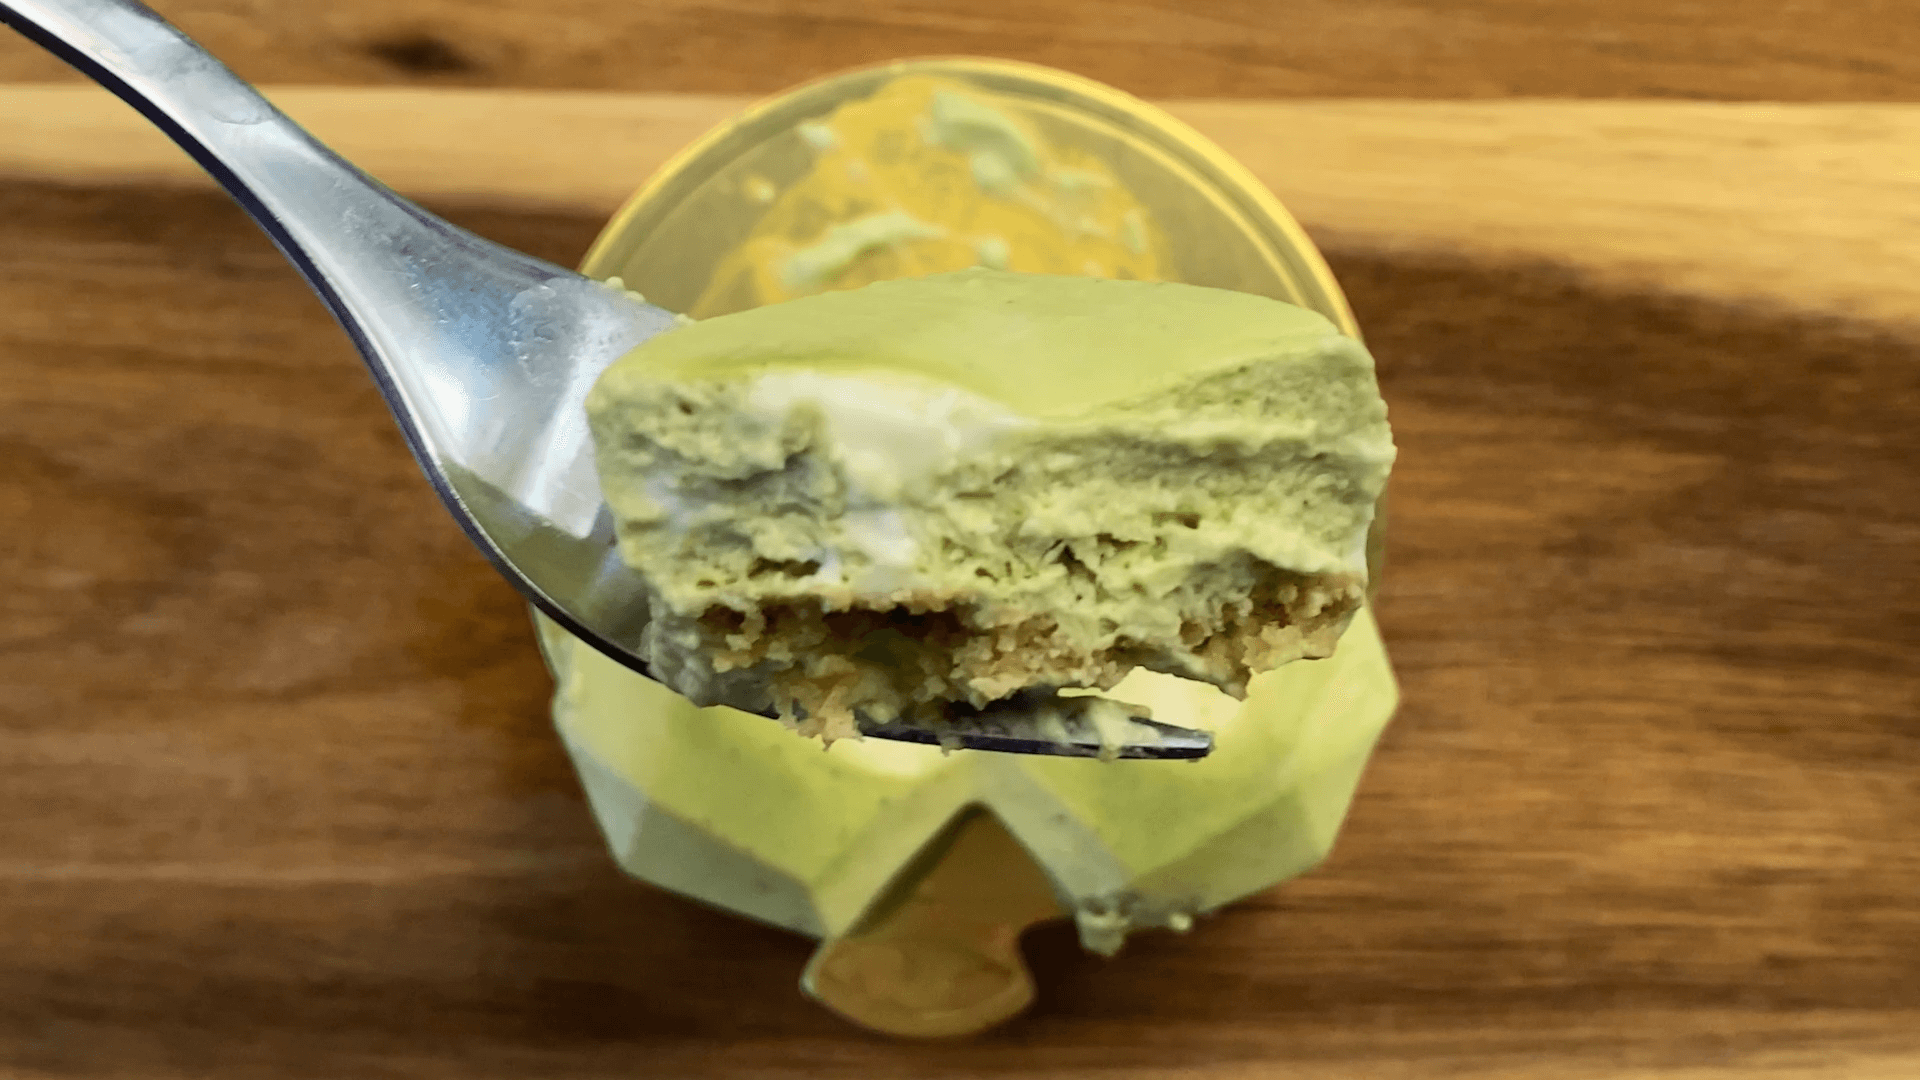
- The flavour and combination of textures are amazing. The combination of rich and airy mousse, crumbly and buttery biscuit and tart berry gelée or creamy white chocolate ganache are a delicious combination.
- It’s the perfect way to make use of the cute shaped silicone baking molds that craft stores sell around any holiday. I think most people use them to bake mini cakes in, but honestly I think this recipe is an even better use for them! I made these for Valentine’s Day of course, but you can use any shape of mold you like (I recommend using one that’s roughly 3-4″ wide) to make a delicious dessert at any time of year.
- You can make it in advance and defrost just one or a few at a time. The cakes set in their molds in the freezer, and you can keep them in there for up to 3 months. The night before, just pop out as many cakes as you want to serve the next day and let them defrost in the fridge.
- They’re so much easier to make than they look. There aren’t any difficult techniques you need to master to make any of the components, and the mousse will take the shape of whatever mold you decide to use so they’ll look like they came from a bakery with minimal effort.
- They’re brightly coloured without a drop of food colouring! The matcha powder and berry purées add a ton of bright all-natural colour to the mousse, which I absolutely love.
Prefer to Watch Instead of Read?
Tips for Success
- Fold the berry purée or matcha into the whipped cream gently to avoid deflating it. Mousse relies on the air you worked into the whipped cream for its delicious texture, so you don’t want to lose it by folding too aggressively.
- Use a cookie cutter that’s at least 1/2″ smaller than your mold for cutting out the butter biscuit cookie bases. They’ll spread a bit as they bake—if yours spread too much to fit into your molds, you can use a small knife to carefully trim the edges until they fit.
- Let the matcha and berry purée cool completely to room temperature before folding them into the whipped cream. Heat makes whipped cream collapse (almost like it’s melting). On the other hand, if you let it cool too much the gelatin will start to set and the mixture won’t fold smoothly into the whipped cream. Room temperature (around 20-22˚C or 68–72˚C) is the sweet spot—not too warm to deflate the whipped cream, or so cool that the gelatin sets prematurely.
- Freeze the white chocolate ganache before using it in the matcha mousse cakes. I just piped my ganache directly into the molds with the matcha mousse and froze them all together—unfortunately the ganache wound up sinking to the tops of the molds. Freezing the ganache layer first should prevent that from happening.

Ingredients to make Extra Nutty and Chocolatey Paris-Brest
- Whipped cream AKA heavy cream, or heavy whipping cream is essential to getting the rich, light, and airy texture that mousse is known for. The cream you use must be at least 35% fat content or it won’t whip up properly. Cream is also used for the white chocolate ganache, to give it a silky richness—you could sub out 10-18% cream if you prefer, but I wouldn’t use anything with less fat content than that.
- Matcha powder lends colour and flavour to the matcha mousse cakes. You can use an inexpensive everyday grade of matcha—no need to splash out on ceremonial grade here.
- Berries add a bright fruity flavour to the berry mousse cakes. You can use any kind of berry you like. Fresh or frozen berries work equally well.
- Gelatin powder is needed to set both the mousse and berry gelée and keep it stable. It’s important to bloom the gelatin (i.e. mix it with some water and let it set for about 10 minutes to fully absorb) before using it in the recipe.
- Unsalted butter adds richness and a delicious flavour to the butter biscuits, used as the base for all of the mousse cake flavours. Bring it to room temperature before creaming it with the white and brown sugars. If all you have on hand is salted butter, that will work too—just reduce or omit the salt called for in the recipe.
- All-purpose flour has a medium level of gluten—not high like bread flour, or low like cake or pastry flour. For the butter biscuit it strikes the right balance, lending enough structure without winding up too tough or chewy.
- Salt is a very important ingredient in sweet baked goods. We don’t normally think of salt when we think of desserts, but it plays an extremely important role in enhancing all of the other flavours. If no salt was used, the biscuit would taste a little bland.
- White chocolate is used to make the ganache centers for the matcha mousse cakes. You don’t have to use an expensive white chocolate, but I would avoid chocolate chips which often contain stabilizing ingredients that can make chocolate chips difficult to melt smoothly.
- Sugar is used to add sweetness to both the mousses and the butter biscuit base.
- Egg is used in the butter biscuit base—use a large, room temperature egg.
FAQ
How long do mousse cakes last?
They can last up to 3 months in the freezer. After defrosting in the fridge, I would eat them within 2-3 days.
Can I freeze mousse cakes?
Yes, in fact you have to in order to set them properly! You can leave them in their molds in the freezer for up to 3 months or so, then remove them one at a time as needed to defrost in the fridge before serving.
Can I make this gluten-free?
Yes, just find a gluten-free recipe online for the choux pastry (like this one), and make sure none of the ingredients you use for the other components have any hidden gluten.
Can I make this dairy free?
I don’t think so, the heavy whipping cream is a very important part of the texture of the mousse and I’m not aware of a non-dairy substitute that would work as well (but if you have any suggestions please leave me a comment and maybe I’ll test your idea out!)
Can I make this egg free?
Yes—eggs are only used in the biscuit base, the rest of the recipe is already egg free. You can substitute out any rolled and cut-out sugar cookie recipe you like.
Can I make this vegan?
I don’t think so—heavy cream is an important component of the mousse, and I don’t know of a good vegan alternative. If you do though, please leave me a comment and I might try it out!
How should I serve Berry & Matcha Mousse Cakes?
For the best texture, serve it at room temperature. I recommend pulling out as many mousse cakes from the freezer as you plan to serve the next day, and letting them defrost in the fridge. About 20 minutes before serving, take them out of the fridge and let them come to room temperature.

Ingredients
Method
- Preheat the oven to 350˚F (175˚C). Line a baking sheet with parchment paper, a silicone baking mat, or a perforated baking mat.
- Using a stand mixer fitted with the paddle attachment or a hand mixer with a medium bowl, cream together the 95 g unsalted butter, 65 g granulated sugar, and 65 g light brown sugar until light and fluffy (about 3 minutes). Add 1 large egg and beat on medium speed until completely incorporated.
- In a medium bowl whisk together 165 g all-purpose flour, ½ tsp baking soda, and ½ tsp fine sea salt. With the mixer on low, gradually add the dry ingredients about a tablespoon at a time.
- Put about half of the dough on a sheet of parchment paper, and place a second sheet on top. Roll the dough to about ¼" thick. Peel the top piece of parchment paper off, then place it back on and flip the dough over to peel the other piece of parchment off (this makes it much easier to remove the cookies after cutting them out). If the dough feels soft at this point, place the dough sandwiched between both sheets of parchment paper on a baking sheet and pop it in the freezer for 10-20 minutes to firm up.
- Using a cookie cutter that's about ¼–½" smaller than the molds you will be using, stamp out as many shapes as you can. Carefully transfer them to the baking sheet leaving 1" between each cookie. Bake for 8–10 minutes or until just slightly golden.
- Leave to cool on the baking sheet for 5 minutes, then transfer to a wire rack to cool completely. This recipe makes enough for 3–4 batches of mini mousse cakes—you can either bake the whole batch and freeze the extra cookies to use as bases ready to assemble in mousse cakes later or just eat them as they are! You can also freeze the raw dough tightly wrapped to roll out and bake fresh another day. It would be difficult to properly cream less butter, so I don't recommend making a smaller batch.
- Add 365 g berries 40 g granulated sugar, and 2 ½ tsp lemon juice to a small saucepan. Cook over medium heat while stirring occasionally and mashing the berries with your spoon or spatula until they've softened, lost most of their juices, and the mixture has slightly thickened and looks like a loose jam.
- Carefully pour the berry mixture into a blender or food processor. Make sure your blender or food processor can handle hot liquids, otherwise allow the berry mixture to cool for 10–15 minutes first. Blend until a smooth as possible, then pass the mixture through a sieve into a bowl to remove the skins and seeds.
- Measure out ½ cup to use for the Berry Gelée, and store the rest in the fridge to use for the Berry Mousse later.
- Line a small baking sheet with a silicone or teflon mat. Sprinkle 1 ½ tsp powdered gelatin over 2 tbsp cold water and allow to bloom (i.e. absorb the water and swell up) for about 5–10 minutes.
- If the ½ cup Berry Purée is still warm, stir the bloomed gelatin into it until melted and smooth—otherwise, microwave the bloomed gelatin for 10–15 seconds just until melted, then stir it into the berry purée.
- Pour the mixture out onto the prepared baking sheet and tilt it around until evenly spread (it does not need to reach the edges, aiming for a thickness of about ¼". Place in the fridge or freezer until completely set.
- Remove from the fridge. Place another silicone or Teflon mat on top of the gelée and flip it over, then peel the other silicon or Teflon mat off. Using a cookie cutter that's at least 1" smaller than the molds you will be using, stamp out as many shapes as you can. If you're kitchen is very warm, you may want to store the cut out shapes in your fridge until you're ready to assemble the mousse cakes, otherwise your gelée may start to soften.
- Sprinkle 1 ½ tsp powdered gelatin over 2 tbsp cold water and leave to bloom for 5–10 minutes. Meanwhile, whip 1 cup heavy whipping cream to stiff peaks.
- Microwave the gelatin for 10–15 seconds, just until melted. Stir into the remaining Berry Purée. Pour the berry and gelatin mixture over the whipped cream, and gently fold in until incorporated.
- Add 50 g white chocolate to a heat-proof and microwave-safe bowl. Heat 50 g heavy whipping cream in a small saucepan or in the microwave just until steaming. Pour over the chocolate and let sit for 1–2 minutes to allow the chocolate to melt. Whisk until smooth. If any chocolate refuses to melt, microwave for 15–30 seconds and whisk again.
- Cover with plastic wrap and refrigerate until chilled and set, about 2 hours.
- Line a small baking sheet with parchment paper or a silicone mat. Transfer to a disposable piping bag and snip an opening about ¼" wide, and pipe shapes that are similar to the shape of the molds you will be using, and about 1" smaller. Or alternatively, pipe them into silicone molds that are smaller than the molds you will be using for the mousse cakes. Freeze until solid, about 1 hour (in the video, I pipe the ganache directly into the mousse, but it ended up sinking towards the bottom of the mold—freezing the ganache first will work much better!)
- Add 160 g whole milk and 1 tbsp lemon zest to a microwave-safe bowl. Microwave for about 30 seconds, or until the milk is steaming. Allow to infuse for 10 minutes, then pour through a strainer into a clean bowl to remove the zest. Whisk in 2 tsp matcha until smooth.
- Sprinkle 1 ½ tsp powdered gelatin over 2 tbsp water and leave to bloom for 5–10 minutes. Microwave for 10–15 seconds or just until melted, then whisk into the milk and matcha mixture.
- Whip 1 cup heavy whipping cream to stiff peaks, then fold in the milk and matcha mixture until combined.
- Spoon some mousse into each mold until it's about halfway full. Smooth the mousse up the sides of each mold, and add another spoonful of mousse. For a berry mousse cake add a gelée shape in the middle (you can stack 2–3 on top of each other if you want a thicker layer of gelée). For a matcha cake add a piece of frozen white chocolate ganache. Top it off with a butter biscuit. Ideally, the biscuit base will be flush with the tops of the molds—if not, fill the mold with more mousse next time and for now, just add some more mousse to fill the mold. Use an offset spatula to even out the mousse.
- Freeze for at least 8 hours or ideally overnight. Remove from the mold while still frozen, then leave in the fridge to defrost, then 20 minutes before serving remove them from the fridge to allow them to come to room temperature.
Leave a Reply