If you’ve always wanted to learn how to make macarons but have felt too intimidated to try, you’re in the right place! This beginner-friendly Swiss macaron recipe will demistify the process and set you up with the confidence and know-how to confidently make bakery-quality macarons from your own kitchen! You’ll learn exactly what you need to look for at each stage, and which parts of the process really make a difference, and what you can stop stressing about.
Some links in this post may be affiliate links. Read my disclosure policy.
Jump To:
- Why this Swiss Macaron Recipe & Method Works
- Keep an Open Mind & Embrace the Learning Curve
- Equipment You’ll Need to Make Macarons
- Key Ingredients for Making Macarons
- How to Make Macarons (Step-by-Step)
- Step 1: Prep your Equipment
- Step 2: Prep & Weigh Your Ingredients
- How Much Should I Make?
- Step 3: Heat the Egg Whites
- Step 4: Whip the Meringue
- Your Meringue is Done When:
- Step 5: Fold in the Dry Ingredients & Macaronage
- You’re Done Macaronage If:
- Step 6: Piping the Macarons
- Tips for Even Macaron Shells
- Step 7: Slam to Release Air Bubbles
- Step 8: Drying
- You’re Macarons are Dry Enough When:
- Step 9: Bake the Macarons
- Your Macarons are Done Baking When:
- Step 10: Fill
- Step 11: Mature the Macarons
- Storage & Freezing
- Analyze Your Macarons
- Troubleshooting your Macarons
- FAQs
- Let me Know How it Went!
- How to Make Macarons—Easy Swiss Recipe for Beginners
Why this Swiss Macaron Recipe & Method Works
It Uses a 1:1:1:1 Ratio of Ingredients
This Swiss macaron recipe is based on equal weights of egg whites, granulated sugar, almond flour, and powdered sugar. That means no need to worry about exact egg sizes or weighing an exact amount of egg whites. Just weigh your egg whites and use that same weight for everything else. Easy-peasy!
It’s Based on the Swiss Method
Of the three macaron methods (French, Italian, and Swiss), this one is my go-to, especially for beginners.
In the Swiss method, you gently heat the egg whites and sugar together before whipping them into a meringue. This causes the egg white proteins to denature (or unfold), which helps them form stronger bonds and a more stable meringue. The heat also dissolves the sugar completely, which makes your meringue smooth, shiny, and easier to work with. It’s also harder to over-whip than a French meringue, which is a huge bonus when you’re learning to make macarons!
If you’re curious how the Swiss method compares to French and Italian, I have a breakdown in the FAQ section below.
You’ll Learn What Actually Matters
There’s a ton of macaron advice floating around the internet. Some of it helpful, a lot of it bordering on superstition. Over the years, I’ve learned out which steps are truly make-or-break when making macarons:
- Whipping a very stiff meringue
- Mixing the batter to the right consistency (i.e. macaronage)
- Drying the shells thoroughly before baking
The entire process of making macarons is important, but these three stages make the biggest difference. They’re also where most beginners struggle. So I break down exactly how to get each one right, with visual cues so you won’t be left wondering.
Keep an Open Mind & Embrace the Learning Curve
I’ll be honest. Even with the best macaron recipe in the world, your first few batches might not turn out perfectly. That’s completely normal.
Learning to make macarons from a recipe is kind of like trying to learn how to swim by reading tutorials about it. You can’t truly learn how to do it until you get in the water a bunch of times and get a feel for it.
Buy a couple cartons of eggs, and a bag each of almond flour, granulated sugar, and powdered sugar. Think of it as an investment in learning how to make macarons without any expectation that this first batch of ingredients will turn into perfect macarons.
Besides, you can save your failed macarons (or “maca-wrongs”) to make my Fresh Fruit Trifle with Macaron Crumble. So either you’ll have beautiful macarons, or a delicious trifle. You really have nothing to lose!

You Can’t Really Fail
Every cracked, hollow, or under-baked shell gets you one step closer to nailing it. And it’s just part of learning how to make macarons. Seriously: ask anyone on Instagram with reels of flawless macarons how many batches they ruined before they figured it out.
Treat each batch like a mini science experiment. Take notes, learn from what happened, and adjust from next time. And if all else fails, crumble your maca-wrongs over some ice cream and try again tomorrow. That’s still a win in my book.
Equipment You’ll Need to Make Macarons
- Digital Scale: This is a must. You need to weigh your ingredients for this method. A good digital kitchen scale isn’t expensive and will make a massive difference in all of your baking.
- Sieve or Fine Mesh Strainer: Sifting the almond flour and powdered sugar will help you get smooth, lump-free shells.
- Hand or Stand Mixer: You’ll be whipping a stiff meringue, which would take a ton of time and arm strength to do without a mixer. A stand mixer with a whisk attachment makes it easier, but a hand mixer works too.
- Heatproof Mixing Bowl: You’ll be making a double boiler, so make sure your bowl can handle some steam. A metal stand mixer bowl is perfect.
- Small Pot: To hold your mixing bowl and create gentle steam for heating the egg whites.
- Rubber Spatula: For folding the macaron batter (macaronage), you’ll want a rubber spatula with a large blade. Don’t use a wooden spoon—it doesn’t get into the sides of the bowl, and can hold onto grease.
- Large Disposable Piping Bags. Grease is the enemy of meringue, so disposable piping bags are the safest option when you’re just learning how to make macarons.
- Round Piping Tip (1/2” / 1.2 cm). A medium round tip is perfect for piping even macaron shells. You can use the same tip to pipe your filling.
- Tall Cup or Deli Container. Holds onto your piping bag to make filling it way easier.
- Flat Baking Sheets. Macarons bake more evenly on flat baking sheets. If you only have rimmed ones, flip them over and bake on the underside. Use light-coloured baking sheets, like ones made of aluminum. Dark materials can absorb and transfer too much heat to the bottoms of your macarons.
- Parchment Paper or Silicone Baking Mats. Macaron shells need a nonstick surface. Silicone mats with pre-printed guides are great for beginners. Avoid those shiny plastic macaron mats with raised edges because your macarons will stick like glue.

Key Ingredients for Making Macarons
- Egg Whites: Use fresh egg whites separated from whole eggs. Carton whites usually don’t whip well. You don’t have to age them, but it can help if your kitchen is humid. Since this recipe is based on the total weight of your egg whites, any size of egg will do!
- Granulated Sugar: Plain white sugar works best for this Swiss macaron recipe. It dissolves easily and whips up beautifully.
- Almound Flour: Go for superfine, blanched almond flour. It should be pale, fine, and powdery. Avoid anything gritty, oily, or clumpy.
- Powdered Sugar: Also called icing or confectioner’s sugar. It sweetens the shells and helps create nice smooth shells. Most brands include a bit of cornstarch which helps absorb excess moisture in the batter.
- White Vinegar: Wipe down your tools with vinegar before starting to remove any hidden grease that could ruin your meringue.
- Food Colouring (Optional): Skip the food colouring while you’re just learning to make macarons. When you’re ready, stick to gel or powdered food colouring. Liquid ones will ruin the batter.

How to Make Macarons (Step-by-Step)
Let’s goooooo! Here’s a detailed, beginner-friendly breakdown of how to make macarons with the Swiss method. I’ll flag the critical steps so you know what to focus on.
Step 1: Prep your Equipment
- Wipe down your bowl, whisk, and spatula with a bit of vinegar to remove any traces of grease.
- Set up a double boiler with 1 inch (2.5 cm) of water in a pot over medium-low heat.
- Fit your piping bag with a round tip and place it in a tall cup for easy filling.

- Line your trays with parchment or silicone mats. You may want to print a couple of these free templates to place underneath:
Step 2: Prep & Weigh Your Ingredients
- Separate your egg whites into a heatproof bowl. Weigh them in grams (e.g., 100g).
- Weigh out the same amount of granulated sugar and whisk it into the egg whites.
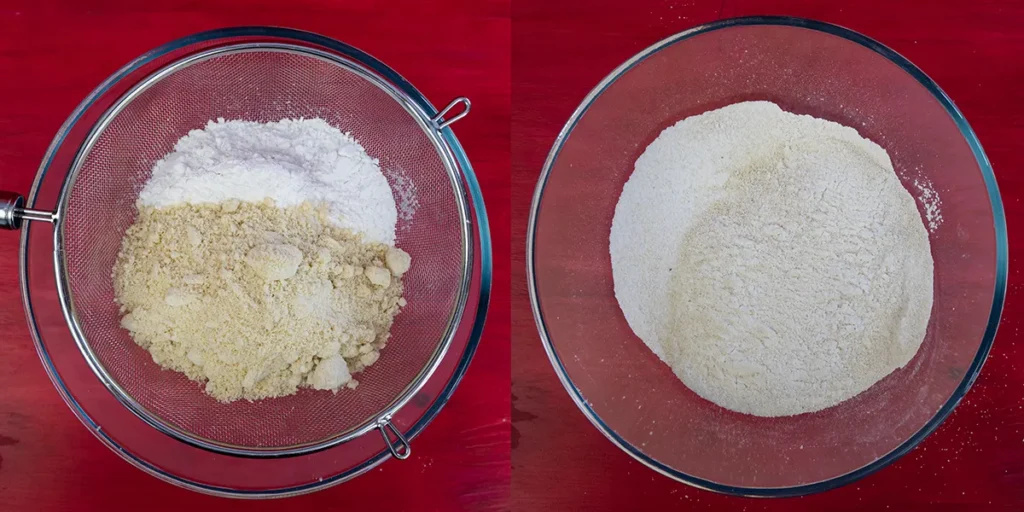
- Sift the same weight each of almond flour and powdered sugar together into a separate bowl. Discard any coarse bits.
- Save your yolks to make some ice cream or lemon curd!
How Much Should I Make?
I usually use 3–4 egg whites (about 90–120g), which makes 24–36 sandwiched macarons depending on their size. Use at least 2 large egg whites (about 60 grams) so you have enough to whip into a stable meringue.
Step 3: Heat the Egg Whites
Place the bowl of egg whites and sugar over your simmering pot. Stir gently until the mixture feels hot and smooth between your fingers.

You’re aiming for a temperature of 122–149°F (50–65°C). If you don’t have a thermometer, do a touch test. It should feel like a too-hot bath—not burning, but warm enough that it will feel uncomfortable after a few seconds.
Step 4: Whip the Meringue
This is a make-or-break step, so take your time and don’t rush.
- Dry the bottom of the bowl and transfer it to your mixer.
- Start whipping at low speed (2 on a KitchenAid) for 2 minutes.
- Increase to medium (4) for 4–5 minutes.
- Then ramp it up to medium-high (6–8) until you get stiff, glossy peaks.
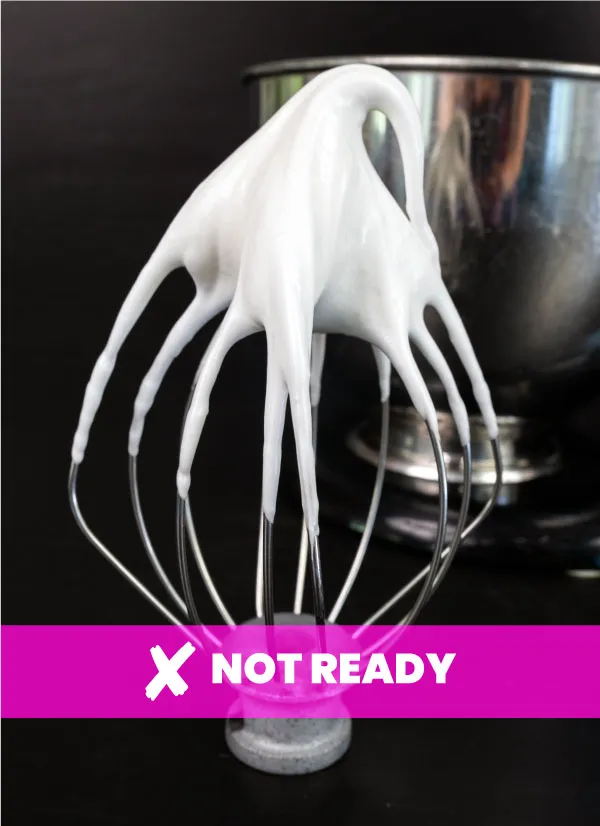
The meringue is slumping over completely. It’s not ready for making macarons.

The meringue is leaning over and forming large curls. It’s at soft peaks, not ready for macarons.

The meringue is almost at stiff peaks. But it’s leaning over and there’s a small curl at the tip. It’s not quite ready for making macarons yet.

The meringue is smooth, glossy, and with a point (or points) that stick straight up. It’s ready to go!
Your Meringue is Done When:
- It feels thick and dense.
- Peaks stand straight up without any lean, when you lift your beaters or whisk up.
- It looks smooth and shiny.
Step 5: Fold in the Dry Ingredients & Macaronage
This is the most technical part of the process, and it’s where the magic happens!

Dump all of the dry ingredients on top of the meringue. Use a rubber spatula to fold the ingredients in until they’re completely combined and no dry bits remain.


Now comes the macaronage. This step is all about knocking just enough air out of the batter. I like to to smear the batter against the sides of the bowl and then scrape it back down. Repeat until it ribbons off your spatula in a smooth lava-like flow, and you can draw a figure 8 without it breaking.

You’re Done Macaronage If:
- The batter flows smoothly in unbroken lava-like ribbons
- You can draw a figure 8 without the batter breaking.
- The batter settles into itself within 10 seconds.
Step 6: Piping the Macarons

- Transfer your batter to a piping bag no more than ⅔ full. Hold the bag straight up and down over your baking mat or parchment paper and pipe into the centre of each circle.
- To cut off the flow, stop squeezing the bag, give it a quick swirl to avoid leaving a peak, and lift the bag up.
- When you’ve filled a baking sheet, remember to slide your printed template out before baking.
Tips for Even Macaron Shells
- Use a template with a dashed inner ring to guide how much batter to pipe.
- No template? You can count “1-2-3” as you pipe each macaron.
- Don’t overfill your piping bag. Fill it to only two-thirds full so it’s easy to handle.
Step 7: Slam to Release Air Bubbles
This step helps prevent hollow shells and lumpy tops:
Slam each baking sheet down on your counter from about 4–6 inches high, five or six times. Do your best to make sure the pan lands flat to avoid distorting the macarons. You can place a tea towel on your counter to muffle some of the noise if you like! You can pop any visible surface bubbles with a toothpick if you’re a perfectionist. But to be honest I don’t usually bother with this unless I see any large air bubbles under the surface, and am pretty happy with how my macs turn out!
Step 8: Drying
Drying is non-negotiable for smooth tops and solid feet. There are some no-rest methods out there, but for a better chance of success your should dry your macarons on your counter before baking.
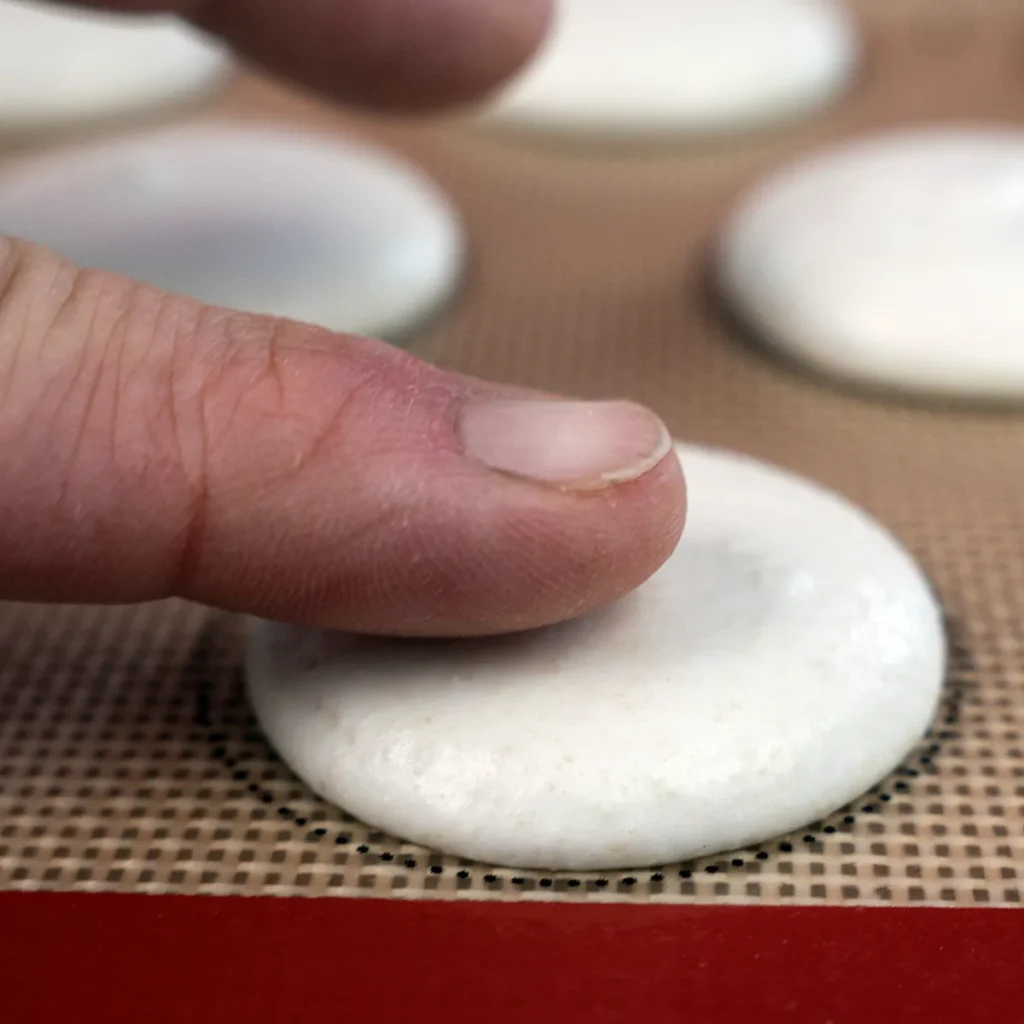
- Let the macarons sit uncovered until they form a dry skin.
- In ideal conditions, that takes 20–45 minutes.
- If it’s humid, it might take an hour or more. To help speeds things up you can turn on a fan nearby (but not pointe directly at them), or use an A/C a dehumidifier.
- Start preheating your oven to 300°F (150°C) toward the end of the drying time.
Over-drying can cause brittle overly-crunchy shells. Under-drying can lead to cracked volcano macarons. When in doubt, err on the side of longer drying time.
You’re Macarons are Dry Enough When:
- You can gently run a finger across the surface of a macaron and it doesn’t feel sticky at all.
- Your macarons look less shiny than when they were first piped (like a satin finish).
Step 9: Bake the Macarons
Make sure your oven has fully preheated to 300˚F (150˚C). Bake for 15–20 minutes, turning the tray 180° halfway through. Don’t use convection fan mode unless your oven has major hot spots (see FAQ below). Let them cool completely on the baking sheet.

Your Macarons are Done Baking When:
- They have puffed up with visible feet.
- You can gently push on a macaron without it wiggling.
Step 10: Fill
Match up similar-sized shells.

Pipe your filling until it reaches about ¼” from the edge.

For runnier fillings like lemon curd or jam, pipe a buttercream or ganache ring first, then fill in the center.

Place the matching macaron shell on top, and gently press down until the filling just comes out to the edge.
Check out my macaron recipes to get ideas for fillings!
Step 11: Mature the Macarons

You totally deserve a macaron now, and I won’t judge you if you sneak one! But for best texture and flavour, refrigerate your filled macarons in an airtight container for 24 hours. The shells will absorb moisture from the filling and turn gloriously chewy.
Bring your macarons back up to room temperature for 20–30 minutes before serving.
Storage & Freezing
- Fridge: Store filled macarons in an airtight container for up to 5 days.
- Freezer (unfilled shells): Freeze for up to 3 months. Fill them when needed. This is a great way to make a few macarons to decorate a cake, or to use up leftover buttercream from another baking project!
- Freezer (filled): Most buttercream or ganache-filled macarons freeze well for up to 3 months. Let them thaw in the fridge overnight, then bring to room temp before eating.

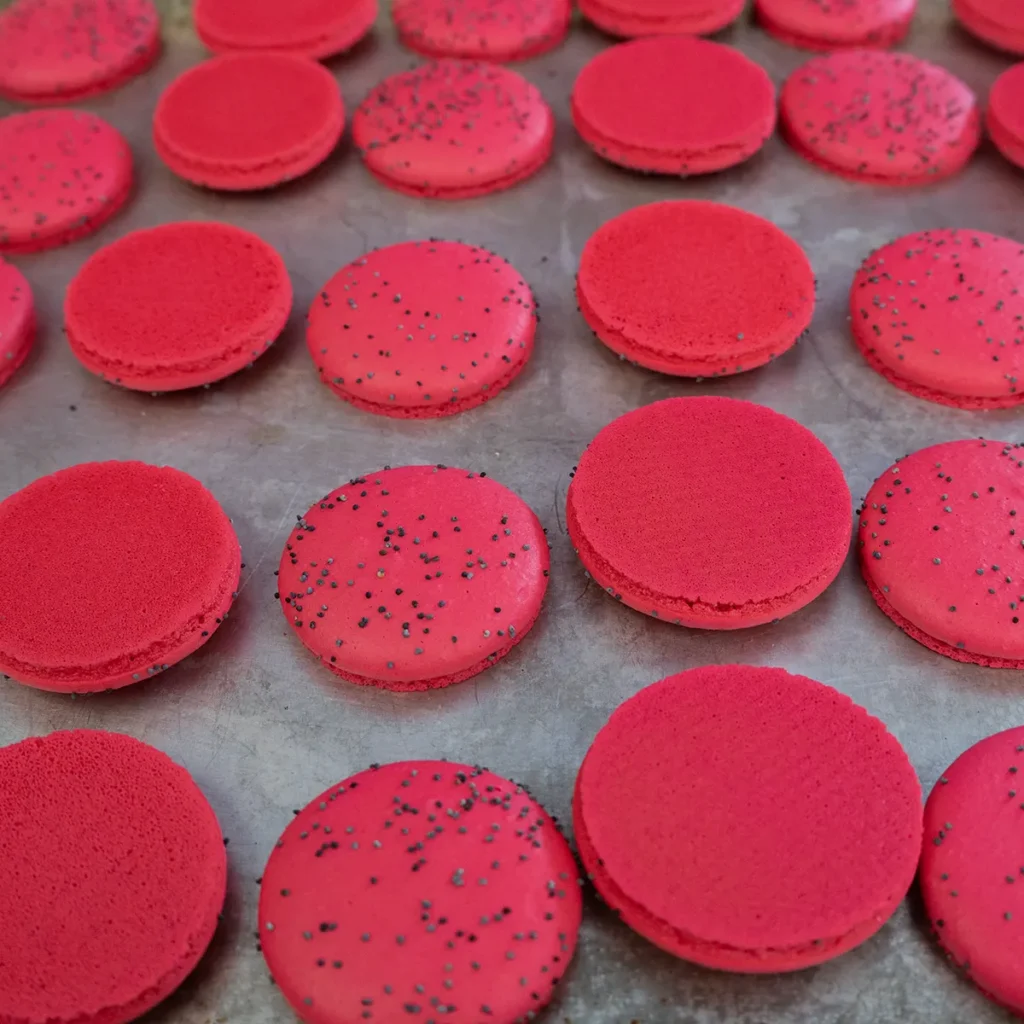
Analyze Your Macarons
Don’t worry about perfection—every batch teaches you something! There’s no need to stress over achieving perfect macarons, but it can be helpful to observe how your macarons turned out versus the ideal, and learn what you can adjust for next time. Here’s what the “ideal macaron” looks like:

- Feet: Finely-textured, neat, and no spreading out.
- Shell: Smooth with a satin finish and no visible bumps or air pockets.
- Interior: Slightly chewy, with no hollows after maturing.
- Filling: Should come just up to the edge, with the right balance of richness. Use less of a rich, very flavourful filling, or more of a light filling.
Troubleshooting your Macarons
If your macarons fell short of the “ideal”, this troubleshooting guide should help you zero in on the cause!
Why did my macarons crack?
- You didn’t dry your macarons long enough. Macarons need a strong skin to support the batter when it starts puffing up in the oven, so that energy gets directed towards making those beautiful frilly feet. If the skin is too thin and weak, the puffing batter will burst through the top of the macaron making it look more like a volcano. Next time, dry your macarons until you can run a clean finger over the top without feeling the slightest bit of stickiness.
- Your oven temperature is too high. The excess heat made your batter expand too fast, and it cracked through the tops of the cookies. Even if you set your oven to 300˚F (150˚C), it’s possible your oven runs hot. You could get an oven thermometer to confirm the actual temperature inside your oven, or just reduce the temperature by around 10 degrees next time.
- You did too much macaronage so your batter wasn’t stable enough to form a thick enough skin. Hold back on macaronage next time, and stop as soon as it flows off your spatula in thick graceful ribbons and you can draw a figure 8 without the batter breaking.
Why don’t my macarons have any feet (or the feet are very small)?
- Your meringue wasn’t stiff or strong enough. Next time, whip the meringue longer. Make sure it leaves pointy peaks that stand straight up when you lift your beaters or whisk out of the bowl.
- You didn’t do macaronage for long enough. Under-mixed batter isn’t able to spread properly, which is necessary for foot formation. Next time do macaronage a little longer, just until it flows in ribbons off of your spatula like lava, and you’re able to draw a figure-8 without the batter breaking.
- The oven temperature was too low. Macaron batter needs enough heat to puff up in the oven to form feet. Use an oven thermometer to confirm what the actual temperature of your oven is (some ovens run cool), or you can just increase the temperature by around 10 degrees and try again.
Why are my macarons hollow?
Hollow macarons are very common, even some you’ll find at reputable bakeries! It’s not always a problem and will usually fill up while they mature in the fridge because the filling will hydrate the shells. Hollow macarons are only a problem if they’re still raw on the inside, or if the hollows are so large that even after maturing it’s hollow enough for the top of the shell to crack apart when you bite into it. Severely hollow shells can be caused by:
- Beating your meringue too fast can cause large uneven air bubbles in the meringue, which expand in the oven. Start beating your meringue slowly, and gradually increase the speed.
- You didn’t macaronage enough, which left large pockets of air inside the batter that expanded in the oven.
- You didn’t slam your trays of piped macarons (or didn’t do it enough times). That can leave air pockets inside the piped macarons which expand in the oven.
- Your oven temperature was too high, so the interior of the macaron set too quickly and trapped air inside.
- Your macarons are under-baked. The outside set and formed a shell, but the inside wasn’t able to bake through so it collapsed after coming out of the oven. If your shells look raw on the inside, this is the likely cause. Bake for a few minutes longer next time.
Why are my macarons wrinkly?
- There was oil or grease in your meringue, which weakened the structure of your macarons. This can happen if a trace of egg yolk gets into the egg whites, or if your almond flour is oily.
- Your oven temperature was too low. This prevents the macaron from setting properly, causing a sunken or wrinkly surface.
Why are my macarons lumpy?
- You didn’t do macaronage for long enough and the remaining air pockets expanded unevenly in the oven.
- You didn’t sift your almond flour and powdered sugar, and the lumps or chunky bits in the batter are showing up in the shells. Next time, sift the dry ingredients (more than once if necessary), or pulse them together in a food processor a few times before sifting them. Just be careful not to process too much, or you could release oil from the almond flour which can destabilize the meringue.
Why are my macarons lopsided?
- Uneven heat or airflow in the oven. Rotate your tray partway through baking. Use a flat baking sheet, or turn a lipped baking sheet upside-down and bake on the bottom.
- Using a fan in a convection oven. On the one hand, a convection fan can help distribute heat in an oven more evenly, but a strong convection fan can also disturb the delicate shells as they’re rising in the oven causing them to tip or lean over.
Why did my macarons stick to the baking sheet?
- They needed more time to cool on the baking sheet. If you tried lifting a macaron soon after it came out of the oven, it’s possible they were well baked but just needed more time to cool down and set up. Leave the rest of the macarons alone for now. Try lifting another macaron up in 15-20 minutes.
- The macarons are under-baked. Any raw part of the macaron will stick to the mat.

FAQs
It’s not always necessary. Aging does remove water from egg whites through evaporation so it can be helpful to achieve a more stable meringue if your home is very humid. If you find you’re having a hard time achieving a stable meringue and you’re sure there’s no trace of egg yolks in the whites or oil/grease on your tools, you might want to try aging your whites for 1-3 days to see if that helps. To age your egg whites place them in a bowl covered with plastic wrap, and poke a few holes in it and leave it in the fridge for up to 3 days.
I don’t recommend it. Even carton egg whites that have no additives and list “egg whites” as the only ingredient are still pasteurized, and therefore often unable to be whipped to a stiff and stable meringue.
French, Swiss, and Italian are different techniques for making meringue. Since macarons are based on meringue, French, Swiss, or Italian refers to the technique you use to make the meringue.
For French macarons, you gradually add granulated sugar to raw egg whites as they’re being whipped. It’s the easiest method in one way, because no heat is involved and the process is as simple as it can be. But it’s also very easy to over-whip and makes the least stable meringue out of all three methods. In my opinion, that makes French macaron batter the hardest to work with overall, even though the method to make the meringue is the simplest.
For Swiss macarons, you gently heat the egg whites and sugar together over a double boiler, then whip them to stiff peaks. This creates a much more stable meringue than French macarons, but isn’t much more complicated to make. It’s harder to over-whip by accident, and the batter is more stable. In my opnion this makes it the easiest method to use for making macarons, the one I usually use myself, and the method I recommend for beginers.
For Italian macarons, a portion of the egg whites gets mixed with the dry ingredients to form a paste. The granulated sugar gets heated to 240˚F (114˚C), then streamed into the rest of the egg whites while they’re whipping in a stand mixer. The mixture gets whipped to stiff peaks, then the almond flour paste gets folded in. This produces the most stable meringue and macaron batter of all, but the process is more complicated and error-prone.
You’ll need to dry your macarons for longer, sometimes more than an hour. You may also need to use a dehumidifier or turn on your A/C to pull excess humidity out of the air. If neither of those is an option for you, you can turn a fan on near the shells, but don’t aim the fan directly at them or the shells could get distorted.
Starting the meringue at a slower speed and gradually increasing it creates a meringue with small, stable, and even bubbles. If you whip at a high speed from the get-go you’ll wind up with a meringue with large, unstable, and uneven bubbles which won’t create a good structure for your macarons.
If your oven has hot spots and you’re having trouble baking your macarons evenly, using the convection (fan) mode in your oven might help, if your fan isn’t too strong. A strong oven fan can disturb the delicate shells in the oven and make your macarons turn out lopsided.

Let me Know How it Went!
Tried this tutorial? Leave a comment below and let me know how your macarons turned out! If you have any questions or run into any issues, drop a comment and I’ll do my best to help. Or celebrate your amazing macaron victory wit us! And if you found this tutorial helpful, don’t forget to give the recipe a star rating, it helps other aspiring macaron bakers find it, too!

How to Make Macarons—Easy Swiss Recipe for Beginners
Ingredients
Method
- Wipe your tools with some white vinegar to remove any oily residue. Line baking sheet(s) with parchment paper or silicone baking mats, and prepare your piping templates. Fit a large piping bag with a ½" (1.2 cm) round tip, and set it in a deli container or large cup. Fill a small pot with around 1" (2.5 cm) of water and bring to a simmer over medium-load heat.
- Weigh the egg whites into a heat-proof mixing bowl and record or remember the weight—you'll use the same weight for the remaining ingredients.
- Weigh the same amount of granulated sugar into the mixing bowl and whisk to combine. Set the bowl over a small pot of simmering water. While whisking constantly, bring the mixture to 122–149°F (50–65°C) (see notes).
- Dry the bottom of the bowl. Whip using a stand mixer fitted with the whisk attachment or a hand mixer, starting on low speed for about 2 minutes. Increase the speed to medium for another 4-5 minutes. Finally, increase the speed to medium-high until you reach stiff peaks. The meringue should be glossy, smooth, and thick, and when you lift the whisk out you should see sharp and pointy peaks that don't droop.
- Weigh the same amount each of powdered sugar and almond flour and sift into a separate bowl.
- Dump the dry ingredient into the bowl of meringue, and fold together until completely combined. Spread the batter over the sides of the bowl and scrape down. Repeat until the batter flows in thick lava-like ribbons off the spatula, you can draw a figure 8 without it breaking, and dropped batter combines with the batter in the bowl after about 10 seconds.
- Transfer the batter to the piping bag. Hold the piping tip straight up and down over the middle of a circle template, and apply even pressure until the batter reaches the edge or inner dashed circle. Stop applying pressure, give the bag a swirl and lift up to avoid a peak. When you're done filling a sheet, carefully remove the printed templates (if using) from underneath the mat or parchment.
- Let the macarons sit out uncovered until they form a dry skin. You should be able to carefully run a finger over the surface of a macaron without feeling any stickiness. Towards the end of drying, start preheating the oven to 300˚F (150˚C).
- Bake one sheet at a time for around 15-20 minutes, turning halfway for even baking. When the macarons are done they'll be puffed up with distinct feet, and when you touch one gently with your finger it shouldn't wobble.
- Leave the macarons to cool completely on the baking sheet.
- Find pairs of macarons that match in size, and arrange them side-by-side. Pipe filling on the bottom of a macaron until it reaches about ¼" (0.6 cm) from the edge. Place the matching macaron on top and gently press down until the filling just reaches the edge.
- Place the macarons carefully in an airtight container and leave in the fridge for 24 hours to mature. This gives the filling time to soak into the shells to make them perfectly chewy.
- When you're ready to serve the macarons, bring them up back up to room temperature for 20-30 minutes.
Notes
- Serving size depends entirely on how many egg whites you use and how large you pipe your macarons. For reference, I get around 50 x 1¾” macarons when I use 3 large egg whites weighing around 100 grams, or around 40 x 2″ macarons. Divide that in half for how many finished sandwiched macarons you can expect.
- If you don’t have a thermometer, you can check the temperature of the egg white and sugar mixture by dipping a finger in. It should feel like too-hot bath water—not so hot it burns, but hot enough that it will feel uncomfortable after a few seconds.
Keith says
This is every tip I needed for macarons all on one page.
Joanna Rankin says
So glad you found it helpful!