Dacquoise is a French pastry made of deliciously crunchy meringue cake layers sandwiched with creamy fillings, creating an absolutely glorious combination of textures. This Piña Colada Dacquoise Cake takes it to the next level, with tropical pineapple and coconut filling that transports your taste buds straight to the beach!
Some links in this post may be affiliate links. Read my disclosure policy.
Jump To:
What is a Dacquoise Cake?
Dacquoise is a cake usually made with almond or hazelnut meringue cake layered with some combination of chocolate ganache, hazelnut praline, or custard. It originated in Dax, France, hence the name Dacquoise! Mine is inspired by Piña Coladas, because I like Piña Coladas (though I don’t care for getting caught in the rain). So instead of ground almonds or hazelnuts in the meringue cake I use shredded coconut, and I use pineapple curd and coconut rum mousseline to fill the layers.
Why You’ll Love Piña Colada Dacquoise Cake
- It’s easier to make than it looks. There aren’t any relly tricky techniques you need to master to pull this cake. It looks a lot harder and more impressive to make than it actually is!
- You can make it over several days. There are a lot of components to make, it’s true…but none of them are especially difficult to make, and all of them can be made in advance. This is a project you could spread out over a few days to make it much more manageable—see below for how to make and store each component in advance.
- It’s full of contrasting textures. The soft yet crunchy coconut dacquoise layers pair perfectly with the fruity and creamy fillings, for a dessert that will delight your palate.
- You can easily make it any size and shape you want. The dacquoise gets baked in one large sheet, which you then cut into rounds of whatever size or shape works for you. You could even make lots of mini dacquoise cakes by cutting out small rounds using a round cookie cutter.
Tips for Success
- Separate the eggs while they’re cold. Yolks are less likely to split while cold, reducing your chance of contaminating the egg whites. Save both the whites and yolks—you’ll be using both to make the various components.
- Separate the whites into a small separate bowl before adding it to the rest of the whites—that way, if a little yolk happens to get into the white, you can leave it out and avoid contaminating all of the whites.
- Whip the egg whites in a very clean bowl. Any trace of fat or grease risks ruining the meringue. As a bit of added insurance, you may want to wipe the whisk and bowl down with white vinegar before adding the egg whites to the bowl.
- Whip the egg whites at room temperature. Room temperature whites are looser than cold whites, making them easier to whip up into a meringue. Separate the eggs first and leave them to come up to room temperature while you measure out and prep the rest of your ingredients.
Prefer to Watch Instead of Read?
What You’ll Need to Make Piña Colada Dacquoise Layer Cake
Apart from the standard items I assume you likely have in your kitchen (like spatulas, saucepans, and bowls), you will need:
- A stand mixer or hand mixer to make light work of whipping up all that meringue and buttercream.
- A scale to measure the ingredients accurately.
- A rimmed half-sheet baking pan. These are 18″ x 13″ (46 cm x 33 cm) and the perfect size for baking your coconut dacquoise.
- Parchment paper to make it easy to flip the dacquoise out of the sheet pan without it falling apart.
- A piping bag to pipe out the coconut rum mousseline. You can get away with using a ziploc bag with a corner cut off.
- A large round or star-shaped piping tip. This is optional, but adds a nice touch to the piped dollops of coconut rum mousseline. If all you have is a ziploc bag, that will do just fine!
- An offset spatula to frost the tops and sides of the cake. A rubber spatula will also work, but is not as easy to use as an offset spatula.

How to Serve your Piña Colada Dacquoise
Leave the cake at room temperature for 20-30 minutes before slicing and serving. That will give the mousseline a better texture.
How to make this recipe in advance
This recipe has a lot of components, which would be overwhelming if you tried making them all on the same day. Luckily, mosts of the components can be made ahead and stored in an airtight container either at room temperature or in the fridge. Then you can assemble the cake a day before you want to serve it.
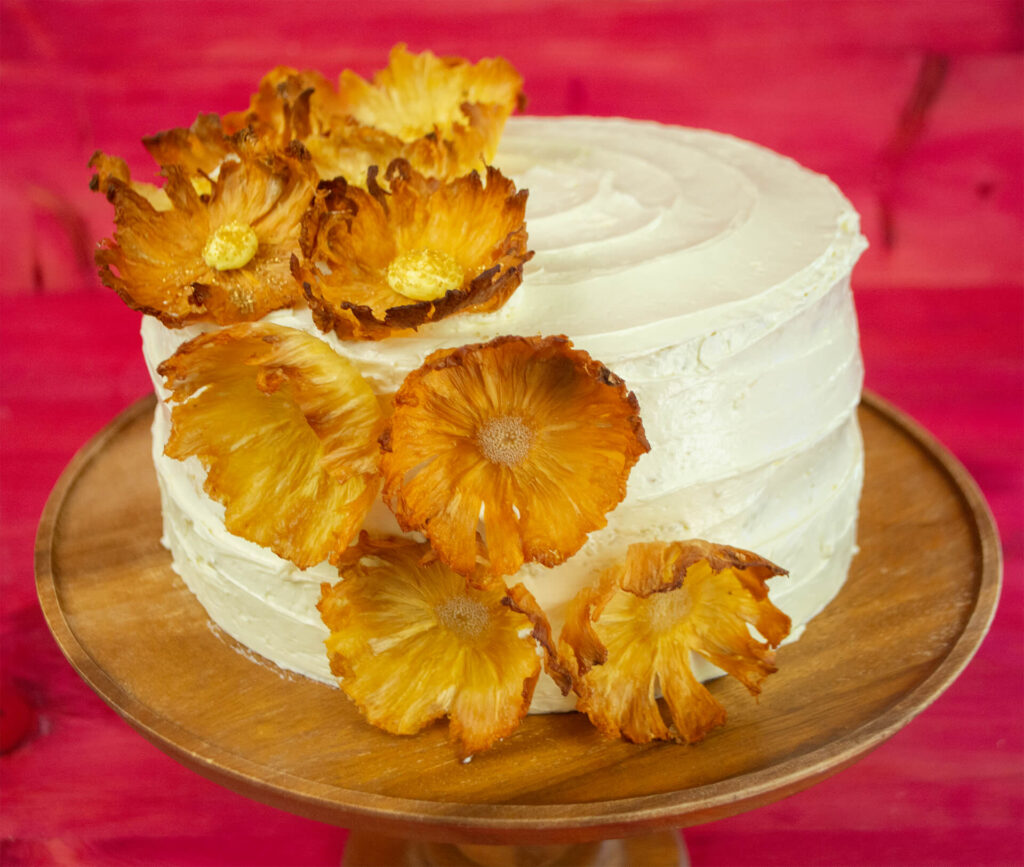
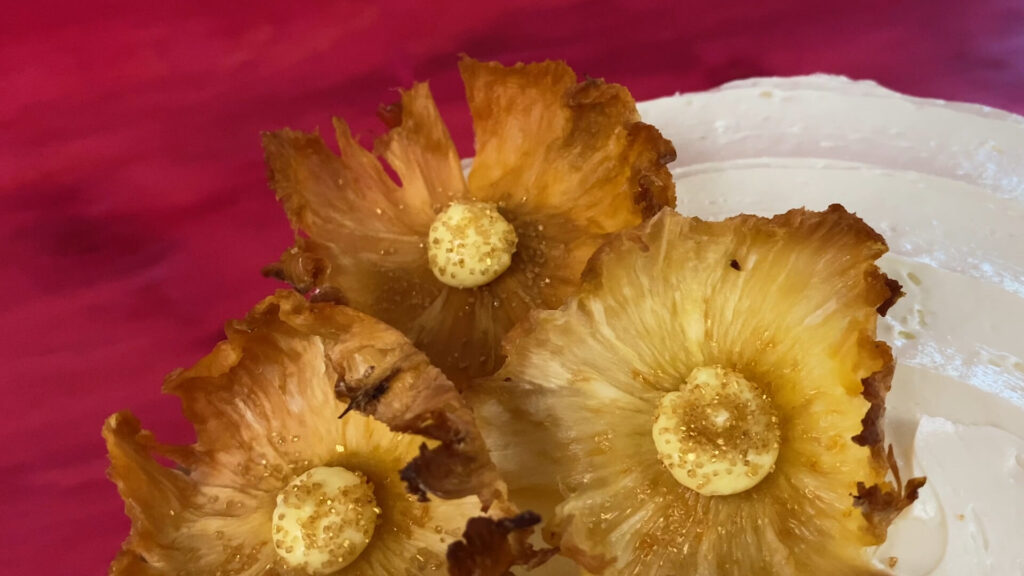
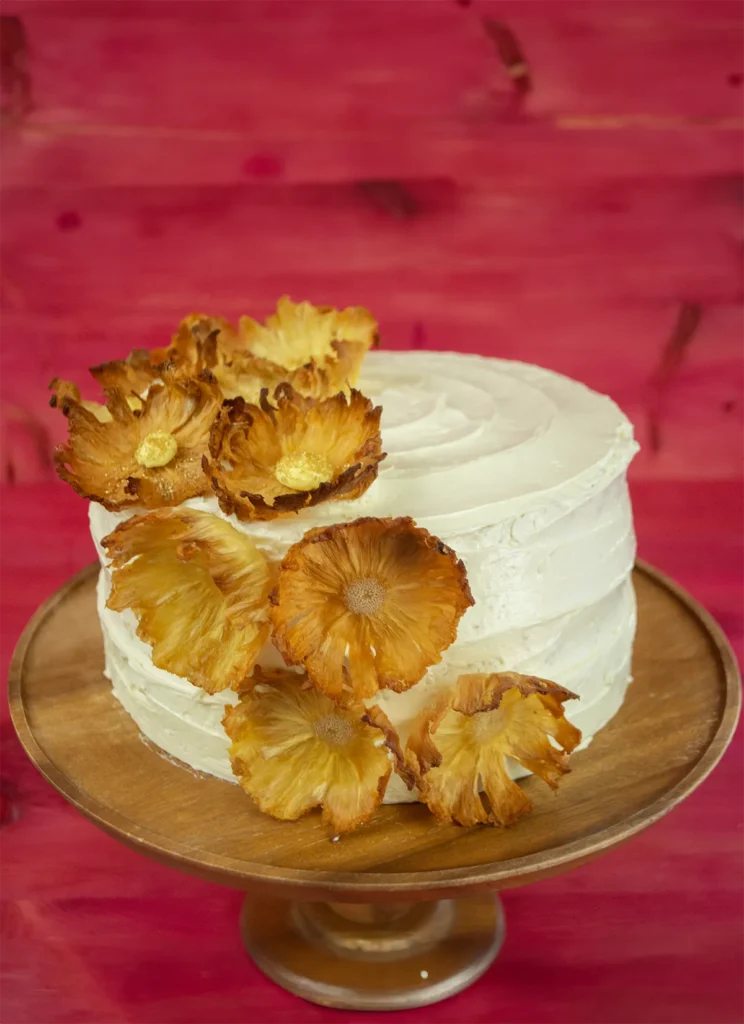
Pineapple Flowers
Allow them to fully dry out at room temperature. Line an airtight container with a piece or two of paper towel to absorb any remaining moisture. Arrange the pineapple flowers on the paper towel in a single layer to prevent them from sticking together. Store for up to 5 days.
Pineapple Curd
This can be made and stored in the fridge up to 1 week in advance. Be sure to press a piece of plastic wrap right on the surface of the curd to prevent a skin from forming.
Coconut Mousseline
You can make the coconut curd up to step 4, then store it in the fridge for up to a week. Bring it to room temperature before mixing it into the whipped butter. You can also prepare the entire mousseline recipe and store it in the fridge for up to 3 days. However you would need to bring it up to room temperature and whip it to a fluffy consistency before using it to fill and frost the cake.
Coconut Dacquoise
Bake the dacquoise and allow it to come completely to room temperature in the pan. Cover the pan wit plastic wrap and leave at room temperature for up to 3 days.
FAQ
Yes! I recommend slicing it first, then placing the slices on a lined baking sheet covered with plastic wrap until they’re solid (about 2-3 hours). Then you can transfer the slices to a ziploc freezer bag and store for up to 3 months. Take a slice out whenever you have a tropical cake craving!
This will keep in the fridge for up to 3 days. If you have more cake than you can finish by then, freeze the leftovers in individual slices (see above).
Pineapples contain an enzyme called bromelain, which inhibits corn starch from being able to thicken the curd. Bromelain gets destroyed through heat. Since canned pineapples were heat treated, the bromelain has already been deactivated. If you want to use fresh pineapple juice, just heat it to 176˚F (80˚C) for at least 8 minutes, or bring it to a boil for a minute or so.
Carton egg whites go through a pasteurization process, and sometimes contain additives. Both of these are reasons why carton egg whites are often difficult (if not impossible) to whip into a good meringue. It’s better to use whites that were separated from a whole egg. You’ll need the egg yolks to make the pineapple curd and coconut rum mousseline anyway!
Yes! Just swap out an equal amount of gluten free all-purpose flour blend (such as Cup4Cup) for the cake/pastry flour.
Yes, just leave the Malibu Rum out of the Coconut Rum Mousseline. Use more coconut extract, and add some rum extract if you wish. Please note that most extracts are alcohol-based, so if you truly need a completely alcohol-free dessert you should look for alcochol-free extracts or use a baking emulsion instead.

Piña Colada Dacquoise
Ingredients
Method
- Preheat the oven to 200˚F (95˚C).
- Cut the top and bottom off of 1 pineapple. Run a large sharp knife around the outside of the pineapple to carefully remove the peel. Use a veggie peeler to pick out any dots remaining from the peel, then use the knife to cut slices as thin as possible (ideally ⅛" or so).
- Put a layer of paper towel or clean kitchen towels on a baking sheet. Arrange the pineapple slices in a single layer on the towel, and put a second layer of paper or kitchen towels on top. Press down with your hand to blot out the excess moisture.
- Remove the towels, and line the baking sheet with parchment paper or a silicone baking mat. Arrange the pineapple slices on a single layer. Bake for about 2 hours or until they start to thin and dry out.
- Remove the pineapple slices from the baking sheet and press them one by one into the cups of a muffin pan to give them more of a flower shape. Put them back in the oven for another 1–2 hours or until they're a bit darker, thinner (almost lacy), and quite dry. Leave them to cool in the muffin tray to keep their shape.
- In a medium heat-proof bowl, whisk together the 100 g granulated sugar and 28 g corn starch until smooth. This helps work out any lumps in the cornstarch without having to pass it through a strainer. Whisk in the 6 large egg yolks until smooth.
- Strain the 2 398 mL (14 oz) cans of pineapple chunks. Set the pineapple chunks aside for later, and put the juice in a small saucepan. Bring it to a boil over medium heat.
- Slowly stream the hot pineapple juice into the egg yolk mixture while whisking constantly, then return the mixture back into the saucepan.
- Heat on medium low while whisking constantly until thick. Remove from the heat and whisk in 57 g unsalted butter, cold until the butter is melted and smooth.
- Pass through a strainer into a clean bowl, and press a piece of plastic wrap directly on the surface to prevent a skin from forming. Chill in the refrigerator until completely cold and set, at least 2 hours.
- Take the pineapple chunks you strained out earlier, and add them to a medium bowl along with 55 g brown sugar. Fold together until the pineapple chunks are coated with brown sugar, and transfer to a small saucepan.
- Heat over medium low heat until the pineapple chunks turn a few shades darker, most of the juice cooks off, and they smell delicious. Set aside to cool to room temperature.
- Once at room temperature, fold the pineapple chunks into the pineapple curd and return to the refrigerator until ready to assemble the cake.
- In a medium heat-proof bowl, whisk together the 100 g granulated sugar and 35 g corn starch until smooth. This helps work out any lumps in the cornstarch without having to pass it through a strainer. Whisk in the 6 large egg yolks until smooth.
- Add the 1 398 mL can coconut milk to a small saucepan and bring to a simmer. Carefully pour it into the egg yolk mixture while whisking constantly, then return to the saucepan.
- Heat on medium low while whisking constantly until thick. Remove from the heat and whisk in 80 g cold unsalted butter until the butter is melted and smooth.
- Pass through a strainer into a clean bowl, and press a piece of plastic wrap directly on the surface to prevent a skin from forming. Leave to cool at room temperature.
- Put the 225 g unsalted butter in the bowl of a stand mixer fitted with the paddle attachment. Beat on medium high speed until the butter is very light and fluffy.
- Reduce the mixer speed to medium low, and add the coconut pastry cream one dollop at a time. Once it's all added, increase the mixer speed to medium high and keep whipping for another 1–2 minutes until it gets light and fluffy.
- Add ½ cup Malibu rumand 1 tsp. coconut extract if using. These quantities are just suggestions as a good starting point. You can use as much extract and rum (within reason) to get the flavour to where you like it. Add a little at a time, whip, taste, and add more if you like. You can also make this alcohol-free by using just coconut extract.
- Add roughly 3 cups of the mouseline cream to a piping bag fitted with a large round or star-shaped tip. Leave the rest in the bowl for frosting the cake. Leave at room temperature for up to 2 hours until ready to assemble the cake.
- Preheat the oven to 350˚F (175˚C). Line a half-sheet (13" x 18") baking pan with parchment paper.
- Sift together the 190 g almond flour, 200 g confectioners sugar, and 95 g pastry flour into a medium bowl. Add the 50 g shredded coconut and whisk together.
- Add the 310 g egg whites, room temperature to the bowl of a stand mixer fitted with the whisk attachment, or add them to a medium bowl and use a hand mixer. Whip on medium speed until frothy. Gradually add the 250 g granulated sugar and whip on high speed until medium peaks form.
- Add about ⅓ of the dry ingredients into the egg whites and gently fold in. Add the rest of the dry ingredients in 2 more additions, folding gently to combine each time. Be careful not to deflate the egg whites too much, though some deflation is normal.
- Pour the batter onto the baking sheet, and use an offset spatula or rubber spatula to spread it out to the edges as evenly as possible. Bake until the cake springs back when touched and is lightly golden, 10–12 minutes. Carefully turn the pan halfway to ensure even baking.
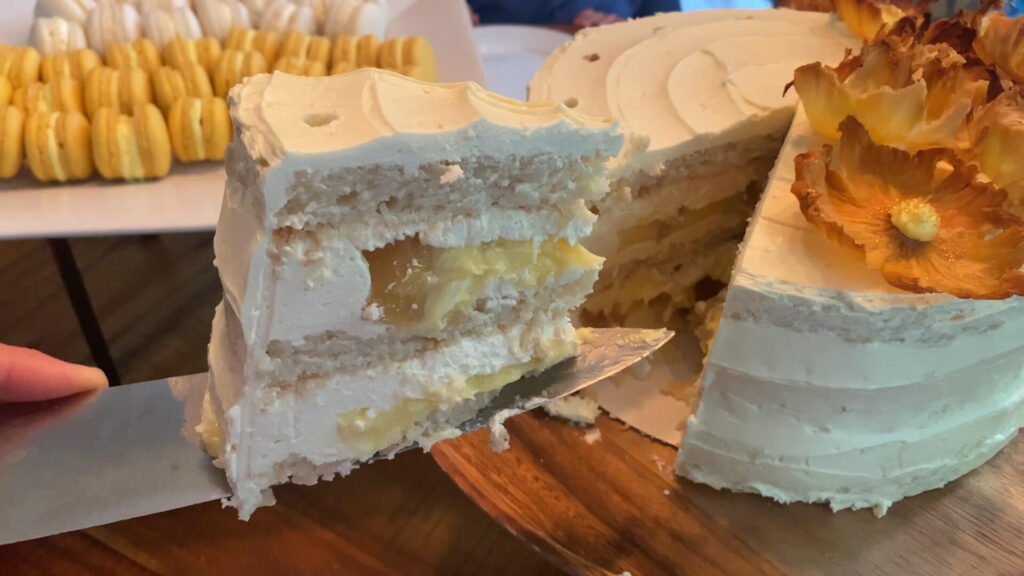
- Leave to cool in the pan for about 10 minutes, then run a knife around the edge of the pan to loosen the cake. Invert it onto a cutting board and peel away the parchment paper. With a sharp knife use a 7-8" round cake board (or a plate that's about 7–8" in diameter) to cut out two full circles and two semicircles of cake as shown in the video at 5:27. Set aside until ready to assemble. If you need to hold off on assembling the cake for more than an hour, store the layers in an airtight container to prevent them from drying out. Save the cake scraps for assembling the cake.
- Take the cake board (or a large plate) and pipe a small dollop of coconut rum mousseline on either side as shown in the video at 6:00. Press a semicircle of dacquoise over each dollop. Pip a few more dollops of mousseline in the gap in the middle, and fill it in using cake scraps. Enjoy whatever cake scraps are left as a chef's snack.
- Add four standard cookie scoops or about 1 cup of mousseline on top of the cake layer. Spread it out evenly.
- Pipe a ring of dollops of mousseline around the outside edge. Fill the center of the mousseline ring with about half of the caramelized pineapple curd and spread out evenly.P
- Add another 4 cookie scoops or 1 cup of mousseline on top, and spread out evenly.
- Place a layer of coconut dacquoise on top, and press it down to adhere and level it. Repeat the layering process (add mousseline, pipe a ring, filling the center with the rest of the caramelized pineapple curd, and add another layer of coconut rum mousseline).
- Place the final dacquoise layer on top and press it down gently to adhere and level it. Add 4 more cookie scoops (or 1 cup) of mousseline on top, and spread into an even layer. Refrigerate until the cake is firm enough to frost, about 1 hour.
- Take the remaining mousseline, and frost the sides and top as evenly as possible.
- Pipe a small blob of mousseline wherever you'd like a pineapple flower. Press a pineapple flower on each blob.
- If you like, you can pipe another blob of mousseline into the center of each flower and sprinkle with some edible glitter or metallic sprinkles.
Leave a Reply